Anyone familiar with Shakespeare's Julius Caesar remembers the
"Beware of the Ides of March" quote. When Brittany was in high school I used to send her off to school with a thought for the day. Sometimes it was a quote or just a nice saying. Her class was in the process of reading Julius Caesar and it was March 15 so the quote for the day was "
Beware of the Ides of March". She laughed as she headed out the door to meet the bus. Ever since that time no matter where she is I call her and tell her to
"Beware of the Ides of March". My husband laughed because he couldn't believe that this has some how become a tradition between the two of us.
Later that day, my husband was walking down the steps into the garage and the flip flop that he was wearing slid causing him to fall and fracture his leg. The next day when I visited him in the hospital I reminded him that it was the Ides of March when he fell. Hmm! Maybe Shakespeare was right and we should "
Beware of the Ides of March". He has spent the last 3 weeks in a recliner with his leg elevated. He's convalescing well but still can't put any weight on his leg. I have tried to work on craft projects that don't require me to be in my studio so that I can be close by if he needs something. During this time I finished the Stacy Shawl and am completing Lions et Oiseux.

This is the beautiful Stacy Shawl from Wendy Knits Lace by Wendy Johnson. While the shawl was very easy, for someone new to lace, to knit it does require some knitting experience. Wendy's instructions and charts were clear and well written. I was a little confused by the Garter Stitch Tab but You Tube had a great tutorial. I loved the choice of yarn for the project. Dream in Color Classy was very easy to work with especially for my first lace project. I love the finished shawl and wear it with a white shirt and jeans as an alternative to a sweater.
This project calls for stitch markers to be placed to mark sections of the lace pattern. Stitch markers have always been a source of knitting frustration-the small plastic rings tend to jump off the needles and waste yarn looped over the needles tends to fray after several rows. I really like the beaded knitting markers available at the yarn shops but they tend to be a little pricey ($5 to $8 per marker). I bought a beaded marker to try it out. The weight of the beads held the marker firmly on the needle with no slipping. I liked the marker but didn't want to invest in a set of them so I came up with a similar version. Brittany and I have both tested my version and they slide along the needles easily and don't slip off. I'm posting my marker instructions so that you can make your own.

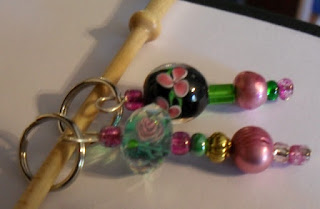
Beaded Knitting Marker Directions:
Decorative beads- I used beads left over from previous jewelry projects but you can buy beads at any craft store. Try choose a medium size bead.
Small beads-tube of glass E beads,tube of glass seed beads
2 inch silver-tone head pins-usually sold in packages of 72
Small silver-tone split rings- 12mm size
Needle nose pliers
1. Place two seed beads on the head pin.
2. Place an E bead on the head pin.
3. Now place a decorative bead on the head pin.
4. Place another E bead on the head pin.
5. Place another decorative bead on the head pin.
6. Place another E bead on the head pin.
7. Use the needle nose pliers to make a loop and thread the end of the loop into the top of the last E bead placed on the head pin. Place the split ring in the loop that you just made. Hold the split ring in place and squeeze the end of the head pin toward the bottom of the loop to secure it ( use the needle nose pliers for this ). This will also keep the split ring from slipping.


