Sunday, April 27, 2014

Raven Collage

This was a busy week for me but I did manage to make the trek to Hobby Lobby to buy some more art supplies. I bought the Ranger Melting Pot, bees wax and alcohol inks. I am really fortunate to have a husband who supports my art but even he couldn't understand the need for a Melting Pot. To him, melting wax and then pouring the hot wax onto my artwork just seems absurd. Normally Brittany is 100% behind my creative ideas but I think I lost her on this one.

Lately I have been working in my Medici Lion journal. At first I found art journaling intimidating-where do I start? I remembered how my high school art teacher required me to keep a journal and turn in 10 entries per week and how much I dreaded journaling. I wasn't visited by the Muse and my teacher was always complaining that my journal wasn't creative. How could it be, with a required number of entries a week? I set my fear of journaling aside and decided to make my journal a creative place where I could experiment with ideas and a variety of art products. I am really starting to enjoy journaling and look forward to each new entry.

The idea for this journal entry was inspired by Dali's Prince and Princess painting. I chose to do a collage rather than a painting. I used Van Gogh's Starry Night for the bottom of the collage, hand drawn elements (Raven, Moon and Tree) and dried hydrangeas from last summer's gardens. I added a quote by Edgar Allan Poe to finish the piece (Deep into that darkness peering, long I stood there wondering, fearing, Doubting, dreaming dreams no mortal ever dared to dream before.).

Finished Raven Collage entry.

The base for the collage is created by painting the pages with thinned light purple, dark purple and medium blue acrylic paints. The blue is painted on the lower half of the page and the purple on the rest of the page. Let the paint dry and take the Tim Holtz Honeycomb stencil and place it randomly on both pages. Apply modeling paste over the stencil. Remove the stencil and let the pages dry overnight. Apply acrylic paint over the stenciled area but don't cover the stencil completely (let some of the Modeling Paste show through). Cut a circle out of yellow card stock and glue it to the top of the right page. Glue a layer of yellow tissue paper over the moon. Cut the tree trunk and branches out of brown card stock and glue over both pages. The branches should extend to the right page. Draw or trace a  Raven and cut the bird out of black card stock. Glue the Raven to the branch on the right page. Glue two small dark blue feathers to the Raven's tail and glue blue glass glitter on top of the feathers. Add a small crystal for the Raven's eye. Add decorative trim for the nest and glue to the branch under the bird. Print a copy of Starry Night using the 3x5 option. Cut the Cypress tree, the village and the mountains out of the picture and glue it to the bottom right page (lower right corner). Stamp bats around the top of the pages. Cut out a banshee and glue her to the left side of the tree. Apply dried flowers to the tree branches with Golden Clear Gloss Gel medium. Print the quote by Edgar Allan Poe, mat it with black card stock and glue to the left page. Randomly apply dots over the entire collage with a white gel pen to unify the piece.

Monday, April 14, 2014

Stations of the Cross Card


My faith is very important to me so I wanted to do a religious Easter card. The inspiration for this card came while I was reading the Stations of the Cross. Everyone recites- We adore you, O Christ, and we bless you. For By Your Holy Cross You Have Redeemed The World, at each Station before the mediation and prayer. This recitation seemed like a perfect fit for the Crucifix on Cricut's New Testament cartridge. I wanted the Crucifix to be the focal point of the card and therefore kept the embellishments to a minimum.

This project uses Frantage to decorate the halo and bottom of the card. I used basic Frantage- heating embossing powder and embedding Diamond Dust in the heated embossing powder.


Direction for Stations of the Cross Card:

Sheer dark purple ribbon
Got Flowers? Fabric Fancies- Opal
Black Ink Decorative Papers- white and tan print handmade paper
Cricut New Testament cartridge
Paper Studio Tattered and Worn paper pack- brown paper
White, cream, gold, dark brown and tan card stock
Recollections self adhesive gold beads
Roman gold embossing powder
Twinklets Diamond Dust
Versa mark ink pad
Small foam dots
Zots, Regular and 3D
Heat Gun


1.  Print an Easter greeting on the inside of the card using a card program and the half-fold option.  Print  We adore you, O Christ, and we bless you. For By Your Holy Cross You Have Redeemed The World on plain white paper with Microsoft Word using the Nyala font at 12 pts.

2.  Using the Cricut New Testament cartridge, cut the Crucifix at 5 inches out of the brown paper from the Tattered and Worn paper stack. Press shift and cut the next layer of the Crucifix out of dark brown card stock. Press layer and Crucifix to cut Jesus out of cream card stock. Press layer, shift and Crucifix to cut Jesus' clothes out of white card stock. Press layer 2 and Crucifix to cut the halo out of gold card stock. Assemble the Crucifix. Place a small self adhesive gold bead to the nail holes on Jesus' hands and feet.

3.  Attach small foam dots to the back of the Crucifix. Center the Crucifix on a 4 x 6 inch piece of the handmade paper and press in place. Cut a piece of tan card stock approximately 1/4 inch larger than the handmade paper (on all sides) and use Zots to attach the handmade paper to the card stock.

4.  Apply the Versa mark ink to the halo and the lower right and left corners of the handmade paper. Sprinkle Roman Gold embossing powder over the ink and shake off the excess. Use a small paintbrush, if necessary, to remove any stray flecks of embossing powder from the image. Using the lowest temperature of the heat gun, heat the embossing powder until it starts to melt and then sprinkle the Diamond Dust on the melted embossing powder. Heat until the embossing powder is melted and the Diamond Dust is set.

5.  Attach 3D Zots to the back of the tan card stock, center on the front of the card and press into place. Use Zots to attach five flowers at the base of the Crucifix. Place a self adhesive gold bead in the center of each flower.

6.  Cut a piece of sheer purple ribbon approximately 1/2 inch longer than the width of the card. Loosely twist the ribbon and use Zots to attach it to the top of the card.

7.  Cut the prayer so that a small border of white surrounds the prayer. Cut a piece of brown card stock slightly larger than the prayer and glue the prayer to the card stock.  Center the prayer over the Crucifix and glue in place.

Monday, April 7, 2014

Decoupage Makeover

After the last post I began looking around my studio for more ways to display my favorite paintings via decoupage.  The candidates for this makeover were my watercolor paint box, the Jet Max craft carousel and the light switch cover.

I use a Jet Max craft carousel to store my frequently used art supplies. Like all Jet Max products the craft carousel is white so that it matches the other pieces in the line. The craft carousel is divided into six segments which means that I could display six of my favorite paintings. I chose paintings from Van Gogh (of course), Monet, Degas and Berthe Morisot and decoupaged them to the craft carousel and then painted the dividers for each segment and tiers in light blue. I really like the transformation. The carousel could display your favorite photos instead of prints. Just be sure to use a toner based copy and not the original photo for the project.


Decorated Jet Max Craft Carousel


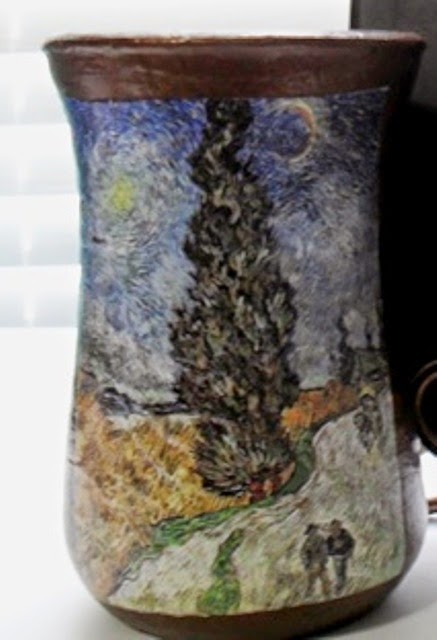
While I had the Mod Podge out I decided it was time to give the light switch cover a face lift. This project required a little planning to make it work. I needed a vertical print that would not lose it's integrity once the holes for the light switches were cut out. Finally the only print that seemed to work was Van Gogh's Road with Cypresses and Star. I printed the painting at 4x6 and checked the fit print to page option, with a laser printer. I printed the image two times. I cut out both copies of the print, setting the second copy aside for later use. I centered the switch plate cover over the print and traced the openings for the light switches onto the print and carefully cut them out. Next I placed the print over the switch plate cover to align the switch openings. This is when I discovered that my print was 1/8 inch to short on the top, bottom and left side, so I trimmed 1/8 inch from the corresponding sides of the second print. After gluing the print to the switch plate cover, I carefully matched the 1/8 inch strips to the print and applied decoupage.

Light Switch cover.


My watercolors came packaged in a nice wooden box. I really liked the box but not the cheap label that was glued to the top. When I tried to remove the label it left large chunks of paper and glue stuck to the lid. Sanding removed most of the residue but left the box stripped of it's finish. The perfect candidate for a makeover project!  For this project I painted the top of the box with light lavender acrylic paint. After the paint dried I applied a coat of Martha Stewart Living silver Metallic Glaze. After the glaze dried I sponged light aqua and purple metallic acrylic paint over the top of the box and then decoupaged Van Gogh's Women in the Field to lid.


Finished Paint Box.


Directions for Decoupage Makeover Projects:

Switch Plate Cover:

White Switch Plate Cover
Mod Podge Hard Coat
Foam Brush
Print or photo- toner based copy
Mod Podge sealant

1.  Remove the switch plate cover from the wall (if using an existing cover). Wash it and dry it.

2.  Print the picture of your choice with a laser printer, using the 4x6  fit print to the edge option, on white paper. Print the picture twice. Cut out both prints.

3.  Lay the switch plate cover over the print and trace the openings for the light switches on the print. Carefully cut out these openings.

4.  Apply Mod Podge to the back of the print. Center the print on the switch plate cover, aligning the openings for the light switches. Smooth out any air bubbles in the print and seal the edges. If the print does not completely cover the switch plate cover then trim the other print to cover these areas. Apply Mod Podge to the edges of the switch plate cover that are not covered by the print and align the print strips so that they match the print and press to seal.

5.  Apply two more coats of Mod Podge to the switch plate cover. After the second coat of Mod Podge dries spray the switch plate cover with sealant.


Decorated Jet Max Craft Carousel:

 Jet Max Craft Carousel
Foam brush
Mod Podge Hard Coat
Mod Podge Sealant
Light blue acrylic paint
Paintbrush, small round
Toner based copies of prints or photos (6)

1.  Paint the edges of the top and bottom tiers of the craft carousel with light blue paint using a small round paintbrush. Next paint the dividers between each of the six segments of the carousel and the top edges of each segment. Let it dry and apply a second coat of paint.

2.  Print six photos or prints with a laser printer using the wallet and fit print to edge option. Trim the prints.

3.  Apply Mod Podge to the back of the print. Center the print on the white area of segment. Smooth out any air bubbles and repeat with the other five prints.

4.   Apply three coats of Mod Podge to the prints, letting the prints dry before applying the next coat.

5.  Seal the prints with the spray sealant.


Decorated Paint Box:

Wooden box
Print or picture
Martha Stewart Living Metallic Glaze-Mercury color
Folk Art acrylic paints- light lavender, light aqua and metallic purple
Foam brush
Craft sponge
Mod Podge Hard Coat
Mod Podge Sealant

1.  Paint the lid of a wooden box with light lavender paint and let it dry. Paint over the lavender with the Martha Stewart mercury metallic glaze. Let it dry overnight- it takes about 12 hours for the paint to dry completely.

2.  Once the glaze is dry, sponge the light aqua paint randomly over the lid. Next sponge the metallic purple paint randomly over the lid, overlapping the aqua is some areas. Let the paint dry.

3.  Print the picture of your choice with a laser printer using the 5x7 and fit print to edge option. Cut the print out and apply Mod Podge to the back of the picture. Center the picture over the lid and press it in place, smoothly out any air bubbles with your fingertips. Apply Mod Podge over the entire lid and let it dry. Repeat this process two more times. After the third coat of Mod Podge is completely dry, spray the lid with the sealant and let it dry.

Friday, April 4, 2014

Decoupage Projects

When time permits, I love to browse through craft supply stores because I always discover new and interesting products. I also like being able to share these products with you. On my last excursion to Michaels I discovered Mod Podge Hard Coat and the Mod Podge silicone craft mat. This is a great idea! The mat protects work surfaces from paint, Mod Podge, glue and ink and simply wipes clean. The Mod Podge Hard Coat was designed for use on wood, glass, terra cotta and furniture. I used it on a glazed pottery vase with good results.

I love art, especially paintings by Van Gogh and the Impressionists, but there is only so much wall space to hang prints. In an effort to find ways creative ways to display my favorite prints, I have turned to other objects.  The vase I use as a paint brush holder was a good candidates for the makeover. The vase was a pottery piece that I had purchased from a street vendor in Washington, DC in the 1980's. It had originally held wooden spoons but eventually found its way into my studio as a brush holder. I really liked the shape and the quality of the piece but the colors were a bit outdated. On a recent trip to Home Depot I found Martha Stewart Metallic Paint Specialty Finish in Cast Bronze and decided to use it to paint the vase. The Martha Stewart paint went on smoothly and dried to a beautiful bronze finish.


Original vase with coating of gesso.

Finished Vase


Directions for Mod Podge Vase:

Pottery Vase
Laser or toner based prints-do not use original pictures or prints
Martha Stewart Living Metallic Paint-Cast Bronze-available at Home Depot
Foam craft brushes
Mod Podge Hard Coat sealant
Mod Podge Sealant Spray
Gesso


1.  Apply gesso to the vase. Completely cover the piece including the top rim. Let it dry. Repeat the process if you are covering a glazed piece of pottery. Once the piece is completely dry (I let mine cure overnight), apply a thin coat of metallic paint with a foam brush. Let it dry thoroughly. Do not use heat or a hair dryer to dry the piece or it will damage the paint. Once the vase is dry apply another coat of paint and let it dry. Again I let my piece dry overnight so the paint would harden.


2.  Position the print on the front of the vase. You may have to make small slits around the edges of the print where the vase curves so the print will be flat. Don't worry you won't see the slits after the Mod Podge is applied.  Apply Mod Podge to the back of the print and adhere to the vase. Apply one end of the print and smooth out any air bubbles or wrinkles as you glue it down. If there is a small gap where the print won't lay flat against the vase, cut a small V in the picture and a matching square from the duplicate print. Apply Mod Podge to the square a place it over the V, smoothing it out so that it blends with the picture. Coat the entire vase with Mod Podge and let it dry. Coat the vase two more times. Once the Mod Podge is completely dry, spray the vase with the sealant.