Every year I tend to under estimate the time it takes to make Christmas cards. No matter how good my intentions are it seems that I'm always making my cards at the last minute. I suppose that I could go to the store and buy a box of cards but I just can't bring myself to do that. I really enjoy making the cards and printing an individualized Christmas message for each recipient.
The lion and the lamb laying down peacefully together is one of my favorite themes. It's a theme that I feel is appropriate especially at Christmas time. This card uses 3 Cricut cartridges: Noah's ABC Animals, Joy of the Season and New Testament.
Directions for Peace On Earth:
Cricut cartridges: Noah's ABC Animals, Joy of the Season, New Testament
White, light blue, dark blue, yellow, golden yellow, and black card stock
Cuttlebug Swiss Dots embossing folder and Sizzix Big Shot or Cuttlebug
Self adhesive pearl trim
Self adhesive clear crystals
Martha Stewart Snowflake border punch
Stickles Icicle glitter glue
Gold ribbon
Foam Dots
Computer greeting card program
1. Load the Noah's ABC Animals cartridge into the Cricut machine and cut the Lion at 2 inches out of golden yellow, yellow, dark blue and black card stock (as directed in the handbook). Assemble the lion.
2. Load the New Testament cartridge into the Cricut and cut the lamb at 1 1/2 inches out of black and white card stock. Assemble the lamb.
3. Load the Joy of the Season cartridge into the Cricut and cut the North Star at 1 1/2 inches out of dark blue and yellow card stock. Assemble the star. Next cut peace at 1 1/2 inches out of dark blue card stock.
4. Punch several small snowflakes out of white card stock using the Martha Stewart snowflake border punch.
5. Cut a 4 3/4 inch wide by 5 1/2 inch long piece of light blue card stock and emboss it with the Swiss Dots embossing folder and the Sizzix or Cuttlebug machine.
6. Using the greeting card program select the half fold vertical card option and print a Christmas message on the inside of the card. Fold the printed card in half and crease along the edge.
7. Glue the embossed blue card stock 1 1/4 inches from the bottom of the front of the card. Apply foam dots to the back of the lamb and attach him near the bottom right of the blue embossed card stock. Apply foam dots to the back of the lion and attach him to the embossed card stock, with his paw extending onto the lamb's body. Press the lion in place. Center the North Star at the top of the blue embossed card stock, apply foam dots and press into place. Glue the small snowflakes to the embossed blue card stock. Place a self adhesive clear crystal to the center of the North Star. Apply Stickles Icicle glitter glue to the center of each snowflake and the yellow part of the North Star. Apply the self adhesive pearl border along the top edge of the embossed blue card stock.
8. Measure 3/4 inches down from the top edge of the card and center the word peace. Glue into place. Dot the ends of the word with Stickles.
9. Cut a piece of gold ribbon the width of the front of the card plus 1/2 inch. Starting at the left edge of the card glue the ribbon in place and fold the extra 1/2 inch of ribbon over the edge of the card and secure with glue. Tie a small bow and glue it over the ribbon.
Bienvenu `a mon blog! Welcome to Madame Frog's Craft Blog! This site is devoted to crafts.
Friday, December 16, 2011
Snow Friends Candle
I have had this idea on my project list for a while and finally got around to completing it-just in time for Christmas. I enjoyed making the Halloween candle so much that I wanted to do a winter themed candle. Although I hate snow, I think snowmen are so cute. The Cricut Snow Friends cartridge has the most adorable Snowman images. These happy little Snowmen were perfect for my winter candle. This was a quick (2 hours start to finish) and easy project.
Directions for Snow Friends Candle:
Cricut Snow Friends cartridge- still available through Amazon
White or Ivory Flame-less Candle
Candle Holder-large enough to hold the candle globe
Glass Candle Globe or cylinder
Sheer Dark Aqua Ribbon
Martha Stewart Snow flake paper punch
Vellum
Self adhesive crystals and pearls
Blue and white print card stock, white, black, and orange card stock
Pink colored pencil
Hot glue gun
Xyron Machine
1. Using the Snow Friends cartridge cut Snowman 7 at 2 1/2 inches out of white card stock. Cut the shoes, buttons and eyes out of black card stock. Cut the nose out of orange card stock. Cut the scarf out of blue and white print card stock. Cut a total of four Snowmen. Assemble the Snowmen. Highlight the Snowman's cheeks with pink colored pencils. I like the look of Snowmen with rosy cheeks.
2. Run the Snowmen through the Xyron machine. Remove the paper backing and attach each Snowman 1 1/2 inches from the base of the glass cylinder, leaving about 1 inch of space between each Snowman. Press them securely in place.
3. Tie a small bow with the dark aqua ribbon and use the hot glue gun to attach the bow between the Snowman's hands. Trim the ends of the ribbon if necessary. Repeat this 3 more times.
4. Punch 8 snowflakes out of Vellum using the Martha Stewart Snowflake paper punch. Punch each snowflake slowly to avoid tearing the Vellum as it punches. Run the snowflakes through the Xyron machine. Carefully peel each snowflake from the paper backing to avoid tearing. Position 4 snowflakes approximately 1 1/2 inches above the bows and press in place. Next position the other 4 snowflakes between the attached snowflakes about 1/4 inch from the top of the glass globe. Press firmly in place.
5. Add a self adhesive rhinestone to the center of each snowflake. Add a small pearl to each branch of the snowflake (5 pearls for each snowflake).
6. Place the glass globe in the candle base and place the flame-less candle inside the glass globe.
Thursday, December 15, 2011
Annie Portrait
I recently visited New York to do some sight seeing and of course shopping. Michelle, Brandon and I took a walking tour of Central Park. I was mesmerized by it's beauty and it's calm demeanor in the middle of the hustle and bustle of the city. I took several photographs of the park and the lake. I hope to turn one of them into a painting.
This was my favorite spot in Central Park.
I never know what to give my friend Cindy for Christmas. She has everything and really doesn't want or need anything. Cindy owns a beautiful Golden Retriever, Annie, that just turned 8 years old so I thought a portrait might be a nice gift. I wanted the gift to be a surprise so I called her husband Randy to enlist his help. Randy sent me some pictures of Annie so I could make a sketch. I asked my husband to be a combination of technical adviser and art critic. I asked for an honest, don't spare my feelings critique of the initial sketch and the painting itself. Sometimes it's hard to see things that need to be changed when working closely on a painting for a long period of time and I feel a second set of eyes is helpful.
Annie is so sweet and I wanted to convey her personality in the portrait. I had worked on the painting for several days but it wasn't until I did the shading on her face that I was able to finally put down my brush and say yes this is Annie!
Tuesday, November 29, 2011
Water Color Paintings
Water color is becoming one of my favorite media. I like the soft effect that it gives the painting and the fact that it can be combined with other media. I prefer to work with water colors from a tube rather than a pan because the paint can be applied to the painting directly from the tube for a gouache effect or can be diluted with water and used as a wash.
In both of these paintings I combined water color with other media. The portrait of the black and tan Afghan is colored with Derwent Inktense pencils with a water color overlay. I used a black Inktense pencil to draw the lines of the dog's hair. I wet a #4 filbert brush with water and painted over the pencil lines. This produced a black ink. I then painted the white areas on either side of the lines while the ink was still wet. This produced a shaded grey under coat. Once the ink was completely dry I diluted yellow ochre water color and painted the tan areas of the dog's face and throat. I also used this to highlight areas of fur on the dog's coat. Once this was dry. I mixed white with a small amount of yellow ochre to create a light tan for highlights and painted them on the dog's throat. I diluted black water color with water and painted over the inked areas. I then painted the dog's nose and muzzle. I mixed a small amount of burnt umber and yellow ochre and painted the dog's eyes without diluting the paint. Finally I used a light wash of cerulean blue for the background.
The dogs on the beach at dusk is inspired by Diana Fife's beautiful painting. I love the impressionist era and wanted to try my hand at an impressionistic painting.
For this painting I added only enough water to the paint to make it flow. I used acrylic paint to accent the white areas of the sky and the waves. The dogs' fur is highlighted with acrylic paint.
Monday, November 21, 2011
Making a Beautiful Bow
A beautiful bow can transform an ordinary wrapped gift into something special. I have found that most people don't know how to make a bow. In fact they seem a little intimidated by it.
It's really easy to make a bow. The only materials that you need are ribbon, craft wire and scissors. I use approximately 6 yards of 2 1/2 inch wide wire edged ribbon. You don't need to use wire edged ribbon but I think it makes it easier to shape the bow after it's made. I usually buy a spool of ribbon with more 6 yards and leave the ribbon attached to the spool as I work. This ensures that I don't run out of ribbon while making my bow.
Step One: Measure approximately 8 inches from the end of the ribbon. After you have made several bows you will be able to do this without measuring. Pinch the sides of the ribbon between your thumb and index finger.
Step Two: Make a loop and pinch the ends between you thumb and index finger.
Step Three: While pinching the loop tightly between your fingers, twist the ribbon and turn it so that the wrong side of the ribbon is now facing up. Make another loop bringing it toward your thumb and index finger. Pinch the ends of the ribbon in.
Step Four: Twist the ribbon so that the wrong side of the ribbon faces up and make another loop.
Step Five: Repeat the twisting and turning the ribbon to make loops until there are five loops on each side of the bow.
Step Six: While pinching the ribbon between your thumb and index finger wrap craft wire tightly around the bow. After wrapping the wire around the bow several times twist the wire close to the bow. Leave about 5 inches of wire and cut off the excess. Cut the ribbon from the spool approximately 12 inches from the twisted wire.
Step Seven: Shape the bow by separating the loops to give the bow a full look.
Hopefully I have demystified bow making.
It's really easy to make a bow. The only materials that you need are ribbon, craft wire and scissors. I use approximately 6 yards of 2 1/2 inch wide wire edged ribbon. You don't need to use wire edged ribbon but I think it makes it easier to shape the bow after it's made. I usually buy a spool of ribbon with more 6 yards and leave the ribbon attached to the spool as I work. This ensures that I don't run out of ribbon while making my bow.
Step One: Measure approximately 8 inches from the end of the ribbon. After you have made several bows you will be able to do this without measuring. Pinch the sides of the ribbon between your thumb and index finger.
Step Two: Make a loop and pinch the ends between you thumb and index finger.
Step Three: While pinching the loop tightly between your fingers, twist the ribbon and turn it so that the wrong side of the ribbon is now facing up. Make another loop bringing it toward your thumb and index finger. Pinch the ends of the ribbon in.
Step Four: Twist the ribbon so that the wrong side of the ribbon faces up and make another loop.
Step Five: Repeat the twisting and turning the ribbon to make loops until there are five loops on each side of the bow.
Step Six: While pinching the ribbon between your thumb and index finger wrap craft wire tightly around the bow. After wrapping the wire around the bow several times twist the wire close to the bow. Leave about 5 inches of wire and cut off the excess. Cut the ribbon from the spool approximately 12 inches from the twisted wire.
Step Seven: Shape the bow by separating the loops to give the bow a full look.
Hopefully I have demystified bow making.
Sunday, November 20, 2011
Reverse Cable Scarf
Scarves make great knitting projects. They can be knitted quickly, often only use two skeins of yarn and make great gifts. Knitted scarves are very popular and patterns can be found everywhere. I found a free cabled scarf pattern at Michaels. This pattern is also available at www.caron.com. The pattern calls for 2 skeins of Caron Simply Soft yarn. I usually don't like to knit with acrylic yarn but I couldn't resist Caron's beautiful Iris color. I did like the idea that I could throw the scarf in the washer and dryer which is something that I couldn't do with a wool scarf.
I enlisted Mozart's help again to model the scarf since no one else in my house would agree to be a model.
The scarf is knitting up quickly and is very soft. Although the pattern is rated for an intermediate level knitter a beginner with some knitting experience could knit this scarf as well. The cable pattern is relatively easy (slip 8 stitches onto the cable needle, knit 8 stitches from the left hand needle and then knit the 8 stitches from the cable needle) and would make a good introduction to knitting cables.
Bandit Portrait
I love animals and am trying to expand my repertoire. Cats are independent and have an air of mystery so they seemed like a good choice. Bandit is a beautiful black and white tuxedo cat. The contrast of black and white fur made him an interesting subject to paint. After sketching my Afghan Hounds, drawing a cat was a bit out of my comfort zone. It took several attempts to get the cat to a point where I was happy with him and ready to progress to painting.
Directions for Reclining Cat Portrait:
Daler Rowney Canvas Paper
Liquidtex black, white, grey, silver, raw umber and bronze yellow acrylic paint
White 65 lb. card stock
Cray Pas Expressionist oil pastels: pink, green and gold
Drawing board
Royal Soft-Grip brushes: 3/4 inch, #4 flat, #4 round, #0
This painting is based on a photograph that I took of Bandit. I liked the reclining pose but found it hard to sketch.
1. Scan the picture into the computer, enlarge it to a 5 x 7 inch size and print it on white 65 lb. card stock.
2. Since I don't have a light box I taped the card stock print to a sunny window. Tape a piece of canvas paper over the card stock and trace the outline of the cat with a 2H pencil. Remove the canvas paper and card stock from the window. Place the canvas paper on a drawing board and begin to fill in the details of the cat (his eyes, nose, and the lines for his coloration).
3. Using a #4 round brush and white paint fill in the white areas of the cat. Let it dry.
4. Fill in the black areas of the cat with black paint and a #4 round brush. Let it dry.
5. Mix bronze yellow and raw umber until the color resembles a light golden wood. Fill in the floor area with this color. Add raw umber lines on the floor (to resemble a hard wood floor) before the golden wood floor dries.
6. After the floor dries add highlights with grey paint. Using the 3/4 inch brush paint the wall with a light coat of grey paint.
7. Color the cat's eyes with green oil pastel and blend with a paper stump. Add a layer of gold oil pastel to the eyes and blend with the paper stump. Repeat with the green pastel and blend. Add black acrylic paint to the center of the cat's eyes.
8. Fill in the cat's nose with pink oil pastel and blend with the paper stump. Clean the stump by rubbing it across a piece of sand paper before using it to blend the pink nose.
9. Mix a small amount of grey paint into white paint to make a light grey color. Apply the light grey to the white areas of the cat (shading).
10. Using a #4 round brush and white paint, paint the fur using short strokes. Pull some of the strokes outward toward the black and long strokes for whiskers (above the eyes and on the face). Paint short strokes with the black paint on the black areas. Use black to paint in the marks for the claws on feet.
11. Paint the wall with short swirled strokes using a #4 flat brush and silver paint. Allow some of the grey base coat to show through.
12. Mix the grey paint with a little bit of black and paint a shadow on the floor to the left of the cat.
Sunday, October 30, 2011
65th Anniversary
A couple that I know is celebrating their 65th Wedding Anniversary. This is such an important occasion that I wanted to do something special for them. I love poetry and like to give framed poems a gifts. I chose Sir Philip Sidney's the Bargain. I framed the poem with a textured ivory mat and decorated the mat with roses.
Directions for 65th Anniversary Gift:
Pewter frame (8 x 10)
8 x 10 ivory textured mat
Parchment Paper
Recollections Adhesive Faux Pearls
Recollections Foral Embellishments-Shades of Purple
Dark olive card stock
Martha Stewart Leaf Paper Punch
1. Type the poem into Microsoft Word using the French Script Font at 18 and print it on parchment paper.
2. Trim the parchment paper to fit into an 8 x 10 inch mat. Center the poem in the mat.
3. Remove the glass from the picture frame. Place the matted poem in the frame and put the back on the frame.
4. Position three roses (one light purple, one medium purple and one dark purple) in the upper left hand corner and lower right hand corner of the mat. Glue the roses in place. Punch 4 leaves out of olive card stock using the paper punch. Glue 2 leaves under each set of flowers.
5. Arrange the faux pearls in the corners opposite the roses and press in place.
Portrait de Les Squelettes
I wanted to do one more card for Halloween but didn't want to do witches, haunted houses or pumpkins. I wanted something different! I had purchased some cute K & Company skeleton stickers and wanted to use them. The skulls peering over tombstones or looking out of the windows of a haunted mansion just wasn't what I was looking for. I had just finished reading the Picture of Dorian Gray and was putting the book back on the shelf when the idea popped into my head. What about skeleton portraits? I could frame the skulls and then cover the entire card in spider webbing.
Here's the finished result. It's hard to see the spider webbing because I used a thin layer to cover the card.
Directions for Portrait de Les Squelettes:
Cricut Happy Hauntings cartridge
K & Company Tim Coffey Halloween Bone and Bats Layered Accents
Black, lime green and white card stock
K & Company Kelly Panacci Halloween Paper
Spider Webbing
1. Using the Happy Hauntings cartridge cut Frame 3 twice, once at 3 3/4 inches and the second time at 3 inches out of black card stock. Press the Phrase, Frame 3 and the Shift keys and cut the word CREEPY at 2 1/2 inches out of black card stock. Cut Frame 7 at 3 3/4 inches out of black card stock.
2. Place the lime green card stock on the Cricut mat and load into the machine. Press the Phrase and Frame 3 keys and cut the word CREEPY at 2 1/2 inches. Glue the green word over the black word base.
3. Print a Halloween greeting on the inside of the card using white card stock and a card program. Choose the half fold card option. Fold the card in half and crease.
4. Cut a piece of purple and black dot card stock from the Halloween paper to fit the front of the card. Glue in place.
5. Position the frames so the smaller frame is centered on the purple card stock approximately 4 inches from the bottom of the card. Place the larger frames below the small frame (the square frame to the right and the oval frame to the left). Glue the frames in place. Place a large skull in the center each of the 3 3/4 inch frames and a small skull in the center of the 3 inch frame.
6. Glue the word CREEPY above the smaller frame. Place a bat to the left of the word.
7. Tear off a small piece of spider webbing a pull it apart until it starts to form web strands. Cover the front of the card with the webbing a glue the loose ends under the front edges of the card.
Sunday, October 16, 2011
Waiting For The Great Pumpkin
This weekend is devoted to Halloween-both decorating and working on projects. While I was out buying supplies for my up coming projects I came across a Linus and a pumpkin sticker set. I just couldn't resist it. The story of Linus waiting in the pumpkin patch for the arrival of the Great Pumpkin is one of my perennial favorites.
Directions for the Great Pumpkin card:
K & Company Kelly Panacci Halloween paper- yellow print card stock
EK Success-Peanuts Linus Halloween dimensional sticker set
K & Company Tim Coffey Halloween Grand Adhesions-pumpkins
Medium purple ribbon
Foam Dots
White card stock
1. Print a Halloween greeting on the inside of an 8 1/2 inch by 11 inch piece of white card stock. Print the card using a greeting card program and the half-fold card option. Fold the card in half.
2. Cut the yellow print card stock 7 inches high by 4 1/2 inches wide.
3. Position Linus and the pumpkin 1 1/4 inches from the bottom of the card stock. Center the image and press in place. Position two of the smaller pumpkins from the Tim Coffey set to the right and left sides of Linus and his pumpkin. Press into place.
4. Center the Halloween sticker from the Linus set approximately 1 7/8 inches above Linus' head. Then center Happy above Halloween. Position the smaller bats to the left and right of Happy and the larger bat above Linus' head and slightly to the right.
5. Attach foam dots to the back of the yellow print card stock and place it 1 1/4 inches from the bottom of the card and 1/2 inch from the fold of the card. Press into place.
6. Cut a piece of purple ribbon 5 3/4 inches. Place the ribbon slightly below the yellow print card stock. The left end of the ribbon should touch the fold of the card. Glue the ribbon in place. Tuck the remaining ribbon under the right edge of the card and glue to secure. Cut a piece of purple ribbon and tie a small bow. Center the bow over the ribbon and glue in place.
Photos:
Great Pumpkin,
Halloween,
Halloween cards,
Halloween stickers,
Peanuts
Tuesday, July 26, 2011
Le Petit Rien
I adore my husband! He is as close to perfect as humanly possible. He's an intelligent, handsome, devoted and loving person. He is my muse! I hope that he doesn't read this and let it go to his head. He knows that art is important to me and encourages me to devote more time to it. I wanted to give him a gift to show him how much he means to me.
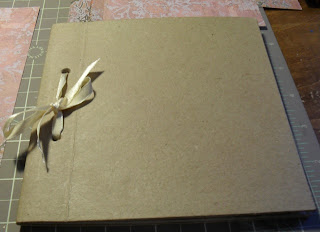
While browsing in Michaels I saw a little brown cardboard book with blank pages. This would make the perfect gift for my husband.
I removed the ribbon and covered the book in card stock.
Since this idea of this book is to express my love for my husband I wanted this book to come from my heart. I wanted to share all of the things that I love with him. I love poetry and have two shelves in my library devoted to it. So naturally this book includes several poems-Elizabeth Barret Browning's How Do I Love Thee, several of Shakespeare's Sonnets and various other poems. I collected flowers from my gardens and pressed them and then glued them in the book. I also included the pink Poodle Valentine's card along with some of our favorite pictures.
This is the finished book. I called it Le Petit Rien which translates to the little something. I chose a French title for the book because of my French heritage.
Directions for Le Petit Rien:
Darice small cardboard book-available with the paper mache boxes at Michaels
DCWV Old World Stack-8x8 inch card stock-pink and grey print
Silk roses-light aqua, medium pink, and dark pink
Mod Podge-matte finish
Gold edged ivory wired ribbon
Hot glue gun
White lace trim
Small white Calla Lilies
Adhesive backed pearl trim
Olive green and parchment card stock
Martha Stewart leaf paper punch
Microsoft word
Small piece of white tulle and craft wire
Tim Holtz Tea dye distress ink
Small oval craft punch
Bone folder
Small hole punch
Clear nail polish or Fray Check
1. Remove the ribbon from the book and set aside. Cut two pieces of pink and grey card stock to fit the covers of the book. Cut the back cover 1/2 inch wider than the book cover. Place the smaller cover on the front of the book. Open the book cover slightly and crease the paper at the line where the book opens. Crease this line with a bone folder. Lay the card stock on the back cover and fold the extra 1/2 inch over the spine of the book and crease with a bone folder. Mark the holes from the covers on the card stock with a pencil and punch with the small hole puncher.
2. Put a thin coat of Modge Podge on the back book cover and postion the card stock over it. Put Modge Podge on the piece that covers the spine and press in place, covering the spine of the book. Let the book dry and then cover the front of the book with Modge Podge and apply the card stock. Let it dry.
3. Cover the back of the book with a light coating of Modge Podge and let it dry. Repeat the process with the front cover.
4. Cut a strip of the adhesive pearls the length of the front cover. Position the pearl strip over the area where the book cover bends to open (see picture) and press in place. Cut a piece of lace edging the length of the front cover and glue with a hot glue gun along the front edge of the cover.
5. Print Le Petit Rien or the title of your choice with Microsoft Word (Hasty Hmk at 20) on parchment card stock. Punch the title out using the small oval paper punch. Use a small sponge and the tea dye distress ink to ink the edges of the oval. Lightly apply the distress ink to the center of the oval.
6. Cut a 2 1/2 inch long strip of white tulle. Fold the strip in half an wrap a piece of craft wire around the center of the tulle. Cut off the excess wire leaving a 1 1/2 inch tail.
7. Position the silk flowers in the center of the book cover. The dark and light pink flowers next to each other and the light aqua flower below them. Form three Calla Lillies into a bouquet and place on top of the tulle. Wrap the tail of the craft wire around the lillies to secure them on top of the tulle. Place the lillies between the pink roses with the green stems extended under the aqua rose.
8. Using the Martha Stewart leaf paper punch and the olive card stock punch four leaves. Positon the leaves under the edges of the roses to fill in open spaces. Once you are satisfied with the placement of the flowers, lift each flower one at a time and place a dab of hot glue on the back of the flower and press in place. Be careful not to disturb the arrangement.
9. Glue the leaves in place with craft glue. Position the title in the upper left just above the flowers and glue in place with craft glue.
10. Put the pages back in the book. Cut a piece of gold edged ivory ribbon approximately 4 inches. Insert the ribbon in the holes in the book cover. Thread the ribbon through the back holes first then the top. Tie the ribbon and make a tight knot. Tie a bow. Adjust the bow and trim the ends at an angle. Apply a small amount of clear nail polish or Fray Check to the ends of the ribbon to kept it from raveling.
Sketch Book
Writers have their journals and artists have sketch books. Although the weather in the DC area has been very hot and at times intolerable (even in the outer Maryland suburbs) I try to spend at least part of my day outdoors in my gardens. I find it inspiring. It's hard not to be inspired when I am surrounded by beautiful flowers. This is one of the Mandevilla plants in my garden.
I love the craft projects and will always continue to do them and post them here but I wanted to get back to sketching and painting. I haven't really done this since I was in high school. When I was a teenager the walls of my room were covered with my sketches. After high school there always seemed to be a reason not to sketch. College, work and family all came first leaving precious little free time. After thinking about it for a while, last week I was prompted by a 40 % off coupon on artist paper and sketch books from Michaels to get back to sketching.
I love Afghan Hounds and had a sketch of one hanging on my wall when I was in high school. After several moves over the years my sketch has been lost. I decided that my first sketch should be an Afghan Hound. I enjoyed sketching this dog and may use him in future projects.
If you have never sketched before I encourage you to try it. Don't worry if your sketches aren't perfect. The more you draw the better your drawings will be. There are several books available for beginners and most communities offer art classes.*
*Drawing on the Right Side of the Brain by Betty Edwards and Lessons in Classical Drawing by Juliette Aristides are two excellent books for anyone seriously interested in learning to draw.
Thursday, June 16, 2011
New Baby Card
The adorable baby images on the Cricut Baby Steps cartridge were perfect for a card that I made for a co-worker who is having a baby.
Directions for New Baby Card:
Cricut Baby Steps cartridge
White, light pink, light blue, light yellow, dark brown, light brown and light tan card stock
Pink and white dotted ribbon
Foam Dots
Pink self stick pearls
Sizzix Hearts embossing folder
Martha Stewart pink flocking powder
Stickles Icicle glitter glue
Tattered Angels Glimmer Mist- pearl mist
Greeting card program
Colored pencils or chalk
1. Select a new baby verse using the greeting card program. Print the card on white card stock using the half-fold option.
2. Load the Baby Steps cartridge into the Cricut and select the Moon Baby image. Cut Moon Baby at 2 1/2 inches out of dark brown card stock. Press the Shift and Moon Baby keys and cut the image out of light tan card stock. Press the Layer 1 and Moon Baby keys to cut the bow and outfit out of light pink card stock. Next press the Shift and Layer 1 keys to cut the cheeks and nose out of light brown card stock. Place the light blue card stock on to the Cricut mat and press the Layer 2 and Moon Baby keys to cut the moon and clouds. Press the Shift, Layer 2 and Moon Baby keys to cut the moon out of light yellow card stock. Assemble the image. I used pink chalk to highlight the baby's cheeks instead using the light brown die cut cheeks.
3. Use a light peach colored pencil to color the baby's face and hand. Add shading to the cloud with a pale aqua colored pencil. Attach a pink self-stick pearl to the center of the baby's bow. Apply a thin layer of glue to the baby's outfit and lightly sprinkle flocking powder to cover the surface. Shake off the excess flocking powder and set aside to dry. Highlight the edges of the cloud with the Stickles Icicle glitter glue. Set aside to dry.
4. Cut a piece of white card stock 4 3/4 inches long and 4 inches wide. Emboss the card stock using the Sizzix Hearts embossing folder.
5. Center the Moon Baby image on the embossed card stock. Use foam dots to adhere the image to the card stock.
6. Spray the image and the embossed card stock lightly with Pearl Glimmer Mist. Set aside to dry.
7. Cut two pieces of pink and white dotted ribbon 5 3/4 inches long. Glue the ribbon 1/2 inch from the top of the card. Glue the second piece of ribbon 1/2 inch from the bottom of the card. Tuck the ends under the front edge of the card and secure with glue. Use the pink and white dotted ribbon to tie a small bow. Attach the bow to the ribbon at the bottom of the card.
8. Place a pink self-stick pearl in each corner of the embossed card stock. Center the embossed card stock containing Moon Baby on the front of the card. Adhere the embossed card stock to the card using foam dots.
Saturday, June 4, 2011
Completed Louis XIV Chest
The Sun King chest is finally finished! Since Brittany plans to take Le Roi Soleil to grad school with her I decided to tuck an inspirational quote in the top drawer. I printed "It is in difficult things that we show our virtue." -Louis XIV on cream colored card stock and trimmed the paper leaving a small border around the edges of the quote.
Top of the chest. The picture is framed in a narrow gold flake border. The red drape in the picture makes the border look wider at the top.
Decorative element on the side of the chest.
Directions for Louis XIV Chest:
Small pre-sanded wooden chest-available at craft stores
Fine grit sanding pad
Matte finish Mod Podge
Foam brush
DecoArt Americana Slate Grey acrylic paint
DecoArt Dazzling Metallics Venetian Gold
Art Minerals Gold Flakes-available at Michaels
Picture of Louis XIV
White card stock
Small stenciling brush or other stiff brush
Round paint brush-I used #2 round
White craft glue-I used Martha Stewart
DecoArt craft varnish
Jolee's Boutique Leaf Elements
1. Lightly sand the chest and the drawers to remove any rough spots. Wipe the sanded chest down with a slightly damp paper towel.
2. Use a foam brush to apply a light coat of craft varnish to the chest and the drawers. Set aside to dry.
3. Lightly sand the chest and the drawers and wipe with a damp paper towel.
4. Paint the chest and the drawers with slate grey paint. Let it dry and then apply a second coat. After the grey paint is dry apply venetian gold paint to the knobs on the drawers and the front edges of the chest.
5. After the paint is dry seal the chest and drawers with a light coat of craft varnish. Set aside to dry. Once the piece is completely dry, lightly sand it and wipe it with a damp cloth.
6. Print a 3 inch by 4inch picture of Louis XIV on card stock with a laser printer or photo copy the image. DO NOT use an ink jet printer because the ink will smear and the colors will run once the Mod Podge is applied. I scanned a picture of the Sun King from one of my books but pictures are also available on the internet. I trimmed the printed picture into an oval shape.
7. Apply a thin coat of Modge Podge to the back of the picture and center it on the top of the chest. Use a brayer or your fingertips to smooth out any air bubbles or wrinkles in the picture. Using a foam brush carefully apply a thin coat of Modge Podge over the top of the chest. Let it dry at least overnight (longer if the weather is humid). The chest must be completely dry. Lightly sand the top of the chest and wipe it with a damp cloth. Apply another light coat of Modge Podge. Repeat this process 2 more times.
8. Use the #2 round brush to apply a thin layer of white craft glue around the edges of the picture. Let the glue sit until it becomes slightly tacky (about 5 minutes). Apply small pieces of gold flake on top of the glue. Lightly press the gold flake to get it to adhere to the glue. The gold should stick to the glue but have a slightly raised appearance. You are trying to achieve the look similar to a carved frame. Once the glue is completely dry add another layer if necessary. I brushed glue on the flat areas and added more gold flake to get a raised appearance around the entire frame. Let the glue dry overnight.
9. Seal the top of the chest with a light coat of Modge Podge. Carefully apply the Modge Podge to the picture first, then dab it on top of the gold flake and then coat the rest of the top. Let it dry completely. Lightly sand the picture and the top of the chest. Be careful not to sand the gold flake. Wipe the top with a damp cloth.
10. Using the #2 round brush apply small amounts of Venetian gold paint to the gold flake frame. Let the paint dry. Seal the entire top with Modge Podge and let it dry. Then lightly sand the top (except for the gold flake frame) and wipe it with a damp cloth.
11. Paint the leaf elements with Venetian gold and let them dry. Position them to the right and left of the picture and glue in place. Position the leaf elements on each side of the chest and glue in place. Cover the entire chest with a light coat of Modge Podge and let it dry. Lightly sand the chest (except for the leaf elements) and wipe with a damp cloth.
Since the Jolee's Boutique Leaf Elements were no longer available at Michaels I made a mold and molded the elements from polymer clay. I baked the molded leaf elements, painted them and a glued them to the chest.
Thursday, June 2, 2011
Now I Lay Me Down to Sleep
The past couple of weeks have been devoted to my garden. Unfortunately the garden takes so much time that the craft projects often temporarily get pushed aside. Today I was able to work on both the garden and my craft projects since I didn't have any time constraints. The weather was beautiful so I decided to ease into my day by having a cup of coffee in the garden while listening to Mozart's Divertimenti. It was nice to drink my coffee leisurely outdoors surrounded by beautiful flowers rather than quickly sipping my coffee as I get into the car to drive to my next destination.
I found this little bunny while I was reorganizing the other day. I had painted it for Michelle's room while she was in kindergarten. At the time decorative and folk art painting were popular. A friend of mine had invited me to go shopping with her. One of our stops was a store that was devoted to folk art painting and supplies. I had dabbled in watercolors but had never used acrylic paints or painted on wood. At the time I was looking for a picture for Michelle's room that was different from the mass market pictures available at children's stores. I found this adorable little bunny in a book and decided to try to paint it. I was very pleased with the result. Unfortunately the book that this bunny came from is no longer in print.
To make this picture I started with a pre-sanded wooden plaque (available from a craft store). I sanded the plaque with a fine grit sanding pad to smooth out any rough places. I wiped the plaque down with a damp cloth. After the plaque was dry I lightly varnished it with DecoArt water based craft varnish (available at Jo-Ann). I lightly sanded the plaque again and wipe it down. Next I used a wash of walnut acrylic paint to color the plaque. The paint should be very watery. Apply the wash several times until you have achieved the desired look (a light walnut color). Seal the plaque again with the varnish and lightly sand and wipe down. I then transfered the bunny image to the plaque using graphite paper. The bunny was painted using a wash of light blue and tan. The dots are made by dipping the wooden end of the paint brush in undiluted paint. The stars are made by dipping the end of the paint brush in a wash of white paint and pulling the paint out from the center.
Sunday, May 8, 2011
Decoupaged Louis XIV Chest
I have been reading The Sun King's Garden by Ian Thompson. Inspired by the Sun King I dropped everything on the first warm day and headed off to Lowes and Home Depot for plants. I spent the last two weeks planting and getting the garden in shape which left little time to work on my Sun King project.
I really like decoupage and wanted to do another project. I also wanted to do another historic project. Brittany really liked the Marie Antoinette chest and asked for a similar one with the Sun King. Since she thinks "the Sun King is awesome" I chose him as my decoupage project. The project is taking longer than I anticipated so I am posting it as a work in progress. I will post the work as it progresses and the directions when the piece is finally finished.
Small wooden chest-sanded and varnished
Drawers-painted slate gray and accented with gold
Chest painted and varnished.
Picture of Louis XIV decoupaged on top of the chest.
Decorative elements molded from polymer clay
Tuesday, April 26, 2011
Paper Hydrangea's
Paper flowers are so easy to make yet they can be rather expensive to buy. I recently found a package of 6 flowers for $5 at a local scrapbook store. Instead of buying the pre-made flowers I decided to buy some paper punches to make my own flowers. I bought the Martha Stewart hydrangea and rose leaf paper punches for a total cost of $20. I wanted the hydrangeas to mimic the colors of the hydrangeas in my garden so I chose purple and pink card stock. The flowers were easy to make and assemble.
I punched 18 hydrangeas out of pink card stock, 12 out of light purple, 6 out of blue violet and 10 out of dark purple card stock. Next I used pink chalk to highlight the centers of the pink flowers and purple to highlight the centers of the light and dark purple flowers. Starting at the center of the flower apply the chalk in a circular motion extending it toward each petal.
Using a stylus and a foam mat or the back of a mouse pad press the stylus into the center of the flower and move the stylus in a circular motion until the flower begins to have a cupped shape. Don't press too hard to avoid poking a hole in the center of the flower.
Next take a stylus or an awl and slightly curve the end of each petal backward.
Once the petals are curved add a small adhesive pearl to the center of each flower.
Punch the leaves out of parrot green Bazzill card stock. Place the leaf on the foam mat and press the stylus from the top of the leaf to the bottom to form a vein. Add smaller veins to the right and left of the center vein. Highlight the leaf with dark green chalk. Glue two or three leaves under the petals of each flower and set aside to dry.
After I had made all of the flowers I wanted to use them to make a card.
Directions for Hydrangea Card:
Parchment card stock
Paper hydrangeas
Recollections Adhesive Faux Pearls
Purple ribbon
Tattered Angels Pearl Glimmer Mist
Spellbinders Nestabilities Rectangles
K & Company Ariana card stock
Foam Dots
1. Fold a piece of parchment card stock in half lengthwise and crease.
2. Cut the second largest rectangle from the Spellbinders die set out of parchment card stock.
3. Place a foam dot on the back of each of the flowers and position the flowers on the parchment rectangle as shown in the picture.
4. Cut a piece of blue and white print card stock from the Ariana collection 4 7/8 inches wide by 7 1/2 inches long. Glue the card stock to the front of the folded parchment card stock, leaving a border around the edges of the card.
5. Center the parchment rectangle on the blue and white card stock and attach with foam dots.
6. Cut a piece of purple ribbon approximately 5 1/4 inches and tuck under the edges of the blue and white patterned card stock. Position the ribbon at the bottom edge of the card stock, just under the parchment rectangle. Glue in place. Using the purple ribbon tie a small bow and attach to the center of the purple ribbon.
7. Place the faux pearls in the upper right and lower left corners of the blue and white patterned card stock. The pearls on the left side of the card should be slightly above the ribbon. Press the pearls in place.
8. Lightly spray the flowers with the pearl Glimmer Mist and let them dry.
I punched 18 hydrangeas out of pink card stock, 12 out of light purple, 6 out of blue violet and 10 out of dark purple card stock. Next I used pink chalk to highlight the centers of the pink flowers and purple to highlight the centers of the light and dark purple flowers. Starting at the center of the flower apply the chalk in a circular motion extending it toward each petal.
Using a stylus and a foam mat or the back of a mouse pad press the stylus into the center of the flower and move the stylus in a circular motion until the flower begins to have a cupped shape. Don't press too hard to avoid poking a hole in the center of the flower.
Next take a stylus or an awl and slightly curve the end of each petal backward.
Once the petals are curved add a small adhesive pearl to the center of each flower.
Punch the leaves out of parrot green Bazzill card stock. Place the leaf on the foam mat and press the stylus from the top of the leaf to the bottom to form a vein. Add smaller veins to the right and left of the center vein. Highlight the leaf with dark green chalk. Glue two or three leaves under the petals of each flower and set aside to dry.
After I had made all of the flowers I wanted to use them to make a card.
Directions for Hydrangea Card:
Parchment card stock
Paper hydrangeas
Recollections Adhesive Faux Pearls
Purple ribbon
Tattered Angels Pearl Glimmer Mist
Spellbinders Nestabilities Rectangles
K & Company Ariana card stock
Foam Dots
1. Fold a piece of parchment card stock in half lengthwise and crease.
2. Cut the second largest rectangle from the Spellbinders die set out of parchment card stock.
3. Place a foam dot on the back of each of the flowers and position the flowers on the parchment rectangle as shown in the picture.
4. Cut a piece of blue and white print card stock from the Ariana collection 4 7/8 inches wide by 7 1/2 inches long. Glue the card stock to the front of the folded parchment card stock, leaving a border around the edges of the card.
5. Center the parchment rectangle on the blue and white card stock and attach with foam dots.
6. Cut a piece of purple ribbon approximately 5 1/4 inches and tuck under the edges of the blue and white patterned card stock. Position the ribbon at the bottom edge of the card stock, just under the parchment rectangle. Glue in place. Using the purple ribbon tie a small bow and attach to the center of the purple ribbon.
7. Place the faux pearls in the upper right and lower left corners of the blue and white patterned card stock. The pearls on the left side of the card should be slightly above the ribbon. Press the pearls in place.
8. Lightly spray the flowers with the pearl Glimmer Mist and let them dry.
Tuesday, April 19, 2011
Mother's Day Card
Cricut's Kate's ABCs cartridge is quickly becoming my favorite cartridge because the images are so cute. I especially liked the image of the girl hugging the kitten and thought it would make a nice Mother's Day card. I wanted the girl with the kitten to be the focal point so I decided to use a ribbon rather than a lot of other embellishments.
Directions for Mother's Day Card:
Cricut Kate's ABCs cartridge
Spellbinders Shapeabilities Pendants-Lattice
Sizzix Damask Embossing Folder
White, light pink, medium pink, dark pink, yellow, light tan, brown and green card stock
Stickles glitter glue- Platinum
Pink and white gingham ribbon
Chalk or pastels
Foam Dots
1. Using the Cricut Kate's ABCs cartridge cut Girl 6 at 3 inches out of brown card stock. Press the Shift and Girl 6 keys and cut the grass out of green card stock. Next press the Layer 1 key and cut the hat and dress out of medium pink card stock. Press the Shift and Layer 1 keys and cut the dress and flower out of dark pink card stock. Press the Layer 2 key and cut the hat out of yellow card stock. Press the Shift and Layer 2 keys and cut the face, hands and feet out of light tan card stock. Assemble the image and highlight the girl's face and lips with a pink pastel or chalk. Highlight her arm with light pink chalk and the grass with green chalk. Apply the platinum stickles to the cat's neck to make a collar.
2. Cut the pendant out of light pink card stock using the Spellbinders die.
3. Use the Sizzix Damask embossing folder to emboss a piece of white card stock.
4. Cut a piece of light pink card stock 6 inches high by 4 7/8 inches wide.
5. Fold a piece of white card stock in half lengthwise. Center the pink card stock on the white card and glue it approximately 2 inches from the bottom of the card. Glue the white embossed card stock on top of the light pink leaving a 1/4 inch border on all sides. Attach foam dots to the back of the lattice pendant and position it approximately 1 inch from the edge of the embossed white card stock. Attach foam dots to the back of the girl with the kitten image and center it on the lattice pendant. Position the flowers near the grass blades and secure them in place with foam dots. You may have to cut the dots so that they fit the flowers. Position the butterfly just above the upper right edge of the pendant and secure in place with a foam dot.
6. Cut a piece of ribbon the width of the card plus 1/2 inch and glue to the card approximately 1 inch from the bottom of the card. Tie a small bow and glue to the ribbon.
Thursday, April 14, 2011
Easter Bunny Card
Cricut recently released the Kate's ABC's cartridge. The images on this cartridge are so cute. I adore this little bunny and thought that he would make a cute Easter card.
Directions for Easter Bunny Card:
Cricut Kate's ABC's cartridge
Bright blue, bright green, bright pink, yellow, white and light brown card stock
Googly eyes
Green chalk or pastels
Cuttlebug Swiss Dots embossing folder
Yellow multi-print ribbon
Foam dots
Small piece of bright blue ribbon
1. Using the Cricut Kate's ABC's cartridge select the bunny and cut the image at 3 inches out of light brown card stock. Press the Shift and the bunny keys and cut the grass out of bright green card stock. Press the Layer 1 key and cut the grass blade. Press the Shift and Layer 1 keys and cut the flowers and dragon fly out of bright pink card stock. Press the Layer 2 key and cut the flowers center out of yellow card stock. Assemble bunny, the dragon fly and the flowers. Glue a googly eye to the bunny's head. Tie a small bow with the blue ribbon and glue it to the bunny's neck. Highlight the grass and the grass blades with green chalk or green pastels.
2. Cut a piece of bright blue card stock approximately 5 1/2 inches long by 4 inches wide and emboss it using the Cuttlebug Swiss Dots embossing folder.
3. Attach foam dots to the back of the bunny, flower and dragon fly. Position the bunny 1 inch from the bottom of the embossed card stock and press in place. Place the dragon fly to the right of the bunny and the flower between the grass blades and press in place.
4. Cut a piece of yellow multi-print ribbon approximately 10 inches. Center the ribbon on the front of the card and fold the ends of the ribbon under the top and bottom edges of the card. Glue the ends of the ribbon in place. Tie a small bow and glue over the ribbon approximately 1 inch from the bottom of the card.
5. Center the embossed blue card stock slightly above the bow and glue in place.
6. Using Microsoft Word and the Cataneo BT font at 18 type Just hopping by to wish you Happy Easter! Print it on white card stock. Trim the card stock close the greeting. Cut a piece of bright pink card stock slightly larger than the card stock with the greeting. Glue the greeting to the pink card stock. Center the greeting on the embossed blue card stock and position it so that the pink card stock rests just above the second row of embossed dots. Glue in place.
Easter Card
Easter is quickly approaching and my cards are finally finished. While I enjoy making the cute bunny themed cards I wanted to do something different. Cricut's Inspired Heart Lite cartridge contains religious images. The crucifix seemed like the perfect choice for my Easter card. I cut the crucifix out of bronze metallic card stock and then used the d-stress tool to distress the edges to make the image stand out.
Directions for Easter Card:
Parchment, white, light purple and bronze metallic card stock
DCWV Shimmer Stack-purple shimmer card stock
Cricut Inspired Heart Lite cartridge
Martha Stewart Doily edge punch and Dove paper punch
Imaginisce d-stress distressing tool
Gold mesh ribbon
Tim Holtz tea dye distress ink
Narrow purple ribbon
Small Calla Lily-These are available in a small bunch in the bridal aisle at Michaels
Foam Dots
1. Fold the parchment card stock in half lengthwise and crease.
2. Using the Inspired Heart cartridge cut Christ 2 at 3 inches out of the bronze metallic card stock. Press shift and the Christ 2 image and cut the background out of light purple card stock. Using the d-stress tool and the white tip, lightly distress the edges of the crucifix. Attach the crucifix to the purple background. Press the phrase key and the Dreidal key and cut rejoice at l inch out of purple shimmer card stock.
3. Cut a piece of purple shimmer card stock 1/4 inch larger, on all sides, than the light purple card stock and attach the image with foam dots.
4. Punch the long edge of a piece of parchment card stock with the Martha Stewart doily border punch. Cut the doily strip approximately 7/8 inches wide (measured from the scalloped edge of the border). Cut a strip of purple shimmer card stock approximately 3/4 inch wide and attach it under the doily strip so that the scalloped edge almost touches the edge of the purple strip. Glue the border to the right edge of the card so that the purple edge faces inward.
5. Center rejoice and glue it approximately 1/2 inch from the top of the card.
6. Use the Martha Stewart dove paper punch to punch a dove out of white card stock. Highlight the edges of the dove with Tim Holtz tea dye distress ink. Glue the dove to the left of rejoice.
7. Center the purple backed crucifix and glue it approximately 1 1/2 inches from the bottom edge of the card.
8. Tie a knot in a piece of gold mesh ribbon and glue it under rejoice.
9. Tie a small bow around three Calla Lilies. Glue the lilies at an angle on the lower right edge of the card. Trim the ends of the stems so they don't extend past the edge of the card.
Thursday, April 7, 2011
Cherry Blossom Card
One of the nice things about living in the Washington, DC area is the annual arrival of the Cherry Blossoms. The Cherry trees bloom around the last week of March and the first week of April. They line both sides of the Reflecting Pool in front of the Jefferson Memorial. When the Cherry blossoms are at their peak this is the most beautiful spot in the city.
I made this card in honor of the beautiful Cherry Blossoms but the card can be used for other occasions (birthdays, Mother's Day). I cut one corner off of Bo Bunny a gift of love paper and then ran it through a crimper to give some texture and evoke the feeling of a fan. Rather than use a traditional card greeting, I decided to use part of the quote by Kahil Gibran-...Beauty is a light in the heart.
Directions for Cherry Blossom Card:
Light grey and white card stock
Bo Bunny a gift of love paper/Sophie Joy Die Cut
Fiskars Crimper
Hero Arts Four Dolls stamp
Color Box black pigment ink
Colored pencils
Pink and white dotted ribbon
Recollections butterfly-light pink
Got Flowers? -small pink flowers
Recollections flower shaped brads-green
Martha Stewart Doily border punch
Foam Dots
1. Fold a piece of 8 1/2 x 11 inch light grey card stock in half.
2. Print ...Beauty is a light in the heart. -Kahil Gibran on white card stock using Microsoft Word and Calligraph 421 BT font at 18. Trim the card stock so that a small border surrounds the quote.
3. Cut lower left corner of the Bo Bunny paper 4 1/2 inches long by 3 1/2 inches wide. You want the brown scalloped edge on the left and bottom of the paper. Turn the paper so that the blue corner is at an angle. Feed the blue corner into the Fiskars crimper to begin crimping the paper.
4. Stamp the Hero Arts doll onto a piece of white card stock with black ink. Use the colored pencils to color in the doll. Carefully cut out the doll. Turn the crimped paper so that the brown scallops run along the side and bottom and the blue edge is at the top. Attach the doll to the Bo Bunny paper using foam dots. Tie a small bow with the pink and white dotted ribbon and glue to the top corner of the fan. Position the center scallop approximately 1 7/8 inches from bottom of the card. glue in place. Tuck the quote just under the blue edge and glue in place.
5. Glue a light pink butterfly to the left of the quote.
6. Attach 4 light pink and 2 dark pink flowers to the bottom of the card with green flower shaped brads.
7. Use the Martha Stewart Doily border punch to punch a border out of white card stock. Trim the border to the length of the card and glue in place.
Wednesday, April 6, 2011
L'Affaire de la Joconde
I'm always thinking of ideas for future projects. I would jot the ideas on post-it notes and leave them on my desk. The problem was that I didn't have a good system for storing the notes and there wasn't enough room to make sketches. Brittany, the ever practical one, suggested that I use a small sketch book to jot down my ideas. This would not only keep my ideas organized but also allow me to make a sketch of the project.
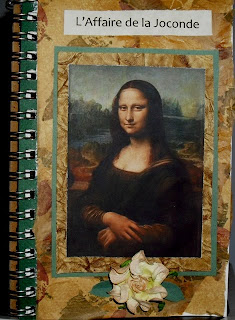
I have been reading Vanished Smile-The mysterious disappearance of the Mona Lisa by R.A. Scotti. L'Affaire de la Joconde was the inspiration for this project. My sketch book was drab and uninspiring-the perfect candidate for a make over. I chose an earth tone color palette to compliment the picture and give the project an aged appearance. Since visitors to the Louvre often placed flowers on the floor beneath the painting I decided to add a rose at the base of la Joconde to represent the flowers left by her admirers.
Directions for L'Affaire de la Joconde:
Recollections Mulberry paper flowers-available at Michaels
5 inch by 8 inch Sketch book
Slate green and parchment card stock
Light brown hand made paper-available at Michaels
Tan flower patterned tissue paper (This was recycled. It had originally lined a shopping bag from a small boutique.)
Modge Podge decoupage glue
Martha Stewart Rose Leaf paper punch
Ink jet photo paper-matte finish
Gesso
1. Scan a picture of the Mona Lisa into the computer and print a 3x5 inch picture onto photo paper. Trim the excess photo paper off so that only the picture remains. Cut a piece of light brown hand made paper 1/4 inch larger (on all sides) than the picture. Attach the picture to the hand made paper using double stick tape. Cut a piece of slate green card stock slightly larger than the light brown hand made paper. Attach the hand made paper with the picture to the slate green card stock using double stick tape.
2. Cover the cover of the sketch book with gesso and let it dry overnight. Apply a second light coat of gesso and let it dry.
3. Tear the tan flowered pattern tissue paper into large pieces and glue to the top of the sketch book, slightly over lapping the pieces until the entire book is covered. Let it dry thoroughly.
4. Center the Mona Lisa on the sketch book and glue in place.
5. Print L'Affaire de la Joconde on parchment card stock using Microsoft Word and the Trebuchet 24 pt font. Cut the title to fit the front of the sketch book. Center it over the Mona Lisa and glue in place.
6. Lightly apply Modge Podge to the cover of the sketch book to seal it. Let it dry completely. It may take a day or two depending on the humidity. Lightly sand the piece and apply another light coat of Modge Podge. Let it dry and lightly sand the cover again.
7. Attach a mulberry flower rose to the bottom of the picture. Punch two rose leaves out of the slate green card stock and glue under the edges of the rose.
Tuesday, March 29, 2011
Mickey Birthday Card
Brittany loves Mickey Mouse so he was the perfect choice for a birthday card for her. I decided to contrast the bright colors of Mickey and Pluto with a softer aqua and grey palette. I didn't add the white to Mickey's eyes because I was trying to make him look more like Steamboat Willie (the first Mickey).
Directions for Mickey Birthday Card:
Cricut Mickey and Friends cartridge
Cricut Classic Font cartridge
Sizzix Textured Impressions Valentine Set #4-Hearts & Dots
Light aqua, dark aqua, white, green, purple, yellow, red, light tan, pink, light grey and dark grey card stock
My Minds Eye Glitter Stack- aqua glitter dotted card stock
White lace edging
Gold self stick beads
Martha Stewart branch paper punch
Tattered Angels Glimmer Mist pearl mist
Recollections Boutique Fleur Mulberry Paper Flowers-available at Michaels
Foam Dots
1. Fold a piece of 8 1/2 inch (21.59 cm) by 11 inch (27.94 cm) light grey card stock in half lengthwise. Crease it with a bone folder.
2. Using the Mickey and Friends cartridge press the Mickey and Pluto key and cut it at 3 inches out of black card stock. Press the Layers:Face/White key and cut Mickey's face out of light tan card stock. Press the same key and the shift key and cut the eyes and gloves out of white card stock. Press the Layers: Outfit/Tongue key and cut Mickey's pants out of red card stock. Press the same key and the shift key to cut the tongue out of pink card stock. Load yellow card stock into the Cricut and press the Layers: Shoes/Ribbon/Hat key to cut Pluto's body and Mickey's shoe. Press the same key and shift to cut Pluto's collar out of purple card stock. Assemble Mickey and Pluto.
3. Cut Happy Birthday at 1 1/2 inches out of dark aqua card stock using the Cricut Classics Font cartridge.
4. Cut a piece of light aqua card stock 4 1/2 inches (11.43 cm) long by 3 1/2 inches (8.89 cm) wide. Place the card stock in the Hearts and Dots embossing folder and emboss it. Attach Mickey and Pluto to the embossed card stock using foam dots.
5. Cut a piece of dark grey card stock 3 3/4 inches (9.53 cm) wide by 4 1/2 inches (11.43 cm) long. Spray it lightly with pearl Glimmer Mist and let it dry. Cut a piece of aqua glitter dotted card stock 5 1/2 inches (13.97 cm) long by 3 3/4 inches (9.53 cm) wide. Place the dark grey card stock at an angle and glue to the aqua glitter dotted card stock. Use foam dots to attach the embossed card stock to the grey/aqua layered card stock. Place a gold bead in each corner of the embossed layer. Glue image 1 3/4 inches (4.45 cm) from the bottom of the card.
6. Center Happy Birthday over the image and glue in place.
7. Cut the white lace edging the length of the card and glue just under the front edge of the card.
8. Attach a foam dot to the back a peach colored mulberry flower. Position the flower at the lower left edge of the card and press in place.
9. Punch 2 branches out of green card stock using the Martha Stewart branch paper punch. Glue the branches under the edges of the flower.
Sunday, March 6, 2011
Making Quilted Fabric
I have been searching since last year for a case to fit my over-sized sunglasses. All I have been able to find are very large clam shell style cases, which took up a lot of space in my fairly large handbag. Either the stores are stocking a lot of these glass cases on their shelves or they just are not selling well. I suspect it's the latter because most women don't want to carry one of these bulky, heavy clam shell cases in their handbags. Since the soft cases don't seem to exist, once again I must design my own.
After a quick stop to my local fabric store and about $5 in fabric and thread, I had the necessary materials to make my own quilted fabric. I have done a lot of quilting but have never attempted to make a quilted fabric. I measured my sunglasses and drew a simple pattern on a piece of white paper. I used a quilting pencil to draw light lines on the diagonal, 2 inches apart, on the paisley fabric. Next I layered quilt batting between the fabric layers and quilted on the lines. Then I turned the piece so that I could repeat the process on the opposite side. You are trying to quilt a diamond shape.
Fabric and batting layers.
Diagonal lines drawn with white quilting pencil. For a better view of the lines, click on the picture to enlarge it.
Reverse side of quilted fabric showing diagonally quilted lines making a diamond shape.
Pattern for sun glass case placed on folded edge of fabric.
Finished sun glass case.
Making quilted fabric is easy and only requires basic sewing skills. Given both the cost and ease of making the fabric, I would definitely do this again. This fabric could be used to make other purse accessories ( cosmetic bags, mp3 cases, etc.) and the best part is that I can choose any pattern of fabric that the fabric store stocks. If you plan to make multiple accessories I suggest that you buy fabric by the yard rather than use the fat quarters.
Directions for Quilted Fabric Sun Glasses Case:
1/2 yard cotton print fabric-I used a black background paisley print.
1 fat quarter cotton print fabric, in a coordinating color-I used a purple print.
Piece of quilt batting
Gutterman polyester thread to coordinate with fabrics and JP Coates quilting thread in Ecru
Quilting pencil or #2 pencil
Ruler
Straight Pins
1. Iron the fabrics. Fold the fabric pieces and cut off the uneven ends. Cut the paisley fabric to the same dimensions as the fat quarter.
2. Cut a piece of quilt batting 2 inches larger on all sides than the pieces of fabric.
3. Starting at one corner of the paisley fabric measure approximately 2 inches from the top and draw a line diagonally across the fabric. Measure approximately 2 inches down from the line that you just drew and draw another diagonal line. Repeat this process until you come to the end of the fabric.
4. Lay the purple print fabric on a table with the wrong side facing up and the right side facing the table. Next place the quilt batting on top of the fabric and then place the paisley fabric right side facing up on top of the batting. Pin the layers in place.
5. Thread the bobbin of the sewing machine with the Ecru quilting thread and then thread the Gutterman thread through the sewing machine guides and needle.
6. Starting at the edge of the fabric, using the diagonal lines as your guide, sew along the lines. Sew each diagonal line until the entire fabric has been quilted.
7. Turn the fabric and mark lines on the diagonal about every 2 inches. These lines will run across the previously quilted lines. That's perfectly all right because we are trying to achieve a diamond effect in the quilting (refer to pictures above). Sew the lines along the diagonal marks that you just made until the entire piece has been quilted. Lightly press the fabric with an iron.
8. Cut a piece of paper 3 3/4 inches wide by 7 1/2 inches long. This is your pattern. Round the corners on the right side of the pattern. Fold a piece of the quilted fabric in half and place the long un-rounded edge of the pattern against the fold. Pin the pattern in place and cut along the lines.
9. Cut 2 strips of paisely fabric 1 1/2 inches wide. Sew the strips together at one end. Press the seam open. Fold 1/4 inch under on the right side of the strip ( the length of the strip) and press. Repeat the process on the left side of the strip. Fold the strip in half lengthwise and press.
10. Pin the strip along the edges of the sun glasses case to bind the raw edges. Sew along the open edge of the binding, removing the pins as you sew. Sew slowly around the rounded edges, moving the binding along with the fabric as you sew to avoid bunching the fabric.
11. Fold the finished case in half and press lightly. Pin the bottom and the edges of the case together. Measure 3/4 inches from the top edge of the case and mark it with a pin. Sew the case together along the outside, starting at the bottom, folded edge. Continue sewing along the edge of the case until you reach the marked area.
Subscribe to:
Posts (Atom)