Sunday, October 30, 2011

Portrait de Les Squelettes


I wanted to do one more card for Halloween but didn't want to do witches, haunted houses or pumpkins. I wanted something different! I had purchased some cute K & Company skeleton stickers and wanted to use them. The skulls peering over tombstones or looking out of the windows of a haunted mansion just wasn't what I was looking for. I had just finished reading the Picture of Dorian Gray and was putting the book back on the shelf when the idea popped into my head. What about skeleton portraits? I could frame the skulls and then cover the entire card in spider webbing.

Here's the finished result. It's hard to see the spider webbing because I used a thin layer to cover the card.


Directions for Portrait de Les Squelettes:

Cricut Happy Hauntings cartridge
K & Company Tim Coffey Halloween Bone and Bats Layered Accents
Black, lime green and white card stock
K & Company Kelly Panacci Halloween Paper
Spider Webbing

1. Using the Happy Hauntings cartridge cut Frame 3 twice, once at 3 3/4 inches and the second time at 3 inches out of black card stock. Press the Phrase, Frame 3 and the Shift keys and cut the word CREEPY at 2 1/2 inches out of black card stock. Cut Frame 7 at 3 3/4 inches out of black card stock.

2. Place the lime green card stock on the Cricut mat and load into the machine. Press the Phrase and Frame 3 keys and cut the word CREEPY at 2 1/2 inches. Glue the green word over the black word base.

3. Print a Halloween greeting on the inside of the card using white card stock and a card program. Choose the half fold card option. Fold the card in half and crease.

4. Cut a piece of purple and black dot card stock from the Halloween paper to fit the front of the card. Glue in place.

5. Position the frames so the smaller frame is centered on the purple card stock approximately 4 inches from the bottom of the card. Place the larger frames below the small frame (the square frame to the right and the oval frame to the left). Glue the frames in place. Place a large skull in the center each of the 3 3/4 inch frames and a small skull in the center of the 3 inch frame.

6. Glue the word CREEPY above the smaller frame. Place a bat to the left of the word.

7. Tear off a small piece of spider webbing a pull it apart until it starts to form web strands. Cover the front of the card with the webbing a glue the loose ends under the front edges of the card.

Sunday, October 16, 2011

Waiting For The Great Pumpkin


This weekend is devoted to Halloween-both decorating and working on projects. While I was out buying supplies for my up coming projects I came across a Linus and a pumpkin sticker set. I just couldn't resist it. The story of Linus waiting in the pumpkin patch for the arrival of the Great Pumpkin is one of my perennial favorites.


Directions for the Great Pumpkin card:

K & Company Kelly Panacci Halloween paper- yellow print card stock
EK Success-Peanuts Linus Halloween dimensional sticker set
K & Company Tim Coffey Halloween Grand Adhesions-pumpkins
Medium purple ribbon
Foam Dots
White card stock


1. Print a Halloween greeting on the inside of an 8 1/2 inch by 11 inch piece of white card stock. Print the card using a greeting card program and the half-fold card option. Fold the card in half.

2. Cut the yellow print card stock 7 inches high by 4 1/2 inches wide.

3. Position Linus and the pumpkin 1 1/4 inches from the bottom of the card stock. Center the image and press in place. Position two of the smaller pumpkins from the Tim Coffey set to the right and left sides of Linus and his pumpkin. Press into place.

4. Center the Halloween sticker from the Linus set approximately 1 7/8 inches above Linus' head. Then center Happy above Halloween. Position the smaller bats to the left and right of Happy and the larger bat above Linus' head and slightly to the right.

5. Attach foam dots to the back of the yellow print card stock and place it 1 1/4 inches from the bottom of the card and 1/2 inch from the fold of the card. Press into place.

6. Cut a piece of purple ribbon 5 3/4 inches. Place the ribbon slightly below the yellow print card stock. The left end of the ribbon should touch the fold of the card. Glue the ribbon in place. Tuck the remaining ribbon under the right edge of the card and glue to secure. Cut a piece of purple ribbon and tie a small bow. Center the bow over the ribbon and glue in place.

Tuesday, July 26, 2011

Le Petit Rien

I adore my husband! He is as close to perfect as humanly possible. He's an intelligent, handsome, devoted and loving person. He is my muse! I hope that he doesn't read this and let it go to his head. He knows that art is important to me and encourages me to devote more time to it. I wanted to give him a gift to show him how much he means to me.

While browsing in Michaels I saw a little brown cardboard book with blank pages. This would make the perfect gift for my husband.
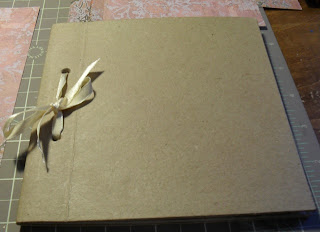


I removed the ribbon and covered the book in card stock.


Since this idea of this book is to express my love for my husband I wanted this book to come from my heart. I wanted to share all of the things that I love with him. I love poetry and have two shelves in my library devoted to it. So naturally this book includes several poems-Elizabeth Barret Browning's How Do I Love Thee, several of Shakespeare's Sonnets and various other poems. I collected flowers from my gardens and pressed them and then glued them in the book. I also included the pink Poodle Valentine's card along with some of our favorite pictures.

This is the finished book. I called it Le Petit Rien which translates to the little something. I chose a French title for the book because of my French heritage.


Directions for Le Petit Rien:

Darice small cardboard book-available with the paper mache boxes at Michaels
DCWV Old World Stack-8x8 inch card stock-pink and grey print
Silk roses-light aqua, medium pink, and dark pink
Mod Podge-matte finish
Gold edged ivory wired ribbon
Hot glue gun
White lace trim
Small white Calla Lilies
Adhesive backed pearl trim
Olive green and parchment card stock
Martha Stewart leaf paper punch
Microsoft word
Small piece of white tulle and craft wire
Tim Holtz Tea dye distress ink
Small oval craft punch
Bone folder
Small hole punch
Clear nail polish or Fray Check

1. Remove the ribbon from the book and set aside. Cut two pieces of pink and grey card stock to fit the covers of the book. Cut the back cover 1/2 inch wider than the book cover. Place the smaller cover on the front of the book. Open the book cover slightly and crease the paper at the line where the book opens. Crease this line with a bone folder. Lay the card stock on the back cover and fold the extra 1/2 inch over the spine of the book and crease with a bone folder. Mark the holes from the covers on the card stock with a pencil and punch with the small hole puncher.

2. Put a thin coat of Modge Podge on the back book cover and postion the card stock over it. Put Modge Podge on the piece that covers the spine and press in place, covering the spine of the book. Let the book dry and then cover the front of the book with Modge Podge and apply the card stock. Let it dry.

3. Cover the back of the book with a light coating of Modge Podge and let it dry. Repeat the process with the front cover.

4. Cut a strip of the adhesive pearls the length of the front cover. Position the pearl strip over the area where the book cover bends to open (see picture) and press in place. Cut a piece of lace edging the length of the front cover and glue with a hot glue gun along the front edge of the cover.

5. Print Le Petit Rien or the title of your choice with Microsoft Word (Hasty Hmk at 20) on parchment card stock. Punch the title out using the small oval paper punch. Use a small sponge and the tea dye distress ink to ink the edges of the oval. Lightly apply the distress ink to the center of the oval.

6. Cut a 2 1/2 inch long strip of white tulle. Fold the strip in half an wrap a piece of craft wire around the center of the tulle. Cut off the excess wire leaving a 1 1/2 inch tail.

7. Position the silk flowers in the center of the book cover. The dark and light pink flowers next to each other and the light aqua flower below them. Form three Calla Lillies into a bouquet and place on top of the tulle. Wrap the tail of the craft wire around the lillies to secure them on top of the tulle. Place the lillies between the pink roses with the green stems extended under the aqua rose.

8. Using the Martha Stewart leaf paper punch and the olive card stock punch four leaves. Positon the leaves under the edges of the roses to fill in open spaces. Once you are satisfied with the placement of the flowers, lift each flower one at a time and place a dab of hot glue on the back of the flower and press in place. Be careful not to disturb the arrangement.

9. Glue the leaves in place with craft glue. Position the title in the upper left just above the flowers and glue in place with craft glue.

10. Put the pages back in the book. Cut a piece of gold edged ivory ribbon approximately 4 inches. Insert the ribbon in the holes in the book cover. Thread the ribbon through the back holes first then the top. Tie the ribbon and make a tight knot. Tie a bow. Adjust the bow and trim the ends at an angle. Apply a small amount of clear nail polish or Fray Check to the ends of the ribbon to kept it from raveling.

Sketch Book


Writers have their journals and artists have sketch books. Although the weather in the DC area has been very hot and at times intolerable (even in the outer Maryland suburbs) I try to spend at least part of my day outdoors in my gardens. I find it inspiring. It's hard not to be inspired when I am surrounded by beautiful flowers. This is one of the Mandevilla plants in my garden.


I love the craft projects and will always continue to do them and post them here but I wanted to get back to sketching and painting. I haven't really done this since I was in high school. When I was a teenager the walls of my room were covered with my sketches. After high school there always seemed to be a reason not to sketch. College, work and family all came first leaving precious little free time. After thinking about it for a while, last week I was prompted by a 40 % off coupon on artist paper and sketch books from Michaels to get back to sketching.

I love Afghan Hounds and had a sketch of one hanging on my wall when I was in high school. After several moves over the years my sketch has been lost. I decided that my first sketch should be an Afghan Hound. I enjoyed sketching this dog and may use him in future projects.


If you have never sketched before I encourage you to try it. Don't worry if your sketches aren't perfect. The more you draw the better your drawings will be. There are several books available for beginners and most communities offer art classes.*


*Drawing on the Right Side of the Brain by Betty Edwards and Lessons in Classical Drawing by Juliette Aristides are two excellent books for anyone seriously interested in learning to draw.

Thursday, June 16, 2011

New Baby Card

The adorable baby images on the Cricut Baby Steps cartridge were perfect for a card that I made for a co-worker who is having a baby.


Directions for New Baby Card:

Cricut Baby Steps cartridge
White, light pink, light blue, light yellow, dark brown, light brown and light tan card stock
Pink and white dotted ribbon
Foam Dots
Pink self stick pearls
Sizzix Hearts embossing folder
Martha Stewart pink flocking powder
Stickles Icicle glitter glue
Tattered Angels Glimmer Mist- pearl mist
Greeting card program
Colored pencils or chalk


1. Select a new baby verse using the greeting card program. Print the card on white card stock using the half-fold option.

2. Load the Baby Steps cartridge into the Cricut and select the Moon Baby image. Cut Moon Baby at 2 1/2 inches out of dark brown card stock. Press the Shift and Moon Baby keys and cut the image out of light tan card stock. Press the Layer 1 and Moon Baby keys to cut the bow and outfit out of light pink card stock. Next press the Shift and Layer 1 keys to cut the cheeks and nose out of light brown card stock. Place the light blue card stock on to the Cricut mat and press the Layer 2 and Moon Baby keys to cut the moon and clouds. Press the Shift, Layer 2 and Moon Baby keys to cut the moon out of light yellow card stock. Assemble the image. I used pink chalk to highlight the baby's cheeks instead using the light brown die cut cheeks.

3. Use a light peach colored pencil to color the baby's face and hand. Add shading to the cloud with a pale aqua colored pencil. Attach a pink self-stick pearl to the center of the baby's bow. Apply a thin layer of glue to the baby's outfit and lightly sprinkle flocking powder to cover the surface. Shake off the excess flocking powder and set aside to dry. Highlight the edges of the cloud with the Stickles Icicle glitter glue. Set aside to dry.

4. Cut a piece of white card stock 4 3/4 inches long and 4 inches wide. Emboss the card stock using the Sizzix Hearts embossing folder.

5. Center the Moon Baby image on the embossed card stock. Use foam dots to adhere the image to the card stock.

6. Spray the image and the embossed card stock lightly with Pearl Glimmer Mist. Set aside to dry.

7. Cut two pieces of pink and white dotted ribbon 5 3/4 inches long. Glue the ribbon 1/2 inch from the top of the card. Glue the second piece of ribbon 1/2 inch from the bottom of the card. Tuck the ends under the front edge of the card and secure with glue. Use the pink and white dotted ribbon to tie a small bow. Attach the bow to the ribbon at the bottom of the card.

8. Place a pink self-stick pearl in each corner of the embossed card stock. Center the embossed card stock containing Moon Baby on the front of the card. Adhere the embossed card stock to the card using foam dots.

Saturday, June 4, 2011

Completed Louis XIV Chest

The Sun King chest is finally finished! Since Brittany plans to take Le Roi Soleil to grad school with her I decided to tuck an inspirational quote in the top drawer. I printed "It is in difficult things that we show our virtue." -Louis XIV on cream colored card stock and trimmed the paper leaving a small border around the edges of the quote.


Top of the chest. The picture is framed in a narrow gold flake border. The red drape in the picture makes the border look wider at the top.


Decorative element on the side of the chest.


Directions for Louis XIV Chest:

Small pre-sanded wooden chest-available at craft stores
Fine grit sanding pad
Matte finish Mod Podge
Foam brush
DecoArt Americana Slate Grey acrylic paint
DecoArt Dazzling Metallics Venetian Gold
Art Minerals Gold Flakes-available at Michaels
Picture of Louis XIV
White card stock
Small stenciling brush or other stiff brush
Round paint brush-I used #2 round
White craft glue-I used Martha Stewart
DecoArt craft varnish
Jolee's Boutique Leaf Elements


1. Lightly sand the chest and the drawers to remove any rough spots. Wipe the sanded chest down with a slightly damp paper towel.

2. Use a foam brush to apply a light coat of craft varnish to the chest and the drawers. Set aside to dry.

3. Lightly sand the chest and the drawers and wipe with a damp paper towel.

4. Paint the chest and the drawers with slate grey paint. Let it dry and then apply a second coat. After the grey paint is dry apply venetian gold paint to the knobs on the drawers and the front edges of the chest.

5. After the paint is dry seal the chest and drawers with a light coat of craft varnish. Set aside to dry. Once the piece is completely dry, lightly sand it and wipe it with a damp cloth.

6. Print a 3 inch by 4inch picture of Louis XIV on card stock with a laser printer or photo copy the image. DO NOT use an ink jet printer because the ink will smear and the colors will run once the Mod Podge is applied. I scanned a picture of the Sun King from one of my books but pictures are also available on the internet. I trimmed the printed picture into an oval shape.

7. Apply a thin coat of Modge Podge to the back of the picture and center it on the top of the chest. Use a brayer or your fingertips to smooth out any air bubbles or wrinkles in the picture. Using a foam brush carefully apply a thin coat of Modge Podge over the top of the chest. Let it dry at least overnight (longer if the weather is humid). The chest must be completely dry. Lightly sand the top of the chest and wipe it with a damp cloth. Apply another light coat of Modge Podge. Repeat this process 2 more times.

8. Use the #2 round brush to apply a thin layer of white craft glue around the edges of the picture. Let the glue sit until it becomes slightly tacky (about 5 minutes). Apply small pieces of gold flake on top of the glue. Lightly press the gold flake to get it to adhere to the glue. The gold should stick to the glue but have a slightly raised appearance. You are trying to achieve the look similar to a carved frame. Once the glue is completely dry add another layer if necessary. I brushed glue on the flat areas and added more gold flake to get a raised appearance around the entire frame. Let the glue dry overnight.

9. Seal the top of the chest with a light coat of Modge Podge. Carefully apply the Modge Podge to the picture first, then dab it on top of the gold flake and then coat the rest of the top. Let it dry completely. Lightly sand the picture and the top of the chest. Be careful not to sand the gold flake. Wipe the top with a damp cloth.

10. Using the #2 round brush apply small amounts of Venetian gold paint to the gold flake frame. Let the paint dry. Seal the entire top with Modge Podge and let it dry. Then lightly sand the top (except for the gold flake frame) and wipe it with a damp cloth.

11. Paint the leaf elements with Venetian gold and let them dry. Position them to the right and left of the picture and glue in place. Position the leaf elements on each side of the chest and glue in place. Cover the entire chest with a light coat of Modge Podge and let it dry. Lightly sand the chest (except for the leaf elements) and wipe with a damp cloth.

Since the Jolee's Boutique Leaf Elements were no longer available at Michaels I made a mold and molded the elements from polymer clay. I baked the molded leaf elements, painted them and a glued them to the chest.

Thursday, June 2, 2011

Now I Lay Me Down to Sleep

The past couple of weeks have been devoted to my garden. Unfortunately the garden takes so much time that the craft projects often temporarily get pushed aside. Today I was able to work on both the garden and my craft projects since I didn't have any time constraints. The weather was beautiful so I decided to ease into my day by having a cup of coffee in the garden while listening to Mozart's Divertimenti. It was nice to drink my coffee leisurely outdoors surrounded by beautiful flowers rather than quickly sipping my coffee as I get into the car to drive to my next destination.


I found this little bunny while I was reorganizing the other day. I had painted it for Michelle's room while she was in kindergarten. At the time decorative and folk art painting were popular. A friend of mine had invited me to go shopping with her. One of our stops was a store that was devoted to folk art painting and supplies. I had dabbled in watercolors but had never used acrylic paints or painted on wood. At the time I was looking for a picture for Michelle's room that was different from the mass market pictures available at children's stores. I found this adorable little bunny in a book and decided to try to paint it. I was very pleased with the result. Unfortunately the book that this bunny came from is no longer in print.

To make this picture I started with a pre-sanded wooden plaque (available from a craft store). I sanded the plaque with a fine grit sanding pad to smooth out any rough places. I wiped the plaque down with a damp cloth. After the plaque was dry I lightly varnished it with DecoArt water based craft varnish (available at Jo-Ann). I lightly sanded the plaque again and wipe it down. Next I used a wash of walnut acrylic paint to color the plaque. The paint should be very watery. Apply the wash several times until you have achieved the desired look (a light walnut color). Seal the plaque again with the varnish and lightly sand and wipe down. I then transfered the bunny image to the plaque using graphite paper. The bunny was painted using a wash of light blue and tan. The dots are made by dipping the wooden end of the paint brush in undiluted paint. The stars are made by dipping the end of the paint brush in a wash of white paint and pulling the paint out from the center.