Sunday, December 20, 2015

Still Crafting

With only three days left, I am still busy crafting.  The Cameo is working over time and I must admit I have the cutting down to a science. At night when my husband is asleep, I work on my files-re-grouping and layering them  on a separate mat for each element to be cut.  The next day, I plug in the Cameo and start cutting, leaving the room to work on other things.  The Silhouette makes a lot of noise so I can usually hear when it's done cutting so I can replace the mat.  I repeat this process until everything is cut out and ready to assemble.  I have found that a small rectangular plastic container with a lid to be very helpful.  The lid holds the small cut outs while the container holds the pieces that I am gluing together.

 Reindeer and Polar Bear Card.


Labels for Chocolate Espresso Beans


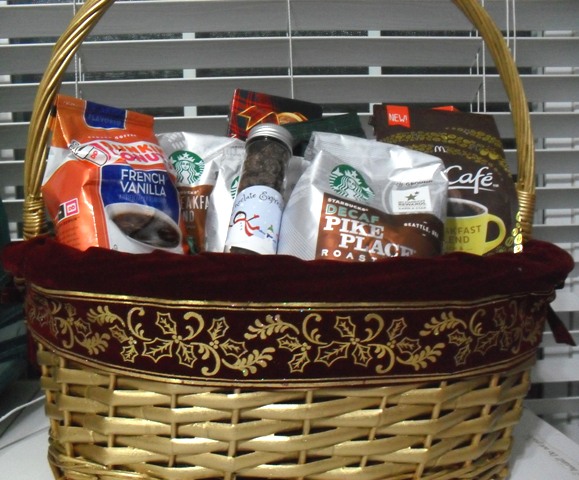
Currently I am making gift baskets.  My coffee baskets are the most requested Christmas gift. It's really easy to put together a basket that rivals the commercially available ones. The best part is that it can be tailored to the recipients tastes.  One of the recipients doesn't like Hazelnut. Personally I don't understand it but I make sure that nothing with Hazelnuts goes into her basket.  This is not limited to coffee but also cookies, and chocolates. No Ferrero Roche? C'est dommage!  I always like to include chocolate covered espresso beans but couldn't find any in my area so I made some. I did a little play on words and called them Expresso Beans because the Snow Family image that I used was so joyful.

The Reindeer is going to be used for gift tags, and the polar bear holding the candy cane is a decorative element for the basket.

Gift Basket in Progress


I will post pictures and directions for the finished basket on a later post.

Friday, December 18, 2015

Gift Card Holders

There are certain people on my Christmas list that get gift cards. While it does simplify shopping, tucking a gift card inside a card just looks like an afterthought.  There are so many nice gift card holders on the market, but they can also be a little pricey.  I came across J.M. Rush's adorable gift card holders on the Silhouette Store site. They were all so cute that I couldn't decide and decided to buy all of my favorite designs. 

These were quick to make.  I was able to make several of each style in a couple of hours.  These a cute enough to present on their own but I tucked them inside a gift bag containing a box of homemade cookies.


Abominable Snowman, Yorkie, Polar Bear and Santa

The assembly instructions for each of these designs can be found on J.M. Rush's Blog.  I had fun adding my own personal touches.  I embossed Santa's fur trim on his coat and hat, the Polar Bear's hat and mittens and Abominable Snowman's fur (light blue) with the Cuttlebug Swiss Dots embossing folder.  I added diamond Stickles to the bear's pom pom and the Snowman's fur and teeth.

Monday, November 2, 2015

Weekend Project

I have been busy working on finishing the Mona Lisa.  The goal is to have the picture completely finished before 2016 and it looks like I'm going to make the deadline.  I am stitching morning and night but the end is in sight.  Only two and half more pages to stitch and most of that is black (Mona Lisa's dress) so that will go very quickly.  Mona Lisa is not yet finished and I am already planning and setting up my next project.  That's what it's like to be me!  My next project is every bit as challenging as the Mona Lisa.  I have really enjoyed watching a famous work of art slowly come to life as I stitched so I just had to stitch my favorite painting-Van Gogh's Starry Night Over the Rhone. The colors are beautiful shades of blue, green and violet.  Starry Night is a Scarlett Quince pattern and uses a lot of blended colors.

Only two and half pages left!

This weekend I took a break from the Mona Lisa to knit a pair of mitts (finger-less gloves).  Last year I decided that these would be very useful to wear indoors or to layer under mittens. While I have several patterns for mitts with beading and fancy stitches, I just wanted a plain pair.  Webs (yarn.com) had a suitable pdf pattern on their website.  I chose to knit Valley Yarns Essential Mitts.  The pattern is easy and suitable for a beginner.  The M1L and M1R stitches (make one left, make one right) might be confusing but You Tube has an excellent tutorial.  My mitts were knit in Madeline Tosh DK merino wool in the Fathom color.  I was able to knit both mitts in a weekend which would make them suitable for a gift or stocking stuffer.

Finished Mitts
Now that the mitts are finished I am already planning my next knitting projects.  I can't wait for my Malabrigo Rastita yarn to arrive from Jimmy Beans Wool so I can start knitting the Odonata hat that was featured on Malabrigo's blog.  The pattern is available from Owl and Cat Designs on Ravelry.

In a few days I will also start working on a ballet wrap sweater.  Now that it's getting colder outside, the Yoga studio is so cold.  After pricing sweaters for Yoga and running jackets at a local sporting good store, I decided to knit my own sweater.  I stopped by Michaels to buy some yarn.  I chose Patons Classic Wool in deep purple.  The total cost of the wool was about $25, much better than the $90 price tag at the sporting goods store.  I am in the process of re-writing the hand knit instructions to instructions for the knitting machine.  The sweater has seed stitch ribbing which I will knit by hand.


Sunday, October 18, 2015

Woman Walking With A Stick

I wish that I had unlimited time to just draw and paint like Van Gogh did.  I have resigned myself to the reality that is just not going to happen because no matter how hard I try something else always takes precedence.  Every once in a while I put my foot down and say Enough, I'm spending the day in the studio! While I enjoy working on craft projects that is not enough for me, I need to draw or paint.

Vincent Van Gogh was not only a prolific artist, he was also an eloquent writer.  He included sketches or drawings in his many letters to his brother Theo.  I have several books of Van Gogh's letters complete with sketches.  Recently when I felt the need to draw, I chose a drawing from one of the books of letters.

Woman Walking With A Stick after Van Gogh.

There was something about Van Gogh's drawing of the old woman with a walking stick that touched my heart.  According to Van Gogh, it was a cold morning and the woman was walking, slightly bent, to work at the mines with a shawl wrapped around her head to protect her from the cold winds.

Van Gogh thought that the only way to improve as an artist to copy paintings by the masters.  He often copied the great Delacroix's work and drew and painted several versions of Millet's The Sower. I don't think that Van Gogh would mind that I copied the Woman Walking With A Stick and hopefully he might find my rendition of his work an acceptable tribute to him as an artist.  I did use the drawing in an art project to illustrate Robert Browning's poem because the woman seemed to illustrate the line "grow old with me, the best is yet to be."

A Silhouette Halloween

The Cameo is really getting a lot of use lately.  I'm really enjoying the flexibility of buying exactly the cutting files that I want and then modifying them to suit my needs.

This year I wanted to pull out all the stops and make Halloween special for the Trick-or-Treaters that come to our door.  We have always had the reputation among the neighborhood kids as the house with the cute decorations that gives out good candy but why rest on our laurels?  Some of the decorations from previous years were just too ratty to make it through another Halloween.  C'est dommage!  I fired up the Cameo and made yard signs, but why stop there?  There are so many cute designs available.  Who can resist Lori Whitlock's Bat candy bar wrapper or Jamie Lane's Spider Web tea light holder?  Not only were these cute but they went together quickly.

Candy bar wrapper and tea light holder.

Close-up of Spider Web tea light holder.

I made the candy bar wrappers in Halloween colors-purple, green and purple.  Only one wrapper (to fit a full size candy bar) would fit on a 12x12 inch piece of card stock so I cut the wrappers out of 8 1/2x11 inch card stock resulting in less wasted paper.  The wrapper can be resized to fit smaller candy bars.

The Spider Web tea light holder was just one of those must do projects because it's so different and so cute.  I made several and placed them along the stairs in the foyer and forgot about them.  Everyone who sees them wants to know where I bought them?  When I say that I made them, the next question is what are they made from?  They really don't look like they are made from card stock.  My husband thought they were made from craft foam and my daughter thought they were plastic.  Nope, just a battery operated tea light in a card stock holder!

Assembling the tea light holder is a little tricky and Jamie Lane no longer has the tutorial on her blog.  When removing the pieces from the cutting mat there will be a long piece perforated on both edges with tabs.  Fold the edges along the perforations and glue the tabbed end to the end with no tab. This should fit around the tea light.  Next glue the large solid circle to the outside (over the tabs) of the piece that wraps around the tea light. This is the base.Now glue the other large circle to the inside bottom.  It should cover the tabs and fit on top of the piece that formed the base of the tea light holder.  Press the top tabs down and glue the large circle with the opening in it to the inside of the top.  Then glue the other large piece over the tabs and on top of the previous circle.  Finally glue the smaller circles with the openings to the top of the tea light.  Insert the battery operated tea light in the holder.  Jamie Lane does have a tutorial on a snowman tea light holder that uses a similar construction process.


Saturday, October 17, 2015

Another Halloween Yard Sign

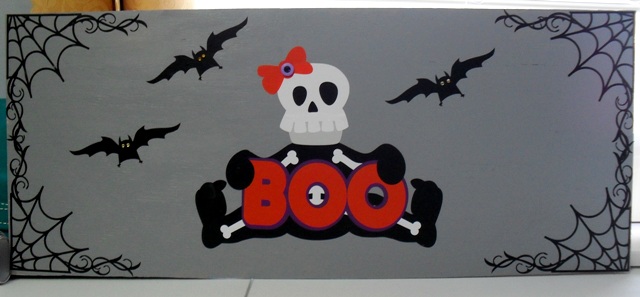
With just about two weeks left until Halloween I have been taking every opportunity to work on projects.  The candy wrappers and tea light holders are finished and will be posted tomorrow (hopefully).  The Boo sign is almost finished and ready to put out and the something wicked sign is in progress.

Boo sign just needs the stake and it's finished!

I thought this little skeleton was so cute and envisioned her as a sign.  All of my svg files are from the Silhouette Design Store but may be available directly from the designers to the owners' of other cutting machines:  Ghoulie Girl (Boo) is a Michele Renee Cloud 9 Design, Spider Web Flourish is a Silhouette Design and the bat came from Happy Halloween by Jennifer Wambach.  All pieces of the this design were cut from Orcal vinyl (available from My Direct Vinyl).


Directions for Boo:

Silhouette SVG cutting files: Happy Halloween by Jennifer Wambach, Ghoulie Girl by Michele Rene and Spider Web Flourish by Silhouette.

Orcal Vinyl for electronic cutting machines- black, orange, dark purple, grey and white.  Available at My Vinyl Direct, limited colors are available at Michaels

Americana Craft paint- Dolphin Grey- available at Michaels

DecoArt DuraCoat Varnish

Small purple button

Small yellow crystals for the bat's eyes

Wood available at Home Depot and cut to 24 inches long by 10 inches wide

Wooden stake available at Home Depot

Small Nails

Hammer


1.  Cut the wood to 24 x 10 inches and seal with water based craft varnish and let it dry.  Varnish again and let it dry. Paint the sign with the grey paint, let it dry and repeat.  Varnish with the DuraCoat and let it dry.

2.  Size the entire Ghoulie Girl to 9.75 inches on the Silhouette mat on the computer screen. Some pieces of the file won't be on the mat but that's fine.  Ungroup the file.  Move the body, the eyes, nose and hands on Mat 1 and open a new mat.  Group the bones and skull together on Mat 2.  Open Mat 3 and move the bottom of the skull (jaw) to this mat.  Open Mat 4 and place the bow, the center circle for the bow and the smaller BOO on it.  Finally place the BOO outline on Mat 5.

3.  Place the black vinyl on the cutting mat, select vinyl on the machine, adjust the blade and cut the images from Mat 1.  Cut the images on Mat 2 in white vinyl, images from Mat 3 in grey vinyl, images from Mat 4 in orange vinyl and the image from Mat 5 in purple vinyl.

4.  Center the body on the sign, approximately 2 inches from the lower edge of the sign.  Add the Skull, jaw and the bones to the body, center the purple Boo outline on the body and overlay the orange Boo before adding the hands.  Add the eyes, nose and bow.  Smooth out any wrinkles or air bubbles with your finger tips.

5.   Open the Spider Web Flourish onto the Silhouette mat on screen and resize to approximately 5.5 inches.  Click Copy and then paste to make three more webs.  Next open the Halloween title and ungroup the title and the bat. Move Halloween from the mat and delete it.  Group the pieces of the bat together and resize to 1.75 inches. Ungroup the bat and move the eyes from the image and delete them.  Click on the bat, copy and paste 7 more bats on the screen (8 total).  Arrange the Spider Web Flourishes on the mat so that on flourish is in each corner.  Place two bats is each of the open areas of the flourish.  Select cut, load the black vinyl on the cutting mat and send to Silhouette.

6.  Carefully weed the pieces of vinyl from around the spider web flourish, remove from the mat and place one flourish in the upper right corner of the sign, smoothing out any air bubbles. Place another flourish in the lower right corner of the sign.  The ends of the upper and lower flourishes will overlap at the middle of the sign.  Repeat this procedure on the left side of the sign.

7.  Arrange the Bats around the open area in the middle of the sign.  I used a grouping of three because odd numbers are more visually pleasing.  Glue the small crystals to the bat's face for eyes.

8.  Center the wooden stake on the sign so that the top of the stake is even with the top of the sign.  Nail the stake to the back of the sign at the top and the bottom of the sign.

Saturday, October 10, 2015

Crazy Hat Bear Gift Bag

Michelle loves the Minions so I decided to go with that theme for her upcoming birthday.  I found the cutest Minion slippers on Amazon.  Every time I see them they make me smile and after having them sitting around the studio for the past few weeks, I'm going to miss them.


Minion Slippers


Like most crafters with an SVG cutting machine, I am always looking for interesting cutting files.  One of my favorite sites is Kadoodle Bug Designs. While I was browsing the site for a suitable image for my gift bag I decided to checkout the Freebie section.  This week's freebie is the Crazy Hat Bear.  He's so cute with his Minion style hat.  I decided to use the jpg image from the downloaded file.


Crazy Hat Bear Gift Bag

Directions for Crazy Hat Bear Gift Bag:

Crazy Hat Bear zip file from Kadoodle Bug Designs
Medium white gift bag-available at craft stores
Pink Satin Ribbon
White card stock- letter size (8 1/2 x 11 inch)
Glue
Cutting machine with Print and Cut capability- I used Silhouette Cameo (directions will be for the Cameo)

1.  Download the Crazy Hat Bear file from Kadoodle Bug Designs.  Unzip the file and export the jpg file to the Silhouette machine.

2.   Open the Silhouette mat and resize the mat to letter size.

3.   Import the Crazy Hat Bear image to the mat and resize to 8.465 x 8.465 inches.

4.  Add the registration marks to the Silhouette mat.  Make sure the bear fits within the registration marks.

5.   Load a sheet of white card stock in the printer. Send the image to the printer.

6.  Open the Trace window and turn off the high pass filter and increase the threshold until most of the image is blocked out in yellow.  The area inside the eyes may not be blocked out but that will not affect the cutting.  Select Trace Outer Edge option.  There should be a red outline around the outside of the image.

7.  Open the Cut window and select cut outer edge.  There should be a thick red line around the outside edge of the bear. Place the printed image on the Silhouette cutting mat and load into the machine and select cut.

8.  Unload the cutting mat from the Cameo and remove the cut image.

9.  Apply glue to the back of the bear and attach to the front of the gift bag.  Cut a piece of pink satin ribbon long enough to tie around the top of the handles of the gift bag and tie in a bow.