Tuesday, March 29, 2011

Mickey Birthday Card

Brittany loves Mickey Mouse so he was the perfect choice for a birthday card for her. I decided to contrast the bright colors of Mickey and Pluto with a softer aqua and grey palette. I didn't add the white to Mickey's eyes because I was trying to make him look more like Steamboat Willie (the first Mickey).


Directions for Mickey Birthday Card:

Cricut Mickey and Friends cartridge
Cricut Classic Font cartridge
Sizzix Textured Impressions Valentine Set #4-Hearts & Dots
Light aqua, dark aqua, white, green, purple, yellow, red, light tan, pink, light grey and dark grey card stock
My Minds Eye Glitter Stack- aqua glitter dotted card stock
White lace edging
Gold self stick beads
Martha Stewart branch paper punch
Tattered Angels Glimmer Mist pearl mist
Recollections Boutique Fleur Mulberry Paper Flowers-available at Michaels
Foam Dots

1. Fold a piece of 8 1/2 inch (21.59 cm) by 11 inch (27.94 cm) light grey card stock in half lengthwise. Crease it with a bone folder.

2. Using the Mickey and Friends cartridge press the Mickey and Pluto key and cut it at 3 inches out of black card stock. Press the Layers:Face/White key and cut Mickey's face out of light tan card stock. Press the same key and the shift key and cut the eyes and gloves out of white card stock. Press the Layers: Outfit/Tongue key and cut Mickey's pants out of red card stock. Press the same key and the shift key to cut the tongue out of pink card stock. Load yellow card stock into the Cricut and press the Layers: Shoes/Ribbon/Hat key to cut Pluto's body and Mickey's shoe. Press the same key and shift to cut Pluto's collar out of purple card stock. Assemble Mickey and Pluto.

3. Cut Happy Birthday at 1 1/2 inches out of dark aqua card stock using the Cricut Classics Font cartridge.

4. Cut a piece of light aqua card stock 4 1/2 inches (11.43 cm) long by 3 1/2 inches (8.89 cm) wide. Place the card stock in the Hearts and Dots embossing folder and emboss it. Attach Mickey and Pluto to the embossed card stock using foam dots.

5. Cut a piece of dark grey card stock 3 3/4 inches (9.53 cm) wide by 4 1/2 inches (11.43 cm) long. Spray it lightly with pearl Glimmer Mist and let it dry. Cut a piece of aqua glitter dotted card stock 5 1/2 inches (13.97 cm) long by 3 3/4 inches (9.53 cm) wide. Place the dark grey card stock at an angle and glue to the aqua glitter dotted card stock. Use foam dots to attach the embossed card stock to the grey/aqua layered card stock. Place a gold bead in each corner of the embossed layer. Glue image 1 3/4 inches (4.45 cm) from the bottom of the card.

6. Center Happy Birthday over the image and glue in place.

7. Cut the white lace edging the length of the card and glue just under the front edge of the card.

8. Attach a foam dot to the back a peach colored mulberry flower. Position the flower at the lower left edge of the card and press in place.

9. Punch 2 branches out of green card stock using the Martha Stewart branch paper punch. Glue the branches under the edges of the flower.

Sunday, March 6, 2011

Making Quilted Fabric

I have been searching since last year for a case to fit my over-sized sunglasses. All I have been able to find are very large clam shell style cases, which took up a lot of space in my fairly large handbag. Either the stores are stocking a lot of these glass cases on their shelves or they just are not selling well. I suspect it's the latter because most women don't want to carry one of these bulky, heavy clam shell cases in their handbags. Since the soft cases don't seem to exist, once again I must design my own.

After a quick stop to my local fabric store and about $5 in fabric and thread, I had the necessary materials to make my own quilted fabric. I have done a lot of quilting but have never attempted to make a quilted fabric. I measured my sunglasses and drew a simple pattern on a piece of white paper. I used a quilting pencil to draw light lines on the diagonal, 2 inches apart, on the paisley fabric. Next I layered quilt batting between the fabric layers and quilted on the lines. Then I turned the piece so that I could repeat the process on the opposite side. You are trying to quilt a diamond shape.

Fabric and batting layers.

Diagonal lines drawn with white quilting pencil. For a better view of the lines, click on the picture to enlarge it.

Reverse side of quilted fabric showing diagonally quilted lines making a diamond shape.

Pattern for sun glass case placed on folded edge of fabric.


Finished sun glass case.


Making quilted fabric is easy and only requires basic sewing skills. Given both the cost and ease of making the fabric, I would definitely do this again. This fabric could be used to make other purse accessories ( cosmetic bags, mp3 cases, etc.) and the best part is that I can choose any pattern of fabric that the fabric store stocks. If you plan to make multiple accessories I suggest that you buy fabric by the yard rather than use the fat quarters.


Directions for Quilted Fabric Sun Glasses Case:

1/2 yard cotton print fabric-I used a black background paisley print.
1 fat quarter cotton print fabric, in a coordinating color-I used a purple print.
Piece of quilt batting
Gutterman polyester thread to coordinate with fabrics and JP Coates quilting thread in Ecru
Quilting pencil or #2 pencil
Ruler
Straight Pins


1. Iron the fabrics. Fold the fabric pieces and cut off the uneven ends. Cut the paisley fabric to the same dimensions as the fat quarter.

2. Cut a piece of quilt batting 2 inches larger on all sides than the pieces of fabric.

3. Starting at one corner of the paisley fabric measure approximately 2 inches from the top and draw a line diagonally across the fabric. Measure approximately 2 inches down from the line that you just drew and draw another diagonal line. Repeat this process until you come to the end of the fabric.

4. Lay the purple print fabric on a table with the wrong side facing up and the right side facing the table. Next place the quilt batting on top of the fabric and then place the paisley fabric right side facing up on top of the batting. Pin the layers in place.

5. Thread the bobbin of the sewing machine with the Ecru quilting thread and then thread the Gutterman thread through the sewing machine guides and needle.

6. Starting at the edge of the fabric, using the diagonal lines as your guide, sew along the lines. Sew each diagonal line until the entire fabric has been quilted.

7. Turn the fabric and mark lines on the diagonal about every 2 inches. These lines will run across the previously quilted lines. That's perfectly all right because we are trying to achieve a diamond effect in the quilting (refer to pictures above). Sew the lines along the diagonal marks that you just made until the entire piece has been quilted. Lightly press the fabric with an iron.

8. Cut a piece of paper 3 3/4 inches wide by 7 1/2 inches long. This is your pattern. Round the corners on the right side of the pattern. Fold a piece of the quilted fabric in half and place the long un-rounded edge of the pattern against the fold. Pin the pattern in place and cut along the lines.

9. Cut 2 strips of paisely fabric 1 1/2 inches wide. Sew the strips together at one end. Press the seam open. Fold 1/4 inch under on the right side of the strip ( the length of the strip) and press. Repeat the process on the left side of the strip. Fold the strip in half lengthwise and press.

10. Pin the strip along the edges of the sun glasses case to bind the raw edges. Sew along the open edge of the binding, removing the pins as you sew. Sew slowly around the rounded edges, moving the binding along with the fabric as you sew to avoid bunching the fabric.

11. Fold the finished case in half and press lightly. Pin the bottom and the edges of the case together. Measure 3/4 inches from the top edge of the case and mark it with a pin. Sew the case together along the outside, starting at the bottom, folded edge. Continue sewing along the edge of the case until you reach the marked area.

Saturday, February 19, 2011

Frog Quilt

I'm always looking for inspiration for my projects. Sometimes the most ordinary things can be the most inspiring. Coco Chanel made a necklace using the paper clips that were laying on her desk. The inspiration for this wall hanging came from a shower curtain. I traced one of the frogs and two of the flowers from the shower curtain on to a piece of tracing paper to make a pattern. Although it may not look like it, the frogs and the flowers were made from the same Bali print fabric.


Directions for the Frog Quilt:

1/2 yard Bali print fabric I chose a multi-colored blue, green, pink and yellow print and positioned the pattern pieces on different areas of the fabric to get the multi-colored effect.

1 yard print fabric that compliments the Bali print fabric

1/2 yard of white fabric

1/2 yard of gold fabric

quilt batting

Heat and Bond


1. Trace frogs and flowers of your choice onto a piece of tracing paper. Trace the pattern that you just made onto a piece of Heat and Bond.

2. Pre-wash and dry all of the quilt fabrics. Fuse the frogs and flowers onto the Bali print fabric following the manufacturers instructions. When fusing place the wrong side of the fabric face up on the ironing board and lay the Heat and Bond piece on top of the fabric.

3. Cut a piece of white fabric 16 inches high by 14 inches wide. Place the frogs and flowers on the white fabric and fuse in place. I placed the frogs on opposite corners and the flowers along the center.

4. Cut two strips of gold fabric 2 inches wide by 19 1/2 inches long. Cut two more strips of gold 2 inches wide by 13 3/4 inches long. Sew the 13 3/4 inch strips to the sides of the white fabric using 1/4 inch seams. Next sew the 19 1/2 inch strips to the top and the bottom of the white fabric.

5. Cut two pieces of print fabric 17 inches long by 3 1/4 inches wide and two pieces 26 inches long by 3 1/4 inches wide. Sew the 17 inch strips to the gold borders at the top and bottom of the quilt. Then sew the 26 inch strips to the gold borders at the sides of the quilt using 1/4 inch seams.

6. Cut a piece of batting and a piece of print fabric three inches longer on all sides than the top of the quilt. Layer the quilt top, batting on top of the print fabric. The batting should be layered on top of the wrong side of the print fabric. Quilt the outline of the frogs and the flowers. Stitch around the gold borders. Trim the excess fabric and batting away. Cut two strips of print fabric 1 1/2 inches wide by 28 inches long and two strips 1 1'2 inches wide by 19 inches long. Fold in half lengthwise and press. Fold under 1/4 inch on the end of the binding and sew along the side edge of the quilt. Trim the excess fabric away leaving 1/4 inch of fabric to fold under. Fold the binding over the edge of the quilt and sew in place by hand along the back edges of the quilt. Repeat the process with the 19 inch strips, sewing them along the top and bottom of the quilt,

Wednesday, February 9, 2011

Hello Kitty Valentine Card

I just love Hello Kitty because she's so cute and sweet. She's just perfect for a Valentine's Day card. The best part about this card is that it uses the left over card stock pieces from other projects.


Directions for the Hello Kitty Valentine's Day Card:

Cricut George and Basic Shapes and Hello Kitty cartridges
Dark pink, light pink, white, black and green card stock
Cream satin ribbon
K & Company Felt Valentine Roses (available at Michaels)
K & Company pink print Valentine's paper
Got Flowers? Iced Flowers- Aqua
Small brads- I used a flower shaped brad for Hello Kitty's bow and a round one for her flower
Martha Stewart Heart Border punch and Rose Leaf paper punch
Microsoft Word
Cuttlebug Swiss Dots embossing folder
Sanding pad


1. Type Be Mine in Microsoft Word using the Monotype Corsiva font at 36. Change the font color to red and print Be Mine on white paper. Trim to approximately 2 inches long by 1 inch high.

2. Using the Cricut George and Basic Shapes cartridge cut a heart at 4 inches out of dark pink card stock. Emboss the heart using the Cuttlebug Swiss Dots embossing folder. Lightly sand the raised dots to highlight them.

3. Cut Hello Kitty 2 at 3 inches out of black card stock. Press the fur key and cut Kitty's face and paws out of white card stock. Press the clothes key and cut her dress out of light pink card stock. Cut it again out of the dark pink card stock. Press the clothes and shift keys and cut her bow out of dark pink card stock. Assemble Kitty using the dark pink pieces for her shirt. Color her nose with a yellow marker. Place a flower shaped brad in Kitty's bow. Use a small aqua flower for the flower in her hand. Attach a small round brad to the center of the flower. Cut a small piece of green card stock for the flower's stem.

4. Use the Heart Border punch to punch a border out of dark pink card stock. Save the small hearts left over from the border. You will use these to accent the card.

5. Cut a piece of pink Valentine paper 5 inches wide by 7 1/2 inches high. Glue a piece of cream satin ribbon 1 inch from the bottom edge of the paper. Tie a small bow and glue it to the ribbon. Glue the dark pink heart border along the right edge of the paper. Fold a piece of white card stock in half lengthwise and crease it with a bone folder. Glue the pink Valentine paper to the white card stock leaving a white border around the top and bottom of the card. Apply foam dots to the back of the heart and attach it approximately 1 3/4 inches from the bottom of the card. Attach foam dots to the back of Kitty and center her on the heart. Press her in place.

6. Place a red felt rose in the upper left hand corner of the card. Punch two leaves out of green card stock using the Rose Leaf paper punch. Glue the leaves under the edges of the rose. Glue Be Mine at an angle above the heart on the right hand side of the card. Glue the small dark pink left over hearts in opposite corners of the Be Mine greeting. Randomly glue the hearts around the pink Valentine's paper.

Wednesday, January 26, 2011

Tribute To Mozart

It's snowing again! It seems like we get snow at least one day each week. If the weather forecast is accurate we may see a foot of snow. This looks like the perfect opportunity to head off into my studio to work on a project.

The Cricut Quarter Note cartridge has been sitting on my drafting table for a while. I wanted to use the cartridge but never could find a way to incorporate the images into a project until now. Mozart is my favorite composer and I love his music, especially his divertmenti. Since tomorrow (January 27) is Mozart's birthday I decided to do a project that honors him.

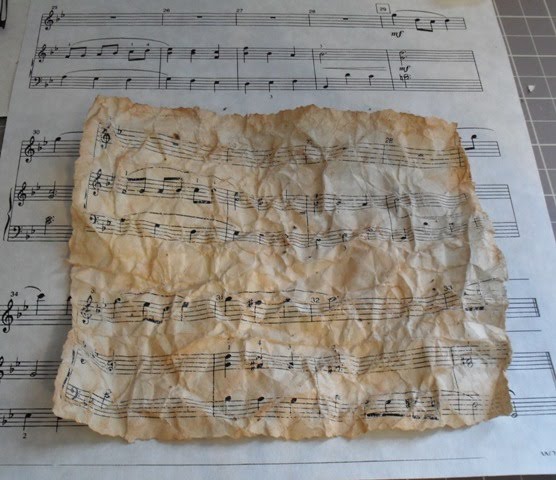
I started by printing some sheet music on parchment paper and then soaked it in coffee to age it.
The picture below shows the music printed on parchment and the smaller coffee aged piece on top of it. After the coffee aged piece dried I carefully crumpled it into a ball, unrolled it and repeated the process. Next I made a wash of sienna and dark umber watercolors and lightly painted them over the crumpled sheet music. I repeated this until the parchment was sufficiently aged. Once the piece was completely dry I trimmed the edges of the paper with deckle edge craft scissors and roughed up the edges with a fine grit sanding pad. I highlighted the creases in the paper and the edges with distressing ink. I wanted the music to look very aged, almost as if Mozart while working on the piece could have crumpled it up and thrown it away.


Here's the finished project.


Directions for Tribute to Mozart:

Cricut Quarter Note cartridge
Black, burgundy and cream card stock
Parchment and white paper
Metal Leaf (I used a mix of gold, copper and silver leaf pieces)
Recollections self adhesive gold beads
Tattered Angels Pearl Glimmer Mist
Tim Holtz Tea Dye Distress Ink
Color Box Gold Pigment Ink
Pearl Ex Gold Powdered Pigment
Small Stenciling Brush and soft paint brush
Sizzix Damask embossing folder and embossing machine
Fine grit sanding pad
Deckle edge craft scissors
Foam Dots
Sienna and dark umber watercolors
Frame


1. Load the Cricut Quarter Note cartridge into the Cricut machine and cut the Violin at 4 inches out of black card stock. Press the Shift and the Violin keys and cut the violin out of cream card stock. Emboss the cream violin using the Sizzix Damask embossing folder. Use the Tim Holtz Tea Dye Distress Ink to darken the violin until it becomes a soft light brown color . Glue the distressed cream layer on top of the black violin. Spray lightly with Pearl Glimmer Mist and let it dry. Highlight the raised areas of the violin with the gold pigment ink. Immediately apply the Pearl Ex gold pigment to the areas you just highlighted. Lightly brush off any loose pigment and let the violin dry. Attach the gold beads to the violin's tuning keys. Using the Quarter Note cartridge press the Phrase key and cut The Gift of Music out of black card stock. Press the Shift and Phrase keys and cut the same phrase out of burgundy card stock. Assemble the pieces and lightly spray with Pearl Glimmer Mist. Set aside to dry.

2. Scan a piece of sheet music into the computer and print it on parchment paper with a laser printer (or photo copy the music on parchment paper). Do not print the music on parchment paper with an ink jet printer or the ink will run when you soak the paper in the coffee. Soak the music in coffee until the desired color is achieved. Let the parchment dry completely. Carefully crumple the parchment into a ball and unroll it. Repeat the process until the paper is visibly creased. Make a wash of sienna and dark umber watercolors and lightly paint them over the paper. Repeat the process until the paper is a light amber color. Let the paper dry completely. Cut the edges of the paper with deckle edge craft scissors. Use a fine grit sanding pad to rough up the edges of the paper and distress it. Apply the Tea Dye Distress Ink to the edges of the paper and to the creases in the paper.

3. Print a picture of Mozart on white paper. You can use an inkjet printer. Glue the picture to a piece of black card stock approximately 3 1/2 inches wide by 4 inches high. With an A2 glue pen apply glue to one edge of the card stock at a time. Apply pieces of metal leaf to the edge of the picture with a small stencil brush. Work the leaf into the glue, brushing away any excess metal leaf. Repeat until all edges of the picture have been framed. Set aside to dry. Cut another piece of black card stock 3 3/4 inches wide by 4 1/4 inches high. Glue the picture of Mozart to the card stock leaving a 1/4 border on all sides.

4. Center the aged sheet music on a piece of parchment card stock and glue in place. Attach foam dots to the back of the Mozart picture, center on the sheet music and press in place.
Center the phrase over the top of the sheet music and glue in place. Attach the violin in the lower right corner of the music with foam dots and press in place. Frame the finished piece.

Saturday, January 22, 2011

Poodle Valentine Card

The Cricut Paper Pups cartridge is so cute and versatile. I really like this cartridge and wanted to use it to make another Valentine's Day card for my husband (who has been banned from reading my blog until Valentine's Day is over). Thursday we had a wintery mix (snow and ice) so it was a good day to work on some cards. Like the last two cards I decided to use a French verse for the greeting. Mon amour pour toi est eternal (My love for you is eternal) just seemed to work well with this card.


Directions for Poodle Valentine Card:

Black, dark pink, pale pink, green and light grey card stock
K & Company Black and White patterned card stock
Cricut Paper Pups cartridge
Spellbinders Nestabilities Labels Nine; Sizzix or other die cut machine
Pink ribbon with white hearts
Clear stick on rhinestones
Martha Stewart Holidays Paper Rose Embellishments
Martha Stewart Lace Heart border punch, Rose Leaf paper punch and Lace Heart edge punch
Bone folder
Large and small foam dots
Tattered Angels Pearl Glimmer Mist
1. Fold a piece of light grey card stock in half lengthwise and crease with a bone folder.

2. Use the Martha Stewart Lace heart edge punch to punch a heart out of dark pink card stock. Next punch a heart border out of the same card stock using the Lace Heart border punch. Save four hearts from the border punch left overs.

3. Place a piece of black and white patterned card stock on top of the Spellbinders large label and cut it with the Sizzix or other die cut machine. Cut a piece of pink and white heart patterned ribbon to fit the lower edge of the label and glue in place. Tie a small bow and glue in the center of the ribbon.

4. Cut a piece of black card stock 4 inches wide by 4 1/2 inches high. Glue the pink lace heart border under the bottom edge of the black card stock. Place foam dots on the back of the label. Center the black and white label on the black card stock and press in place. Glue the four small left over hearts in each corner of the black card stock. Glue the black card stock framed poodle approximately 2 1/2 inches from the top of the card.

5. Using the Cricut Paper Pups cartridge press the solid key and cut a 2 3/4 inch poodle out of pink card stock. Turn off the solid key and cut a poodle out of light grey card stock. Assemble the poodle and spray lightly with Tattered Angels Pearl Glimmer Mist. When the poodle is dry color the nose black and fill in the eye area (add eyelashes if desired) with a fine point black marker. Place three small rhinestones around the poodle's neck to make a collar. Put several small foam dots on the underside of the poodle. Attach the poodle to the label just above the ribbon.

6. Center the dark pink lace heart under the pink lace heart border and glue in place.

7. Print Mon amour pour toi est eternal or the Valentine's greeting of your choice on white paper, using Microsoft word and Monotype Corsiva font at 18. Trim the paper to approximately 3 inches wide by 3/4 inches high and glue on to a piece of dark pink card stock. Leave a small border around the white paper. Cut a piece of black card stock slightly larger than the piece of dark pink and glue the previous layers on top of the black. Position the framed greeting at a slight angle across the top left portion of the card.

8. Place two light pink and one dark pink rose in the upper right hand portion of the card, overlapping them slightly. Press in place. Using the green card stock and the Martha Stewart Rose Leaf paper punch, punch out three leaves and glue them under the edges of the roses.

Thursday, January 20, 2011

Cheshire Cat Valentine Card

Cricut has just released the Disney Classics cartridge. The cartridge contains several images from Alice In Wonderland including the Cheshire Cat. I received my cartridge yesterday and couldn't wait rip open the box and start working on a project. I just had to incorporate the Cheshire Cat, with his cool smile, into a Valentine's Day card for my husband. I chose Je pense a toi (I'm thinking of you) for the greeting because it just seemed to fit the character and it gave me another opportunity to use my French.


Directions for Cheshire Cat Valentine Card:

Cricut Disney Classics cartridge
Light grey, pale pink, dark pink, black, yellow, dark purple, medium purple, dark green and white card stock
Wilton heart shaped lace doily
Pink dotted sheer ribbon
Recollections pearls
Cuttlebug Swiss Dots embossing folder and embossing machine
Tattered Angels Pearl Glimmer Mist
K & Company Valentine Felt Roses
Got Flowers? pink and cream colored flowers
Martha Stewart Lace Heart border punch and Rose Leaf paper punch
Foam backed mouse pad
Dry embossing stylus (ball tip at each end)


1. Fold a piece of light grey card stock in half lengthwise and crease using a bone folder.

2. Cut a piece of medium purple card stock 4 1/2 inches wide by 4 1/4 inches high and emboss it using the Cuttlebug Swiss Dots embossing folder. Lightly sand the embossed surface to highlight the dots.

3. Glue the heart shaped doily 1/2 inch from the right edge of the embossed card stock.

4. Load the Disney Classics cartridge into the Cricut. Place a piece of black card stock on the Cricut mat and cut Cat 2 at 3 inches. Press the shift key and cut the top of the cat's head out of dark purple card stock. Press Layer 1 and cut the tail, ears, paws and mouth out of pale pink card stock. Press the shift and Layer 1 keys and cut the mouth out of white card stock. Cut the eyes out of yellow card stock by pressing Layer 2. Press Layer 2 and shift to cut the stripes out of dark pink card stock. Load pale pink card stock into the Cricut and press Layer 3 to cut the alternating stripes. Assemble the cat.

5. Spray the cat lightly with Glimmer Mist and let it dry. Attach foam dots to the cat and position him to the left edge of the heart.

6. Use the Martha Stewart Lace Heart border punch and pale pink card stock to make a heart border. Glue the border to the bottom edge of the embossed card stock. Attach the Recollections pearls to each corner of the embossed card stock.

7. Apply foam dots to the back of the embossed card stock. Position the piece 2 inches from the bottom edge of the card.

8. Type the Valentine greeting of your choice in Microsoft Word using the Minya Nouvelle font at 18 and print it out. Cut a tag out of dark purple card stock and glue the greeting to it. Glue the hearts left over from the punched border to the top and the bottom of the tag. Tie a small piece of pink dotted sheer ribbon to the end of the tag. Tuck the end of the tag under the embossed card stock and glue in place. Glue three small hearts left over from the heart border next to the cat's head.

9. Punch six leaves out of green card stock using the Martha Stewart Rose Leaf paper punch. Lightly fold each leaf in half lengthwise. Turn a foam mouse pad upside down to expose the foam backing. Place a leaf on the mouse pad and use a stylus to lightly press veins into the leaf.

10. Attach a felt rose to the bottom center of the card. Arrange the off white and pink flowers around the bottom of the card, alternating pink and off white. Glue the flowers in place. Glue the leaves under the edge of the flowers. Attach a Recollections pearl in the center of the flowers.