Wednesday, March 27, 2013

Pastel Yorkie

Next to Afghan Hounds, Yorkies are one of my favorite breeds of dogs. My friend Sue owns several  Yorkies and I used one of her dogs as the inspiration for this painting. The dog I chose to use for the painting had the most beautiful eyes and the sweetest face. The weekend before I presented her with the painting her dog suddenly become very ill and died in her arms before the Vet arrived at her house. I felt so sad about the loss of her favorite dog but she was happy to receive the painting as a remembrance of him.

I had requests to show my work in progress. Here's the working sketch and the preliminary painting on toned Canson paper.

This is the finished painting.

Tuesday, March 12, 2013

Art Deco Thank you Card

I really love the Art Deco period. When Cricut came out with the Art Deco cartridge, I just had to make it part of my library. For this project I started with the Killjoy and greyhound images and worked from there. Once I chose the background papers, Merci rather than Thank you seemed to be more appropriate.


Directions for Art Deco Thank you:

Cricut Art Deco Cartridge
DCWV Tres Chic mat stack, Primrose paper stack
Light grey, grey dark pink, black, brown, cream, olive green and black and white print card stock
Recollections small self adhesive rose
Recollections small clear crystals and small pale blue crystals
Martha Stewart leaf punch
Recollections pink mesh on a roll
Colored pencils
Zots  and small foam dots


1.  Cut Killjoy at 5 inches out of cream card stock. Press Killjoy and the shift keys to cut her clothes out of dark pink card stock. Press Layer and Killjoy to cut her hair and shoes out of brown card stock and repeat with black card stock. Press Layer, Shift and Killjoy to cut her hat band and scarf out of black and white print card stock.. Assemble Killjoy, replacing the brown for the black hair. Disguard the rest of the brown pieces. Use colored pencils to add highlights to Killjoy's dress, skin and facial features.

2.  Cut the Greyhound out of the grey card stock at 2 inches. Press Greyhound plus shift and cut the rest of the dog out of the light grey card stock.. Cut the collar out of dark pink.  Glue the narrow dark pink collar on top of the wider dark pink collar and embellish with three small crystals. Using grey colored pencils  add highlights to the dog's body and legs.

3. Using a card program and the half fold option print Merci on the front of the card. Fold the card in half and crease down the center.

4.  Cut a piece of harlequin paper from the Primrose stack, approximately 5 1/2 inches high by 4 7/8 inches wide. Center on the card and glue 1/4 inch from the bottom of the card.

5.  Cut the Eiffel Tower print from the Tres Chic mat stack approximately 4 1/4 inches high by 4 inches wide.  Attach Zots to the back of the print and position it 2 inches from the bottom of the harlequin paper edge and 1/2 inch from each side of the harlequin paper edge.

6.  Add foam dots to the back of Killjoy and position her along the bottom of the harlequin paper and slightly to the left of the Eiffel Tower.  Place foam dots on the back of the dog and position him slightly in front of Killjoy. Attach a string of small pale blue crystals from Killjoy's hand to the dog's collar for a leash.

7.  Place a small pink rose in the upper right corner of the mat stack. Punch 2 leaves out of olive green card stock. and glue under the rose.

8.  Cut a strip of pink metallic mesh 5 1/2 inches long and press in place 1/4 inch above Merci.


Tuesday, March 5, 2013

Charcoal Cheetah


Lately it seems that everything seems to take precedence over my art work. Yesterday I decided that working in my studio was my top priority. I walked into my atelier and saw the Cheetah sketch that I had made last month still lying on the corner of my drafting table along with some Strathmore grey toned paper that I had recently bought. I was anxious to work with the toned paper and had laid it on the desk hoping to find a suitable project. The Cheetah sketch was done in Pigma black ink on white paper. I decided to re-work the Cheetah on the toned grey paper with vine charcoal. The tonal greys of the charcoal and the paper give the finished drawing a softer look than the original sketch.


Monday, March 4, 2013

Beaded Scarf

Last night I started working on a beaded scarf from Knitting in the Details by Louisa Harding to try to take my mind off of my upcoming back surgery. The pattern called for a cotton/bamboo blend yarn but I substituted Grace hand dyed, a merino wool/silk blend, instead. Knitting with beads is not difficult, but it does take some extra time to string the beads onto the yarn before knitting.

I love Louisa Harding's designs and yarns, her patterns are well written and the charts are easy to read. I love how this scarf is turning out and can't wait to finish it, although I doubt it will be finished before my surgery, which has been pushed up to the end of the week.  One thing that I do have to mention is that this project eats up beads. I have already used almost one tube of beads just on this portion. The pattern calls for 290 beads. I don't know how many beads are in the tube and I had no desire to count them, so I headed off to Michaels to buy 3 more tubes of beads. Hopefully 5 tubes of beads will be enough to complete the project.

Scarf In Progress, beads have been strung on the yarn.


Bottom ruffle is completed.


First pattern repeat is completed.

Friday, February 22, 2013

Wishing For Spring

Winter just won't go away. Those of us living in Maryland have been fortunate not to have had a lot of snow this year, but we have had our share of miserable weather. We have had snow, freezing rain, sleet or a combination of all three every week this winter. Yesterday was one of the rare bright sunny days so I took advantage of it to run some errands. Even though the sun was shining, it was still very cold and windy.


Home Depot was my last stop. One last time to get out of the car and brave the icy wind before heading home. My husband sent me to home depot to pick up trays to start his tomato plants. While walking from the garden center to the check out, I found a display of orchids. I was mesmerized by the blue orchids. They were beautiful and unusual and I had to have one. I started to read the tag about orchid care and quickly became disillusioned by the blue orchid. The tag stated that the plant was actually a white orchid infused with blue dye and the new blooms would be white. Sadly I put the blue orchid back on the shelf and walked away. While walking to the check out I found another display of orchids in lavender, pinks and light coral (all natural colors and half the price of the fake blue one). A beautiful lavender orchid caught my attention so I decided to buy it and bring it home as a little present to myself to help me cope with what's left of winter.


Monday, February 11, 2013

Panda Box

I'm always saying that there are never enough hours in the day for me to get everything accomplished, but some how I can find time to decorate a shipping box. There's always time for art! Decorating shipping boxes is a fun, quick, creative project and everyone seems to like them. The man at the UPS store told me that they enjoy the decorated boxes and Brittany likes coming home from a long day at the University to find a cheerful box waiting on her door step.


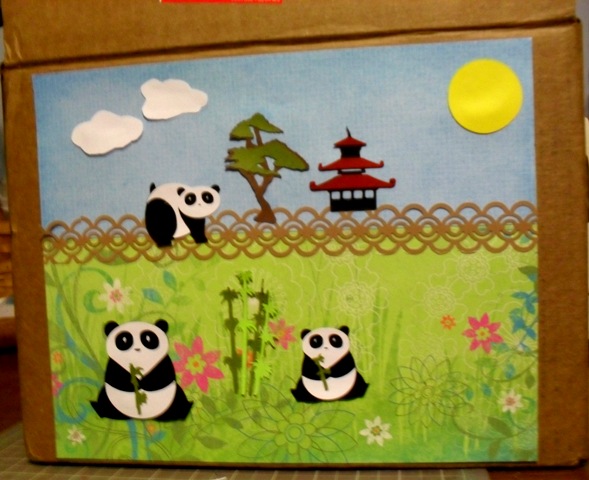
After a stressful day at work, I headed off to my atelier with the my plain brown box. I didn't have a clear vision of the finished project before I started. I knew I wanted a Panda scene and worked from there. I fired up the Cricut and cut the Pandas, bamboo and the pagoda. Next I pulled several sheets of paper and card stock-for the sky and ground and placed the images against the papers that I had chosen until I found the paper that worked well with my images. I placed the paper on the shipping box and marked the measurements for the ground and sky on the paper. I constructed the entire scene before gluing anything down. The scene needed some elements in the sky, so I hand cut a sun and some clouds. When I was satisfied, I glued everything in place and then covered the entire scene with clear shipping tape to protect it. By the time that I had finished my project I was no longer stressed out. Art is such a great way to relieve stress. I get so absorbed in my projects, whether it is painting or Cricut, that I lose all track of time.

Directions for Panda Box:

Medium size brown shipping box- I recycled a box.
Prima Marketing Sasha Paper Collection- green background paper with flowers
Blue paper for sky
White, black, brown, red, yellow, light green and olive card stock
Cricut  Paisley Cartridge
Circle cutter or small round object to cut the sun
Martha Stewart Bangle Chain border punch
Aleene's Clear Tack craft glue


1.  Cut the Sasha green flower print paper to approximately 6 inches. Cut the blue paper to approximately 6 inches. Position the blue paper so that one inch is under the edge of the green flower paper. The blue sky should measure approximately 5 inches high. Glue the paper so that the flower paper over laps the blue paper by one inch.

2.  Using the Cricut paisley cartridge cut one 2 inch sitting Panda out of the black and white card stock. Cut a 1 1/2 inch sitting Panda and a 1 1/2 inch standing Panda out of the black and white card stock. Assemble the Panda's.

3.  Cut the bonsai tree out of the brown and olive card stock at 1 1/2 inches and the Pagoda out of the red and black card stock at 1 1/2 inches.  Using scissors cut a small branch from the bamboo for the Panda to hold. Cut the bamboo at 1 1/2 inches out of light green and olive card stock. Assemble the bonsai tree, bamboo and the Pagoda. Glue the hand cut bamboo branch in the Panda's hands.

4.  Use the Martha Stewart Bangle Chain border punch to punch a border the length of a 12 x 12 inch piece of brown card stock.

5.  Position the background green flower/blue sky paper on the box. Once you like the placement glue it in place with Aleene's Clear Tack craft glue.  Position the large and small sitting Panda's so that they are sitting in a field with flowers and glue in place.

6.  Position the brown bangle chain border so that it covers the seam between the ground and the sky and glue in place.

7.  Center the bonsai tree on the top part of the border and glue in place.

8.  Glue the Pagoda on top of the border just to the right of the bonsai tree.  Glue the small standing Panda to the left of the bonsai tree. Position the Panda on the center of the chain just above the bottom loops.

9.  Use a small round object or a circle cutter to cut a small sun out of yellow card stock. Glue the sun to the upper right of the picture. Lightly draw free form clouds, with a pencil, on white card stock. Cut the clouds out with scissors. The clouds don't have to perfect, in fact it's better if they are not. Glue the clouds to the upper left portion of the picture.

10.  Once all of the glue is dry cover the entire picture with clear shipping tape. Position the tape so that the edges meet and no portion of the picture is left unprotected. This step is necessary to make sure that your decorated box arrives at it's destination in tact. My box traveled to Connecticut via UPS and arrived unharmed. The box was in such good shape that Brittany's room-mate wanted to use it to pack some of her clothing to take back to Turkey for the summer break.

Saturday, February 9, 2013

Kitty Thank you Card

I was standing in the check out line in the grocery store and noticed a display of greeting cards with a "hand made" touch. I picked up a cute card with a die cut bird and bird house on the front. I contemplated buying the card until I turned it over to look at the price. I was in sticker shock- $7.95 for a card with a few die cuts on it? There was no way that I could ever justify the price when I have a Cricut at home.


Although this is a thank you card, it could be used for other occasions by changing the greeting. I almost decided to use theme for a Valentine's Day card instead.


Directions for Kitty Thank you Card:

Recollections small white roses
Tattered Angels Glimmer Mist-Cherry, Pearl
Martha Stewart Heart Border Punch, leaf paper punch
Pink ribbon with white hearts
Recollections adhesive backed small crystal hearts, pearls
White, black, light pink,cream and olive green card stock
DCWV Tres Chic mat stack- pink and black print card stock
Cricut Four Legged Friends cartridge
Bone folder
Zots
Small foam dots


1.  Print the greeting on a piece of white card stock using the half fold option.  Fold the card in half and crease it with a bone folder.

2.  Using the Cricut Four Legged Friends cartridge cut Cat 5 at 2 1/2 inches out of white card stock. Press the shift key and cut Cat 5-S out of cream card stock. Press the Layer key and cut the ear, nose and collar out of light pink card stock. Press the Layer and Shift keys and cut the eye lashes out of black card stock. Assemble the cat. Lightly spray Kitty with Pearl Glimmer Mist and let her dry. Attach a small pink crystal heart over Kitty's nose and attach 3 small pearls to her collar.

3.  Cut a square, 3 1/2 inches high by 3 1/2 inches wide, from black and pink print card stock. Cut a 4 inch square out of the light pink card stock. Cut a 4 1/4 inch square out of the black card stock.

4.  Glue the pink card stock on top of the black card stock, leaving a 1/4 inch border on all sides. Attach Zots to the back of the black and pink print card stock. Layer the print card stock on top of the light pink card stock leaving a 1/4 inch border on all sides. Press the print card stock in place.  Attach foam dots to the back of Kitty, center her on the print card stock and press in place.

5.  Cut a piece of  pink ribbon and tie a small bow. Cut two smaller pieces of ribbon and glue them to opposite corners layered card stock. Glue the bow over the ribbon on the upper right hand corner of the card stock.

6.  Lightly spray a white rose with Cherry Glimmer Mist. Let it dry. Punch two leaves out of the olive green card stock, using the Martha Stewart leaf paper punch.

7.  Punch a heart border out of the light pink card stock, using the Martha Stewart heart border punch. Save the left over pieces from the punched paper (hearts and paper scraps from heart image).

8.  Apply a small pink heart on each side of the word Merci. Use the left over scrap of pink card stock from the heart border punch and glue it over the top and bottom of the word Merci, to frame it. Glue the rose to the left of the frame and glue two leaves under the rose.

9.  Glue the heart border under the front edge of the card.  Glue the small hearts from the border punch to each corner of the black card stock.