Saturday, October 17, 2015

Another Halloween Yard Sign

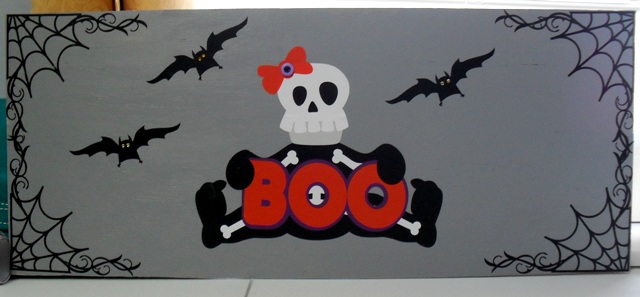
With just about two weeks left until Halloween I have been taking every opportunity to work on projects.  The candy wrappers and tea light holders are finished and will be posted tomorrow (hopefully).  The Boo sign is almost finished and ready to put out and the something wicked sign is in progress.

Boo sign just needs the stake and it's finished!

I thought this little skeleton was so cute and envisioned her as a sign.  All of my svg files are from the Silhouette Design Store but may be available directly from the designers to the owners' of other cutting machines:  Ghoulie Girl (Boo) is a Michele Renee Cloud 9 Design, Spider Web Flourish is a Silhouette Design and the bat came from Happy Halloween by Jennifer Wambach.  All pieces of the this design were cut from Orcal vinyl (available from My Direct Vinyl).


Directions for Boo:

Silhouette SVG cutting files: Happy Halloween by Jennifer Wambach, Ghoulie Girl by Michele Rene and Spider Web Flourish by Silhouette.

Orcal Vinyl for electronic cutting machines- black, orange, dark purple, grey and white.  Available at My Vinyl Direct, limited colors are available at Michaels

Americana Craft paint- Dolphin Grey- available at Michaels

DecoArt DuraCoat Varnish

Small purple button

Small yellow crystals for the bat's eyes

Wood available at Home Depot and cut to 24 inches long by 10 inches wide

Wooden stake available at Home Depot

Small Nails

Hammer


1.  Cut the wood to 24 x 10 inches and seal with water based craft varnish and let it dry.  Varnish again and let it dry. Paint the sign with the grey paint, let it dry and repeat.  Varnish with the DuraCoat and let it dry.

2.  Size the entire Ghoulie Girl to 9.75 inches on the Silhouette mat on the computer screen. Some pieces of the file won't be on the mat but that's fine.  Ungroup the file.  Move the body, the eyes, nose and hands on Mat 1 and open a new mat.  Group the bones and skull together on Mat 2.  Open Mat 3 and move the bottom of the skull (jaw) to this mat.  Open Mat 4 and place the bow, the center circle for the bow and the smaller BOO on it.  Finally place the BOO outline on Mat 5.

3.  Place the black vinyl on the cutting mat, select vinyl on the machine, adjust the blade and cut the images from Mat 1.  Cut the images on Mat 2 in white vinyl, images from Mat 3 in grey vinyl, images from Mat 4 in orange vinyl and the image from Mat 5 in purple vinyl.

4.  Center the body on the sign, approximately 2 inches from the lower edge of the sign.  Add the Skull, jaw and the bones to the body, center the purple Boo outline on the body and overlay the orange Boo before adding the hands.  Add the eyes, nose and bow.  Smooth out any wrinkles or air bubbles with your finger tips.

5.   Open the Spider Web Flourish onto the Silhouette mat on screen and resize to approximately 5.5 inches.  Click Copy and then paste to make three more webs.  Next open the Halloween title and ungroup the title and the bat. Move Halloween from the mat and delete it.  Group the pieces of the bat together and resize to 1.75 inches. Ungroup the bat and move the eyes from the image and delete them.  Click on the bat, copy and paste 7 more bats on the screen (8 total).  Arrange the Spider Web Flourishes on the mat so that on flourish is in each corner.  Place two bats is each of the open areas of the flourish.  Select cut, load the black vinyl on the cutting mat and send to Silhouette.

6.  Carefully weed the pieces of vinyl from around the spider web flourish, remove from the mat and place one flourish in the upper right corner of the sign, smoothing out any air bubbles. Place another flourish in the lower right corner of the sign.  The ends of the upper and lower flourishes will overlap at the middle of the sign.  Repeat this procedure on the left side of the sign.

7.  Arrange the Bats around the open area in the middle of the sign.  I used a grouping of three because odd numbers are more visually pleasing.  Glue the small crystals to the bat's face for eyes.

8.  Center the wooden stake on the sign so that the top of the stake is even with the top of the sign.  Nail the stake to the back of the sign at the top and the bottom of the sign.

Saturday, October 10, 2015

Crazy Hat Bear Gift Bag

Michelle loves the Minions so I decided to go with that theme for her upcoming birthday.  I found the cutest Minion slippers on Amazon.  Every time I see them they make me smile and after having them sitting around the studio for the past few weeks, I'm going to miss them.


Minion Slippers


Like most crafters with an SVG cutting machine, I am always looking for interesting cutting files.  One of my favorite sites is Kadoodle Bug Designs. While I was browsing the site for a suitable image for my gift bag I decided to checkout the Freebie section.  This week's freebie is the Crazy Hat Bear.  He's so cute with his Minion style hat.  I decided to use the jpg image from the downloaded file.


Crazy Hat Bear Gift Bag

Directions for Crazy Hat Bear Gift Bag:

Crazy Hat Bear zip file from Kadoodle Bug Designs
Medium white gift bag-available at craft stores
Pink Satin Ribbon
White card stock- letter size (8 1/2 x 11 inch)
Glue
Cutting machine with Print and Cut capability- I used Silhouette Cameo (directions will be for the Cameo)

1.  Download the Crazy Hat Bear file from Kadoodle Bug Designs.  Unzip the file and export the jpg file to the Silhouette machine.

2.   Open the Silhouette mat and resize the mat to letter size.

3.   Import the Crazy Hat Bear image to the mat and resize to 8.465 x 8.465 inches.

4.  Add the registration marks to the Silhouette mat.  Make sure the bear fits within the registration marks.

5.   Load a sheet of white card stock in the printer. Send the image to the printer.

6.  Open the Trace window and turn off the high pass filter and increase the threshold until most of the image is blocked out in yellow.  The area inside the eyes may not be blocked out but that will not affect the cutting.  Select Trace Outer Edge option.  There should be a red outline around the outside of the image.

7.  Open the Cut window and select cut outer edge.  There should be a thick red line around the outside edge of the bear. Place the printed image on the Silhouette cutting mat and load into the machine and select cut.

8.  Unload the cutting mat from the Cameo and remove the cut image.

9.  Apply glue to the back of the bear and attach to the front of the gift bag.  Cut a piece of pink satin ribbon long enough to tie around the top of the handles of the gift bag and tie in a bow.


Thursday, October 8, 2015

Cat Gift Bag

While browsing the Silhouette Studio Store site I found the cutest cat gift bag.  The bag is small but the perfect size to hold a gift card.  Michelle loves cats and the cat bag  reminded me of her cat Bandit (a.k.a Mr. Sweetie).

This was a fun, quick project. the total crafting time was about 10 minutes from start to finish.  The cutting file is available from the Silhouette Studio Store or directly from Studio Illustrado.


Cat Gift Bag


Directions for Cat Gift Bag:

Black, pink, yellow and white 12x12 inch card stock
Glue
Ribbon to tie the bag closed
Studio Illustrado Cat Bag cutting file


1.   Open the cutting file and ungroup the cat.  Keep the small circles for the cat's eyes and the cat bag on the mat and move everything else off to the side.

2.  Open another mat and place the paws. inner ears and white fur  on the second mat.  Open another mat for the large eye circles and a fourth mat for the nose.

3.  Cut the cat out of black card stock, the fur and paws from mat 2 out of white card stock, the eyes out of yellow card stock and the nose out of pink card stock.

4.  Fold the cat on the perforated lines.

5.  Glue the white, pink and yellow pieces to the cat and layer the small black circles over the eyes.

6.  Fold the sides of the bag and glue the tabs in place.  Hold a few seconds until the glue dries.

7.  Cut a small piece of ribbon and thread it through the holes at the top of the bag and tie a bow to close the bag.

Drawing Portraits

The past two months everything seemed to take priority over my art work and after what seemed like an eternity, I am finally back in the studio again.  Recently I had the opportunity to take a portrait drawing class taught by Molly Simms.  Molly is a a very talented and well respected portrait artist and a great teacher.  In an effort to learn to draw and paint portraits I bought some books on the subject- Drawing and Painting Beautiful Faces by Jane Davenport, Draw Faces In 15 Minutes by Jane Spicer and my favorite Mixed Media Portraits Techniques and Drawing With Pam Carriker by Pam Carriker. While all three books have a lot of useful information they are not a substitute for taking a class.  Pam Carriker's book was the most thorough. She explains portrait drawing using the face mapping technique and breaks it down step by step.  Molly Simms also used the face mapping technique.  Mixed Media Portraits was a good resource to supplement the information presented in class.

In the first class the instructor demonstrated face mapping and then put several pictures on the table and told us to choose one.  I wanted to try a three quarter head view rather than a front view. To draw a three quarter view, I started with a circle in the center of the paper and then drew an oval on the left side of the circle before starting to map out the facial features.

Portrait using face mapping.

The second class was devoted to drawing a portrait from a photograph.  I chose my Son-In Law, Brandon as my subject.  Brandon's classic features would be easier to draw and his glasses and smile with teeth showing would present a challenge.  Unlike some of the other members in the class, I had never attempted a portrait before.  The man sitting in the seat next to me was an accomplished artist and his work was beautiful.  As I struggled with the initial stages of face mapping for the exact placement and proportion of the facial features, I remembered the quote from my Yoga Teacher.  At the beginning of each class she would say " Remember no judgements, no comparisons, focus on your ability." 


This is the finished portrait.  I left the open sketch book on the kitchen table, hoping for feedback.  My husband and Brittany both told me that it looks like Brandon. I mustered up my courage and e-mailed the picture to Brandon.  I was relieved when he sent a message back saying that he liked it and it looks like him. 

Thursday, August 27, 2015

Halloween Yard Signs

It's been a while since I have posted a craft project, but I have been working on Halloween decorations.  The kids are just getting ready to go back to school and the stores are displaying Halloween candy and decorations.  While I'm holding on to what is left of the summer and not ready to embrace fall or it's holidays just yet, it does make sense to start working on Halloween craft projects now.

Several years ago I purchased some cute signs to decorate my walkway.  Over time the signs faded and fell apart.  Unable to find replacements I decided to make my own.  The supply list for the project is simple- wood and stakes from Home Depot, craft vinyl, paint and an electronic cutting machine.  The total cost one sign was about $5.


Finished Sign- Stake nailed to sign at top and bottom.


Finally finished and ready to attach stake.

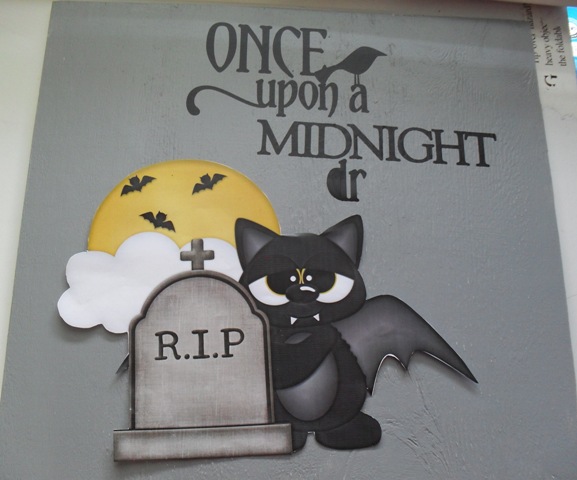
Just need to finish the phrase!

Sign in progress.

 
After sealing the wood with craft varnish and painting it with Gesso, it was painted with two coats of acrylic craft paint.  The bat is a Treasure Box Designs file (available from the Silhouette Design Store). The phrase was also purchased from Silhouette.  The sign is slightly larger than 12 x 12 inches.  The bat was resized and printed on a laser printer using the landscape option to fit on  8 1/2 x 11 inch paper.  The image was hand cut because the wing extended past the registration marks for the Silhouette.  I did try to print the image on printable vinyl but my HP 5700 ink jet printer would not feed the vinyl through.  The bat will be applied to the sign with Mod Podge.


Directions For Yard Sign:

Orcal Black and Purple Vinyl (available from My Vinyl Direct, Cricut or Silhouette)
Batty Print and Cut file and Once Upon a Midnight Dreary quote- available from Silhouette Design Store
Piece of Wood cut slightly larger than 12x12 inches
White paper
Mod Podge-Hard Coat
Vinyl Transfer Tape- I used Cricut
Grey Craft Paint- I used two bottles of Americana
Foam Brush
Craft Varnish- I used DecoArt DuraClear
Wooden Stakes (available at Home Depot in the lumber section)
1.  Open the Batty file and place on the Silhouette mat, then open the Once Upon a Midnight Dreary file and place on the same mat.  Resize the files so that most of the Batty image fits on the lower left portion of the mat and the quote fits across the top right portion of the mat. Once you are happy with the layout, save the file.

2.  Open another mat and copy and paste the resized Batty file onto the new mat.  Add the registration marks for the Silhouette and use the Trace Outer edge and Cut options. Load plain white paper in a laser printer and print the Batty file. Place Batty on a Silhouette mat and load into the machine and cut the design.

3.  Seal the wood with the craft varnish and let it dry.

4.  Paint both sides of the wood with the grey paint.  Let it dry and then add a second coat of paint.  Set aside to dry.

5.  Open a third Silhouette mat and copy and paste the quote onto this mat.  Place the black vinyl on the Silhouette mat. I use painter's tape around the edges of the mat to keep the vinyl from slipping while it's being cut.  Load the vinyl into the machine and cut out the quote.  Carefully weed the excess vinyl from the design.  Apply transfer tape over the quote while it is still on the mat.  Position the quote on the upper right part of the sign, but don't press it in place yet.

6.  Liberally apply Hard Coat Mod Podge to the back of the Batty design and place Batty on the lower left portion of the sign.  Press in place and smooth out any air bubbles with your finger tips.  Re adjust the quote if needed.  Press the quote in place and use a brayer to secure it.

7.  Apply two more coats of Mod Podge to Batty, letting the Mod Podge dry between coats.

8.  Cut small triangles out of purple vinyl to fit around the edges of the sign.  I cut a 1/2 wide strip of vinyl and then cut the triangles from the strip, making each cut at an angle to form the triangles.  Place the triangles around the edges of the sign to make a border.

9.  Center the sign on stake making sure that the top of the stake is even with the top of the sign. Nail a wooden stake to back of the sign at the top and bottom.  I put a small nail through the purple border and then covered it with a small piece of purple vinyl.


Sunday, August 16, 2015

Williamsburg 2015

We just got back from our trip to Colonial Williamsburg. The weather was hot and humid as usual for this time of year.  In addition to joining the Colonial Army, we visited the cabinet maker and the DeWitt Gallery.


The cabinet maker is working on a harpsichord, to be used in Colonial Williamsburg.  This piece has taken over six months to make and it still needs more work before it's finished.


All furniture is crafted exactly as it would have been in the 18th century.  There are no power tools in the shop and any intricate detail work must be carved by hand.

The DeWitt Gallery is a museum housing paintings, furnishings,decorative items, clothing, books and letters from the 18th century.

This watercolor paint box caught my eye as I walked through the gallery.


 I was fortunate enough to find one of my favorite paintings from this era on display. Washington and Lafayette At The Battle Of Yorktown by Reuben Law Reed.  The painting is oil and gold paint on canvas. The Battle of Yorktown was the single most decisive battle of the Revolutionary War. The Marquis de Lafayette convinced Admiral De Grasse to delay sailing to the West Indies and to block off the entrance to Yorktown with his fleet. General Cornwallis was cut off and ultimately surrendered. Several months later America and Britain entered into peace negations.

 My family and friends know how much I love "my dear Marquis" (he was a hero in both the American and French Revolutions).  My kids would always roll their eyes as I proudly described how it was the Marquis de Lafayette who helped America gain her independence. When my family saw  this painting they quickly moved past it, in an effort to avoid the annual lecture on "my dear Marquis."

Washington and Lafayette at Yorktown

This year the gallery added a Doll House exhibit.  On display were several doll houses from the 18th century.  The focal point of the display was a massive, elaborately decorated Colonial doll house.  I took a photo with my husband who is 6'4" standing beside the house, to give you an idea of the scale of the piece.

Colonial Doll House

Furnished Rooms in the Doll House.
  
The DeWitt Gallery offers two floors of interesting exhibits, some of them are interactive.  When the mid-day heat becomes too much, try some of the indoor exhibits, like the DeWitt Gallery, the Capitol or the Governor's Palace.

Wednesday, July 29, 2015

Laurel Burch Cats Update

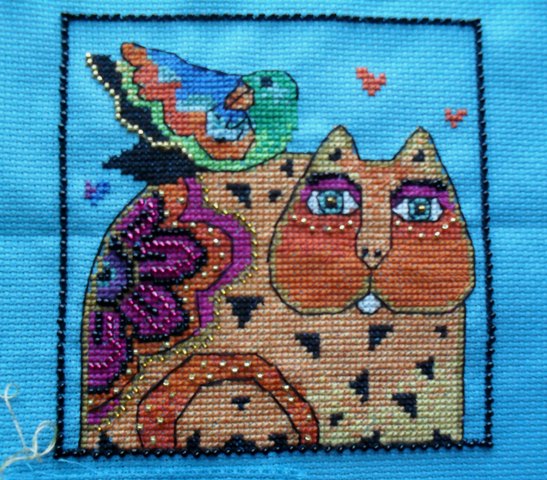
I have been busy stitching my Laurel Burch Cats.  The Feathered Friends has only a little back stitching left and then it can be framed.  I am almost finished the Feline Friends design.  I really like how the pieces turned out.  Even better, they were quick to stitch.  Only two weeks start to finish.  No I am not one of those ladies with nothing better to do than cross stitch.  I am constantly busy, leaving only a couple hours at the most, each evening to cross stitch. 

Feathered Friends


Feline Friends-almost finished!

Recently I pre-ordered Creative Girl Mixed Media Techniques For An Artful Life by Danielle Donaldson, from Amazon.  I was really unsure about ordering this book since Amazon had not posted a preview of the book.  I really like Danielle Donaldson's watercolors and was hoping for a book where she would share her techniques.  The entire book is based on her techniques and is set up on a project by project basis. Naturally I just had to create something using her approach to mixed media.  Watercolor is the foundation of the project and then paints, gel pens, markers and other mixed media elements are added to enhance the painting.

Just Thinking
Just Thinking is a journal entry that will probably never see the light of day.  May be it will end up in a finished piece, who knows?  Danielle Donaldson uses white space to highlight her paintings while I covered every inch of the paper with color.  Gel pens and black Sharpie were used to make the doodles in the background.  Everyone can use this book.  The instructions are easy to follow and the designs are simple and easy to draw.  If you can draw basic shapes you can easily draw a Creative Girl inspired figure.