Showing posts with label Edgar Allan Poe. Show all posts

Sunday, March 29, 2015

Nevermore Raven Collage

While I was working on the C'est la vie canvas, Brittany approached me and asked if I would make a "cool canvas" for her.  She's a big fan of Edgar Allan Poe's literature, especially the Raven, so we decided that should be the theme.  It was difficult to come up with a design idea and get started.  Poe's Raven is very popular and has been worked into art projects so many times that it was hard to find an idea that hadn't been done before. As the blank canvas layed on my drafting table for a couple of days, I kept thinking of the quote by Vincent Van Gogh, " Just slap something on it when you see a blank canvas staring at you with a sort of imbecility.You don’t know how paralyzing it is, that stare from a blank canvas that says to the painter you can’t do anything."  I put a thick coat of black gesso over the entire canvas and the ideas started to flow from there.  Next the canvas received a heavy coat of purple acrylic paint, and swirled lines made with a texture tool.  I had the new Dylusions paints sitting on the work table and the concord grape just seemed to be calling out try me.  I diluted the paint with some water and painted over the textured ridges in the paint.  After it dried the Dylusions paint added a cool two-tone effect.  Dali's paintings- The Pesistance of Memory (the watches) and Argus (the eyes) were the secondary elements of the canvas and everything just progressed from there.

The canvas is almost finished-just a few finishing touches and it will be ready to hang.

Oh and Brittany if you are reading this post, I hope you remember all of the original art work that I created for you, on Mother's Day!

Canvas in progress.


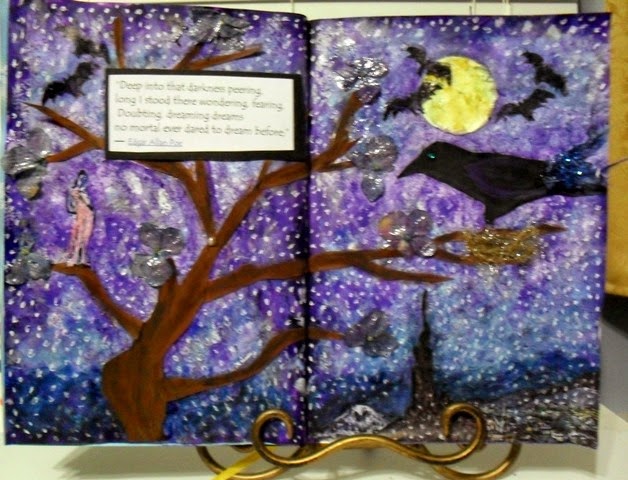
Finished canvas- the brown on the bird is the light reflecting off the UTEE.


Directions For Nevermore Raven Collage:

Canvas  8x10
Liquitex Black Gesso
Foam Brush
Assorted Buttons
Ivory, olive green and black Cardstock
Raven Poem
Ranger Ultra Thick Embossing Enamel-(UTEE) clear
Heat Gun
Tim Holtz Clock Stencil
Golden Modeling Paste
DecoArt Dazzling Metallics Venetian Gold paint
Dylusions Concord Grape paint
Palette Knife
Small Ceramic Tile
Tim Holtz Ideology Clocks and Gears
Decorative Trim
Martha Stewart Leaf Paper Punch
Liquitex  purple, black and medium grey acrylic paint
Small Roses- Black and Purple
Raven SVG Cutting File-mine is from the Silhouette On Line Store
Art Minds Gold Flakes
Small Metal Brad
The Robin's Nest Dew Drops-Water (blue, purple and green)
Tim Holtz Distress Inks-Vintage Photo and Tea Dye
Small Bowl of room temperature coffee-for aging the poem
Princeton Catalyst Wedge W-02
Tom Bow Aqua Glue
Small paintbrush
Ranger  Distress Ink- Gathering Twigs

1.  Coat the canvas with two coats of black gesso and let it dry completely.

2.  Use a foam brush to apply a thick coat of purple acrylic paint to the top of the canvas. Run the Catalyst wedge to create wavy lines in the paint.  Let the paint dry.  Mix Dylusions Concord Purple paint with a little water to make it fluid. Spread the Dylusions over the top of the ridges in the purple paint. Let it dry.  Paint the sides of the canvas with black acrylic paint and set aside to dry.

3.  Mix modeling paste with the Venetian Gold paint.  Lay the clock stencil in the center of the canvas and cover with the gold modeling paste mixture, scraping off the excess with a palette knife. Set aside to dry.  Once the piece is completely dry, brush (with a paint brush) a small area of the gold clock design with Tom Bow Aqua Glue and carefully lay the gold flakes over the glue. Press the gold down onto the canvas. The flakes should appear textured and not smooth.  Apply the gold flakes to the stenciled area, letting some of the modeling paste show through.

4.  Cut a Raven, using the measurements given in the SVG cutting file (mine is from the Silhoette Store), out of black card stock.  Cut a branch long enough for the Raven to sit on out of black card stock. I drew the branch and hand cut it but you can use an SVG cutting file or commercial die cut.  Apply a Versa Mark ink to the front of the Raven.  Cover the entire bird.  Cover the bird with UTEE and shake off the excess.  Place the bird on a ceramic tile and use a heat gun to carefully melt the UTEE.  Let the UTEE dry and cool down before moving the bird.

5.  Print a copy of Edgar Allan Poe's Raven on white paper using a laser printer.  Tear the poem to fit on the right and left sides of the canvas.  Pour leftover cold coffee into a small bowl and soak the poem pieces for a few seconds, remove and blot on a paper towel. Keep soaking the poem and blotting it until the paper looks aged.  Let the paper dry on the paper towels.  After the poem is dry, apply the vintage photo distress ink randomly to the paper.  Adhere the poem pieces to the left and right sides of the canvas, using Liquitex Matte Gel, smooth out any air bubbles with your fingertips.

6.  Cut 3 pieces of ribbon ( approximately 3 inches and 2 1/2 inches) and tie them together with a knot. Tie a knot at the end of each piece of ribbon. Glue the ribbon just under the edge of the clock face. Glue the Ideology clock face to the upper right corner of the canvas. Glue an Ideology gear to the center of the clock and then glue a small brad over the gear.  Glue a small purple Dew Drop to the center of the brad.

7.  Cut a piece of decorative trim 1/2 inch longer than the length of the canvas.  Glue the trim 1/4 inch above the bottom edge of the canvas, so there is a purple border at the bottom.  If the buttons have a shank you will need to remove it so the button will lie flat against the trim.  Glue 3 decorative buttons, evenly spaced, on the trim. Seal the edges of the trim with the Tom Bow glue.

8.  Glue a black rose to the lower right corner of the canvas just above the trim.  Punch 3 leaves out of olive card stock using the leaf paper punch. Glue the leaves under the edge of the rose. Glue a small gear to the left of the rose and glue a Dew Drop in the center

9.  Glue a small purple rose on the poem just to the right of the Raven title.  Hand cut 2 small leaves from the olive card stock and glue under the edges of the rose.

10.  Glue 3 black buttons across the top center of the canvas. Glue  smaller purple buttons in the center of each black button and glue a green Dew Drop in the center of each purple button.  Randomly glue the Dew Drops along the top of the canvas, leaving room for a title.

11.  Glue the branch approximately 1 1/2 inches above the trim on the left side of the canvas.  Place the Raven on the branch and glue to secure him.  Glue a small purple rose with the stem in the Raven's beak on the canvas. Glue a small dark purple crystal over the Raven's eye. Dot the center of the eye with black paint.

12.  Paint the branch black, apply the paint thickly to give a textured appearance.  While the paint is still wet dab medium grey paint randomly along the branch.  Mix a little bit of black into the grey paint and dab randomly over the (wet) grey paint leaving some lighter grey showing along the branch.

13.  Put a few drops of distress ink on a craft mat.  Use the wooden end of a small paint brush to pick up the ink and randomly dab the ink over the surface of the poem.

14.  Print Nevermore on card stock.  Cut the title out, distress the card stock with tea dye distress ink.  Tear the ends of the card stock, leaving enough room to roll the ends.  Use an awl to roll the ends of the card stock inward toward Nevermore.  Glue Nevermore about an 1 1/2 inches under the row of buttons at the top of the canvas.

Sunday, April 27, 2014

Raven Collage

This was a busy week for me but I did manage to make the trek to Hobby Lobby to buy some more art supplies. I bought the Ranger Melting Pot, bees wax and alcohol inks. I am really fortunate to have a husband who supports my art but even he couldn't understand the need for a Melting Pot. To him, melting wax and then pouring the hot wax onto my artwork just seems absurd. Normally Brittany is 100% behind my creative ideas but I think I lost her on this one.

Lately I have been working in my Medici Lion journal. At first I found art journaling intimidating-where do I start? I remembered how my high school art teacher required me to keep a journal and turn in 10 entries per week and how much I dreaded journaling. I wasn't visited by the Muse and my teacher was always complaining that my journal wasn't creative. How could it be, with a required number of entries a week? I set my fear of journaling aside and decided to make my journal a creative place where I could experiment with ideas and a variety of art products. I am really starting to enjoy journaling and look forward to each new entry.

The idea for this journal entry was inspired by Dali's Prince and Princess painting. I chose to do a collage rather than a painting. I used Van Gogh's Starry Night for the bottom of the collage, hand drawn elements (Raven, Moon and Tree) and dried hydrangeas from last summer's gardens. I added a quote by Edgar Allan Poe to finish the piece (Deep into that darkness peering, long I stood there wondering, fearing, Doubting, dreaming dreams no mortal ever dared to dream before.).

Finished Raven Collage entry.

The base for the collage is created by painting the pages with thinned light purple, dark purple and medium blue acrylic paints. The blue is painted on the lower half of the page and the purple on the rest of the page. Let the paint dry and take the Tim Holtz Honeycomb stencil and place it randomly on both pages. Apply modeling paste over the stencil. Remove the stencil and let the pages dry overnight. Apply acrylic paint over the stenciled area but don't cover the stencil completely (let some of the Modeling Paste show through). Cut a circle out of yellow card stock and glue it to the top of the right page. Glue a layer of yellow tissue paper over the moon. Cut the tree trunk and branches out of brown card stock and glue over both pages. The branches should extend to the right page. Draw or trace a  Raven and cut the bird out of black card stock. Glue the Raven to the branch on the right page. Glue two small dark blue feathers to the Raven's tail and glue blue glass glitter on top of the feathers. Add a small crystal for the Raven's eye. Add decorative trim for the nest and glue to the branch under the bird. Print a copy of Starry Night using the 3x5 option. Cut the Cypress tree, the village and the mountains out of the picture and glue it to the bottom right page (lower right corner). Stamp bats around the top of the pages. Cut out a banshee and glue her to the left side of the tree. Apply dried flowers to the tree branches with Golden Clear Gloss Gel medium. Print the quote by Edgar Allan Poe, mat it with black card stock and glue to the left page. Randomly apply dots over the entire collage with a white gel pen to unify the piece.

Sunday, August 18, 2013

Quoth The Raven Nevermore!


This is the last Halloween project for a while. I have ideas for a few more projects but I will save those for later. The inspiration for this project came while browsing the Halloween aisle at Michaels. I found these resin books and just had to find a way to use them  in a project.

Side View
Front View
I scooped up the books and then walked around Michaels gathering items to use in my project (I still had no clear vision of the finished product).  By the time that I arrived at the check out counter I had collected a large Raven, some feathers, a black foam pumpkin, purple flowers and a purple glittered branch and of course-my books. Finally around 2 a.m. the inspiration hit me. I really like Edgar Allen Poe's line "Quoth the Raven Nevermore" and decided to use it as the theme for my project. After all is there anyone who epitomizes Halloween more than Poe?

Front View

This project goes together very quickly. Beware the branches shed glitter! The mat on my work table was covered with purple glitter despite the fact that I had sprayed the branches with sealant. Since this decoration sheds glitter I don't intend to use it near food.


Side View


Directions for Quoth The Raven:

Large Raven-available at Michaels
Branch of purple flowers-the flowers should be medium size with stems so they can be tucked in the branches
Set of resin books-available at Michaels
2 black and dark green feather picks-available in the floral department at Michaels
1 medium black foam pumpkin
1 large purple glitter branch
Tattered Angels Glimmer Mist Raven
Parchment paper
Tim Holtz distress ink
Ranger Walnut Ink-Eucalyptus color
Distressing tool or sand paper
Hot glue gun
Wire cutters


1.  Cut the flower stems from the main branch, using the wire cutters.

2. Spray the bird with the Raven color Glimmer Mist and set aside to dry.

3.  Using the wire cutters, cut the purple branch into 2 pieces. Make the pieces long enough so that they will drape down the sides of the pumpkin. Glue the end of one branch to the left of the pumpkin stem and drape the branch down the left side of the pumpkin and glue in place. Repeat, gluing the second branch to the right side of the pumpkin.

4.  Trim the stems of the flowers if necessary and place the flowers along the top of the pumpkin and along the sides of the pumpkin. The flowers should be glued on top of the branches.

5.  Tuck the feather picks in between the flowers. Position the feathers on the right and left sides of the arrangement and glue in place.

6.  Glue the Raven on top of the pumpkin so that he is nestled in the flowers.

7.  Print Quoth the Raven Nevermore on parchment paper using the font of your choice at 22 pt. Cut out the quote and apply distress ink to the parchment. Lightly spray the quote with Ranger Walnut Ink-Eucalyptus color. Use sand paper or the distress tool rough up the edges of the parchment. Glue the quote just below the flowers.

8.  Glue the decorated pumpkin on top of the resin books.