Sunday, December 20, 2015

Finished Gift Basket

 Due to the recent changes by the EU requiring notification about the use of cookies and advertising, I have decided to make this my last post.  I started this blog in 2009 at the request of friends and family so they could view my art work.  Thanks to my wonderful readers, the blog took off and became very popular. I had been thinking of giving up the blog in 2016 due to the lack of time to write these posts. When I saw the message from Google about compliance with the new EU standards, I decided it was time to end the blog. 

 I want to make it perfectly clear that as an artist, I have never accepted any advertising on my blog. I want to create whatever I want, whenever I want and feel free to post the finished work of art without any commercialism.  I want to feel free to use products that I like and try new ones that look interesting. I like having the freedom to tell you why I liked or didn't like a particular product. All products used in the creation of my art work are products that I have purchased for that particular project or to stock my home studio. All reviews of books used as a reference for projects were books that I purchased and added to my library.  The products listed for each project were to give you, the reader, a way to duplicate the my exact project should you desire to do so.

I have enjoyed creating the posted projects and sharing them with you over the years. Thank you all so much for helping to make this blog successful.  -Adieu,  Suzanne


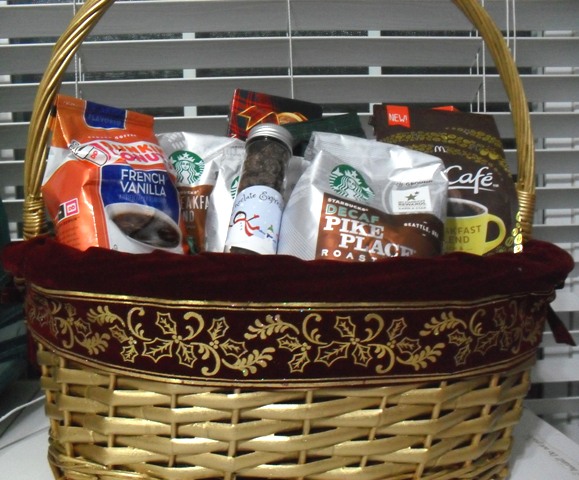
The first gift basket is finished and sitting under the tree awaiting exchange on Christmas Day.

Gift baskets are easy to make and are suitable for different occasions like birthdays, anniversaries, showers and of course Christmas.  I have found my budget to be the only limitation when putting a basket together.  Buying items to fill a basket can quickly get out of hand.  To reign in costs, I look for sales throughout the year.  Holiday ribbons, gift tags and baskets on clearance sales. Then about a month before Christmas I look for sales on coffee, cookies and chocolate. Fortunately my recipients are well trained, they always give last year's empty basket back to me to refill the following year.  This saves me the expense of purchasing a new basket and they don't have to find a place to store it.

Here's a step by step tutorial for assembling a gift basket.

Arrange the items in the basket.

 Don't worry if the items don't stand up, they will once the basket it wrapped.  I usually line the bottom of the basket with a few pieces of white crumpled tissue paper.  Next place the basket filling.  This large basket used 2 bags of shredded paper basket filler.  You can use shredded cellophane (Easter Grass) but it flies everywhere and makes a mess, exposing the white tissue in the bottom of the basket.


Wrapped Basket
Unroll cellophane gift wrap.  Center the basket on the wrap.  You want to have approximately 5 inches or more at the top of the basket after the wrap is gathered.  Re-position the basket on the wrap until you have at least 5 inches at the top.  Twist the cellophane around the top of the basket to form a "top knot" and tie it with a pieces of ribbon, a twist tie of a piece of craft wire.   I used craft wire.  I prefer twist ties or wire because the ribbon tends to slip.


Folded side
 These next two steps make the difference between a homemade basket and a professional one.


Once the top is secure, fold the sides of the wrap.  Lap one end over the other and twist them together until you have a triangular shape. Slide the basket to the edge of the table with the wrap hanging over the end of the table.  Pull the wrap over the edge of the table, lift the basket and tuck the wrap under the bottom of the basket and tape securely.

Twist the wrap.


Pull the wrap over the edge of the table and secure it under the basket.

Add a bow and a gift tag and the basket is finished.. It's the attention to little details that will make a basket look professional rather than home made.  I chose to use a hand made gift tag and bow.  For directions on how to make this bow, refer to my post on Making a Professional Bow.  I like to trim the top of the wrap so it is sort of even ( it looks better if it is not perfectly even) for a nice finished, appearance.

Supplies used:  Red cellophane wrap (Michaels), Holiday Ribbon ( from my ribbon stash), Gold colored floral craft wire, white gift tissue (4 pieces, crumpled), green paper shreds (2 bags from Michaels), Silhouette Cutting file-Doe Re Mi Scarf by ScrapNfonts (for tag) and card stock (brown, tan, white, black, light blue, red and light pink for Doe.

Finished basket.


Still Crafting

With only three days left, I am still busy crafting.  The Cameo is working over time and I must admit I have the cutting down to a science. At night when my husband is asleep, I work on my files-re-grouping and layering them  on a separate mat for each element to be cut.  The next day, I plug in the Cameo and start cutting, leaving the room to work on other things.  The Silhouette makes a lot of noise so I can usually hear when it's done cutting so I can replace the mat.  I repeat this process until everything is cut out and ready to assemble.  I have found that a small rectangular plastic container with a lid to be very helpful.  The lid holds the small cut outs while the container holds the pieces that I am gluing together.

 Reindeer and Polar Bear Card.


Labels for Chocolate Espresso Beans


Currently I am making gift baskets.  My coffee baskets are the most requested Christmas gift. It's really easy to put together a basket that rivals the commercially available ones. The best part is that it can be tailored to the recipients tastes.  One of the recipients doesn't like Hazelnut. Personally I don't understand it but I make sure that nothing with Hazelnuts goes into her basket.  This is not limited to coffee but also cookies, and chocolates. No Ferrero Roche? C'est dommage!  I always like to include chocolate covered espresso beans but couldn't find any in my area so I made some. I did a little play on words and called them Expresso Beans because the Snow Family image that I used was so joyful.

The Reindeer is going to be used for gift tags, and the polar bear holding the candy cane is a decorative element for the basket.

Gift Basket in Progress


I will post pictures and directions for the finished basket on a later post.

Friday, December 18, 2015

Gift Card Holders

There are certain people on my Christmas list that get gift cards. While it does simplify shopping, tucking a gift card inside a card just looks like an afterthought.  There are so many nice gift card holders on the market, but they can also be a little pricey.  I came across J.M. Rush's adorable gift card holders on the Silhouette Store site. They were all so cute that I couldn't decide and decided to buy all of my favorite designs. 

These were quick to make.  I was able to make several of each style in a couple of hours.  These a cute enough to present on their own but I tucked them inside a gift bag containing a box of homemade cookies.


Abominable Snowman, Yorkie, Polar Bear and Santa

The assembly instructions for each of these designs can be found on J.M. Rush's Blog.  I had fun adding my own personal touches.  I embossed Santa's fur trim on his coat and hat, the Polar Bear's hat and mittens and Abominable Snowman's fur (light blue) with the Cuttlebug Swiss Dots embossing folder.  I added diamond Stickles to the bear's pom pom and the Snowman's fur and teeth.

Monday, November 2, 2015

Weekend Project

I have been busy working on finishing the Mona Lisa.  The goal is to have the picture completely finished before 2016 and it looks like I'm going to make the deadline.  I am stitching morning and night but the end is in sight.  Only two and half more pages to stitch and most of that is black (Mona Lisa's dress) so that will go very quickly.  Mona Lisa is not yet finished and I am already planning and setting up my next project.  That's what it's like to be me!  My next project is every bit as challenging as the Mona Lisa.  I have really enjoyed watching a famous work of art slowly come to life as I stitched so I just had to stitch my favorite painting-Van Gogh's Starry Night Over the Rhone. The colors are beautiful shades of blue, green and violet.  Starry Night is a Scarlett Quince pattern and uses a lot of blended colors.

Only two and half pages left!

This weekend I took a break from the Mona Lisa to knit a pair of mitts (finger-less gloves).  Last year I decided that these would be very useful to wear indoors or to layer under mittens. While I have several patterns for mitts with beading and fancy stitches, I just wanted a plain pair.  Webs (yarn.com) had a suitable pdf pattern on their website.  I chose to knit Valley Yarns Essential Mitts.  The pattern is easy and suitable for a beginner.  The M1L and M1R stitches (make one left, make one right) might be confusing but You Tube has an excellent tutorial.  My mitts were knit in Madeline Tosh DK merino wool in the Fathom color.  I was able to knit both mitts in a weekend which would make them suitable for a gift or stocking stuffer.

Finished Mitts
Now that the mitts are finished I am already planning my next knitting projects.  I can't wait for my Malabrigo Rastita yarn to arrive from Jimmy Beans Wool so I can start knitting the Odonata hat that was featured on Malabrigo's blog.  The pattern is available from Owl and Cat Designs on Ravelry.

In a few days I will also start working on a ballet wrap sweater.  Now that it's getting colder outside, the Yoga studio is so cold.  After pricing sweaters for Yoga and running jackets at a local sporting good store, I decided to knit my own sweater.  I stopped by Michaels to buy some yarn.  I chose Patons Classic Wool in deep purple.  The total cost of the wool was about $25, much better than the $90 price tag at the sporting goods store.  I am in the process of re-writing the hand knit instructions to instructions for the knitting machine.  The sweater has seed stitch ribbing which I will knit by hand.


Sunday, October 18, 2015

Woman Walking With A Stick

I wish that I had unlimited time to just draw and paint like Van Gogh did.  I have resigned myself to the reality that is just not going to happen because no matter how hard I try something else always takes precedence.  Every once in a while I put my foot down and say Enough, I'm spending the day in the studio! While I enjoy working on craft projects that is not enough for me, I need to draw or paint.

Vincent Van Gogh was not only a prolific artist, he was also an eloquent writer.  He included sketches or drawings in his many letters to his brother Theo.  I have several books of Van Gogh's letters complete with sketches.  Recently when I felt the need to draw, I chose a drawing from one of the books of letters.

Woman Walking With A Stick after Van Gogh.

There was something about Van Gogh's drawing of the old woman with a walking stick that touched my heart.  According to Van Gogh, it was a cold morning and the woman was walking, slightly bent, to work at the mines with a shawl wrapped around her head to protect her from the cold winds.

Van Gogh thought that the only way to improve as an artist to copy paintings by the masters.  He often copied the great Delacroix's work and drew and painted several versions of Millet's The Sower. I don't think that Van Gogh would mind that I copied the Woman Walking With A Stick and hopefully he might find my rendition of his work an acceptable tribute to him as an artist.  I did use the drawing in an art project to illustrate Robert Browning's poem because the woman seemed to illustrate the line "grow old with me, the best is yet to be."

A Silhouette Halloween

The Cameo is really getting a lot of use lately.  I'm really enjoying the flexibility of buying exactly the cutting files that I want and then modifying them to suit my needs.

This year I wanted to pull out all the stops and make Halloween special for the Trick-or-Treaters that come to our door.  We have always had the reputation among the neighborhood kids as the house with the cute decorations that gives out good candy but why rest on our laurels?  Some of the decorations from previous years were just too ratty to make it through another Halloween.  C'est dommage!  I fired up the Cameo and made yard signs, but why stop there?  There are so many cute designs available.  Who can resist Lori Whitlock's Bat candy bar wrapper or Jamie Lane's Spider Web tea light holder?  Not only were these cute but they went together quickly.

Candy bar wrapper and tea light holder.

Close-up of Spider Web tea light holder.

I made the candy bar wrappers in Halloween colors-purple, green and purple.  Only one wrapper (to fit a full size candy bar) would fit on a 12x12 inch piece of card stock so I cut the wrappers out of 8 1/2x11 inch card stock resulting in less wasted paper.  The wrapper can be resized to fit smaller candy bars.

The Spider Web tea light holder was just one of those must do projects because it's so different and so cute.  I made several and placed them along the stairs in the foyer and forgot about them.  Everyone who sees them wants to know where I bought them?  When I say that I made them, the next question is what are they made from?  They really don't look like they are made from card stock.  My husband thought they were made from craft foam and my daughter thought they were plastic.  Nope, just a battery operated tea light in a card stock holder!

Assembling the tea light holder is a little tricky and Jamie Lane no longer has the tutorial on her blog.  When removing the pieces from the cutting mat there will be a long piece perforated on both edges with tabs.  Fold the edges along the perforations and glue the tabbed end to the end with no tab. This should fit around the tea light.  Next glue the large solid circle to the outside (over the tabs) of the piece that wraps around the tea light. This is the base.Now glue the other large circle to the inside bottom.  It should cover the tabs and fit on top of the piece that formed the base of the tea light holder.  Press the top tabs down and glue the large circle with the opening in it to the inside of the top.  Then glue the other large piece over the tabs and on top of the previous circle.  Finally glue the smaller circles with the openings to the top of the tea light.  Insert the battery operated tea light in the holder.  Jamie Lane does have a tutorial on a snowman tea light holder that uses a similar construction process.


Saturday, October 17, 2015

Another Halloween Yard Sign

With just about two weeks left until Halloween I have been taking every opportunity to work on projects.  The candy wrappers and tea light holders are finished and will be posted tomorrow (hopefully).  The Boo sign is almost finished and ready to put out and the something wicked sign is in progress.

Boo sign just needs the stake and it's finished!

I thought this little skeleton was so cute and envisioned her as a sign.  All of my svg files are from the Silhouette Design Store but may be available directly from the designers to the owners' of other cutting machines:  Ghoulie Girl (Boo) is a Michele Renee Cloud 9 Design, Spider Web Flourish is a Silhouette Design and the bat came from Happy Halloween by Jennifer Wambach.  All pieces of the this design were cut from Orcal vinyl (available from My Direct Vinyl).


Directions for Boo:

Silhouette SVG cutting files: Happy Halloween by Jennifer Wambach, Ghoulie Girl by Michele Rene and Spider Web Flourish by Silhouette.

Orcal Vinyl for electronic cutting machines- black, orange, dark purple, grey and white.  Available at My Vinyl Direct, limited colors are available at Michaels

Americana Craft paint- Dolphin Grey- available at Michaels

DecoArt DuraCoat Varnish

Small purple button

Small yellow crystals for the bat's eyes

Wood available at Home Depot and cut to 24 inches long by 10 inches wide

Wooden stake available at Home Depot

Small Nails

Hammer


1.  Cut the wood to 24 x 10 inches and seal with water based craft varnish and let it dry.  Varnish again and let it dry. Paint the sign with the grey paint, let it dry and repeat.  Varnish with the DuraCoat and let it dry.

2.  Size the entire Ghoulie Girl to 9.75 inches on the Silhouette mat on the computer screen. Some pieces of the file won't be on the mat but that's fine.  Ungroup the file.  Move the body, the eyes, nose and hands on Mat 1 and open a new mat.  Group the bones and skull together on Mat 2.  Open Mat 3 and move the bottom of the skull (jaw) to this mat.  Open Mat 4 and place the bow, the center circle for the bow and the smaller BOO on it.  Finally place the BOO outline on Mat 5.

3.  Place the black vinyl on the cutting mat, select vinyl on the machine, adjust the blade and cut the images from Mat 1.  Cut the images on Mat 2 in white vinyl, images from Mat 3 in grey vinyl, images from Mat 4 in orange vinyl and the image from Mat 5 in purple vinyl.

4.  Center the body on the sign, approximately 2 inches from the lower edge of the sign.  Add the Skull, jaw and the bones to the body, center the purple Boo outline on the body and overlay the orange Boo before adding the hands.  Add the eyes, nose and bow.  Smooth out any wrinkles or air bubbles with your finger tips.

5.   Open the Spider Web Flourish onto the Silhouette mat on screen and resize to approximately 5.5 inches.  Click Copy and then paste to make three more webs.  Next open the Halloween title and ungroup the title and the bat. Move Halloween from the mat and delete it.  Group the pieces of the bat together and resize to 1.75 inches. Ungroup the bat and move the eyes from the image and delete them.  Click on the bat, copy and paste 7 more bats on the screen (8 total).  Arrange the Spider Web Flourishes on the mat so that on flourish is in each corner.  Place two bats is each of the open areas of the flourish.  Select cut, load the black vinyl on the cutting mat and send to Silhouette.

6.  Carefully weed the pieces of vinyl from around the spider web flourish, remove from the mat and place one flourish in the upper right corner of the sign, smoothing out any air bubbles. Place another flourish in the lower right corner of the sign.  The ends of the upper and lower flourishes will overlap at the middle of the sign.  Repeat this procedure on the left side of the sign.

7.  Arrange the Bats around the open area in the middle of the sign.  I used a grouping of three because odd numbers are more visually pleasing.  Glue the small crystals to the bat's face for eyes.

8.  Center the wooden stake on the sign so that the top of the stake is even with the top of the sign.  Nail the stake to the back of the sign at the top and the bottom of the sign.

Saturday, October 10, 2015

Crazy Hat Bear Gift Bag

Michelle loves the Minions so I decided to go with that theme for her upcoming birthday.  I found the cutest Minion slippers on Amazon.  Every time I see them they make me smile and after having them sitting around the studio for the past few weeks, I'm going to miss them.


Minion Slippers


Like most crafters with an SVG cutting machine, I am always looking for interesting cutting files.  One of my favorite sites is Kadoodle Bug Designs. While I was browsing the site for a suitable image for my gift bag I decided to checkout the Freebie section.  This week's freebie is the Crazy Hat Bear.  He's so cute with his Minion style hat.  I decided to use the jpg image from the downloaded file.


Crazy Hat Bear Gift Bag

Directions for Crazy Hat Bear Gift Bag:

Crazy Hat Bear zip file from Kadoodle Bug Designs
Medium white gift bag-available at craft stores
Pink Satin Ribbon
White card stock- letter size (8 1/2 x 11 inch)
Glue
Cutting machine with Print and Cut capability- I used Silhouette Cameo (directions will be for the Cameo)

1.  Download the Crazy Hat Bear file from Kadoodle Bug Designs.  Unzip the file and export the jpg file to the Silhouette machine.

2.   Open the Silhouette mat and resize the mat to letter size.

3.   Import the Crazy Hat Bear image to the mat and resize to 8.465 x 8.465 inches.

4.  Add the registration marks to the Silhouette mat.  Make sure the bear fits within the registration marks.

5.   Load a sheet of white card stock in the printer. Send the image to the printer.

6.  Open the Trace window and turn off the high pass filter and increase the threshold until most of the image is blocked out in yellow.  The area inside the eyes may not be blocked out but that will not affect the cutting.  Select Trace Outer Edge option.  There should be a red outline around the outside of the image.

7.  Open the Cut window and select cut outer edge.  There should be a thick red line around the outside edge of the bear. Place the printed image on the Silhouette cutting mat and load into the machine and select cut.

8.  Unload the cutting mat from the Cameo and remove the cut image.

9.  Apply glue to the back of the bear and attach to the front of the gift bag.  Cut a piece of pink satin ribbon long enough to tie around the top of the handles of the gift bag and tie in a bow.


Thursday, October 8, 2015

Cat Gift Bag

While browsing the Silhouette Studio Store site I found the cutest cat gift bag.  The bag is small but the perfect size to hold a gift card.  Michelle loves cats and the cat bag  reminded me of her cat Bandit (a.k.a Mr. Sweetie).

This was a fun, quick project. the total crafting time was about 10 minutes from start to finish.  The cutting file is available from the Silhouette Studio Store or directly from Studio Illustrado.


Cat Gift Bag


Directions for Cat Gift Bag:

Black, pink, yellow and white 12x12 inch card stock
Glue
Ribbon to tie the bag closed
Studio Illustrado Cat Bag cutting file


1.   Open the cutting file and ungroup the cat.  Keep the small circles for the cat's eyes and the cat bag on the mat and move everything else off to the side.

2.  Open another mat and place the paws. inner ears and white fur  on the second mat.  Open another mat for the large eye circles and a fourth mat for the nose.

3.  Cut the cat out of black card stock, the fur and paws from mat 2 out of white card stock, the eyes out of yellow card stock and the nose out of pink card stock.

4.  Fold the cat on the perforated lines.

5.  Glue the white, pink and yellow pieces to the cat and layer the small black circles over the eyes.

6.  Fold the sides of the bag and glue the tabs in place.  Hold a few seconds until the glue dries.

7.  Cut a small piece of ribbon and thread it through the holes at the top of the bag and tie a bow to close the bag.

Drawing Portraits

The past two months everything seemed to take priority over my art work and after what seemed like an eternity, I am finally back in the studio again.  Recently I had the opportunity to take a portrait drawing class taught by Molly Simms.  Molly is a a very talented and well respected portrait artist and a great teacher.  In an effort to learn to draw and paint portraits I bought some books on the subject- Drawing and Painting Beautiful Faces by Jane Davenport, Draw Faces In 15 Minutes by Jane Spicer and my favorite Mixed Media Portraits Techniques and Drawing With Pam Carriker by Pam Carriker. While all three books have a lot of useful information they are not a substitute for taking a class.  Pam Carriker's book was the most thorough. She explains portrait drawing using the face mapping technique and breaks it down step by step.  Molly Simms also used the face mapping technique.  Mixed Media Portraits was a good resource to supplement the information presented in class.

In the first class the instructor demonstrated face mapping and then put several pictures on the table and told us to choose one.  I wanted to try a three quarter head view rather than a front view. To draw a three quarter view, I started with a circle in the center of the paper and then drew an oval on the left side of the circle before starting to map out the facial features.

Portrait using face mapping.

The second class was devoted to drawing a portrait from a photograph.  I chose my Son-In Law, Brandon as my subject.  Brandon's classic features would be easier to draw and his glasses and smile with teeth showing would present a challenge.  Unlike some of the other members in the class, I had never attempted a portrait before.  The man sitting in the seat next to me was an accomplished artist and his work was beautiful.  As I struggled with the initial stages of face mapping for the exact placement and proportion of the facial features, I remembered the quote from my Yoga Teacher.  At the beginning of each class she would say " Remember no judgements, no comparisons, focus on your ability." 


This is the finished portrait.  I left the open sketch book on the kitchen table, hoping for feedback.  My husband and Brittany both told me that it looks like Brandon. I mustered up my courage and e-mailed the picture to Brandon.  I was relieved when he sent a message back saying that he liked it and it looks like him. 

Thursday, August 27, 2015

Halloween Yard Signs

It's been a while since I have posted a craft project, but I have been working on Halloween decorations.  The kids are just getting ready to go back to school and the stores are displaying Halloween candy and decorations.  While I'm holding on to what is left of the summer and not ready to embrace fall or it's holidays just yet, it does make sense to start working on Halloween craft projects now.

Several years ago I purchased some cute signs to decorate my walkway.  Over time the signs faded and fell apart.  Unable to find replacements I decided to make my own.  The supply list for the project is simple- wood and stakes from Home Depot, craft vinyl, paint and an electronic cutting machine.  The total cost one sign was about $5.


Finished Sign- Stake nailed to sign at top and bottom.


Finally finished and ready to attach stake.

Just need to finish the phrase!

Sign in progress.

 
After sealing the wood with craft varnish and painting it with Gesso, it was painted with two coats of acrylic craft paint.  The bat is a Treasure Box Designs file (available from the Silhouette Design Store). The phrase was also purchased from Silhouette.  The sign is slightly larger than 12 x 12 inches.  The bat was resized and printed on a laser printer using the landscape option to fit on  8 1/2 x 11 inch paper.  The image was hand cut because the wing extended past the registration marks for the Silhouette.  I did try to print the image on printable vinyl but my HP 5700 ink jet printer would not feed the vinyl through.  The bat will be applied to the sign with Mod Podge.


Directions For Yard Sign:

Orcal Black and Purple Vinyl (available from My Vinyl Direct, Cricut or Silhouette)
Batty Print and Cut file and Once Upon a Midnight Dreary quote- available from Silhouette Design Store
Piece of Wood cut slightly larger than 12x12 inches
White paper
Mod Podge-Hard Coat
Vinyl Transfer Tape- I used Cricut
Grey Craft Paint- I used two bottles of Americana
Foam Brush
Craft Varnish- I used DecoArt DuraClear
Wooden Stakes (available at Home Depot in the lumber section)
1.  Open the Batty file and place on the Silhouette mat, then open the Once Upon a Midnight Dreary file and place on the same mat.  Resize the files so that most of the Batty image fits on the lower left portion of the mat and the quote fits across the top right portion of the mat. Once you are happy with the layout, save the file.

2.  Open another mat and copy and paste the resized Batty file onto the new mat.  Add the registration marks for the Silhouette and use the Trace Outer edge and Cut options. Load plain white paper in a laser printer and print the Batty file. Place Batty on a Silhouette mat and load into the machine and cut the design.

3.  Seal the wood with the craft varnish and let it dry.

4.  Paint both sides of the wood with the grey paint.  Let it dry and then add a second coat of paint.  Set aside to dry.

5.  Open a third Silhouette mat and copy and paste the quote onto this mat.  Place the black vinyl on the Silhouette mat. I use painter's tape around the edges of the mat to keep the vinyl from slipping while it's being cut.  Load the vinyl into the machine and cut out the quote.  Carefully weed the excess vinyl from the design.  Apply transfer tape over the quote while it is still on the mat.  Position the quote on the upper right part of the sign, but don't press it in place yet.

6.  Liberally apply Hard Coat Mod Podge to the back of the Batty design and place Batty on the lower left portion of the sign.  Press in place and smooth out any air bubbles with your finger tips.  Re adjust the quote if needed.  Press the quote in place and use a brayer to secure it.

7.  Apply two more coats of Mod Podge to Batty, letting the Mod Podge dry between coats.

8.  Cut small triangles out of purple vinyl to fit around the edges of the sign.  I cut a 1/2 wide strip of vinyl and then cut the triangles from the strip, making each cut at an angle to form the triangles.  Place the triangles around the edges of the sign to make a border.

9.  Center the sign on stake making sure that the top of the stake is even with the top of the sign. Nail a wooden stake to back of the sign at the top and bottom.  I put a small nail through the purple border and then covered it with a small piece of purple vinyl.


Sunday, August 16, 2015

Williamsburg 2015

We just got back from our trip to Colonial Williamsburg. The weather was hot and humid as usual for this time of year.  In addition to joining the Colonial Army, we visited the cabinet maker and the DeWitt Gallery.


The cabinet maker is working on a harpsichord, to be used in Colonial Williamsburg.  This piece has taken over six months to make and it still needs more work before it's finished.


All furniture is crafted exactly as it would have been in the 18th century.  There are no power tools in the shop and any intricate detail work must be carved by hand.

The DeWitt Gallery is a museum housing paintings, furnishings,decorative items, clothing, books and letters from the 18th century.

This watercolor paint box caught my eye as I walked through the gallery.


 I was fortunate enough to find one of my favorite paintings from this era on display. Washington and Lafayette At The Battle Of Yorktown by Reuben Law Reed.  The painting is oil and gold paint on canvas. The Battle of Yorktown was the single most decisive battle of the Revolutionary War. The Marquis de Lafayette convinced Admiral De Grasse to delay sailing to the West Indies and to block off the entrance to Yorktown with his fleet. General Cornwallis was cut off and ultimately surrendered. Several months later America and Britain entered into peace negations.

 My family and friends know how much I love "my dear Marquis" (he was a hero in both the American and French Revolutions).  My kids would always roll their eyes as I proudly described how it was the Marquis de Lafayette who helped America gain her independence. When my family saw  this painting they quickly moved past it, in an effort to avoid the annual lecture on "my dear Marquis."

Washington and Lafayette at Yorktown

This year the gallery added a Doll House exhibit.  On display were several doll houses from the 18th century.  The focal point of the display was a massive, elaborately decorated Colonial doll house.  I took a photo with my husband who is 6'4" standing beside the house, to give you an idea of the scale of the piece.

Colonial Doll House

Furnished Rooms in the Doll House.
  
The DeWitt Gallery offers two floors of interesting exhibits, some of them are interactive.  When the mid-day heat becomes too much, try some of the indoor exhibits, like the DeWitt Gallery, the Capitol or the Governor's Palace.

Wednesday, July 29, 2015

Laurel Burch Cats Update

I have been busy stitching my Laurel Burch Cats.  The Feathered Friends has only a little back stitching left and then it can be framed.  I am almost finished the Feline Friends design.  I really like how the pieces turned out.  Even better, they were quick to stitch.  Only two weeks start to finish.  No I am not one of those ladies with nothing better to do than cross stitch.  I am constantly busy, leaving only a couple hours at the most, each evening to cross stitch. 

Feathered Friends


Feline Friends-almost finished!

Recently I pre-ordered Creative Girl Mixed Media Techniques For An Artful Life by Danielle Donaldson, from Amazon.  I was really unsure about ordering this book since Amazon had not posted a preview of the book.  I really like Danielle Donaldson's watercolors and was hoping for a book where she would share her techniques.  The entire book is based on her techniques and is set up on a project by project basis. Naturally I just had to create something using her approach to mixed media.  Watercolor is the foundation of the project and then paints, gel pens, markers and other mixed media elements are added to enhance the painting.

Just Thinking
Just Thinking is a journal entry that will probably never see the light of day.  May be it will end up in a finished piece, who knows?  Danielle Donaldson uses white space to highlight her paintings while I covered every inch of the paper with color.  Gel pens and black Sharpie were used to make the doodles in the background.  Everyone can use this book.  The instructions are easy to follow and the designs are simple and easy to draw.  If you can draw basic shapes you can easily draw a Creative Girl inspired figure.

A Hibiscus By Any Other Name

Lately I have devoted so much time and effort to maintaining the gardens, but it has paid off.  They are beautiful!  Everyone who visits our home always wants to visit the gardens.  My son-in-law has described it as "a beautiful retreat."  He really liked the perennial Hibiscus. He always liked Hibiscus but didn't like the fact that they were annuals in our part of the country. Brandon recently planted the perennial Hibiscus in his gardens and they are thriving.

As I acquired four more Rose of Sharon bushes, also a Hibiscus, the cashier at the garden center saw Hibiscus on the plant tag and said that she thought that these were Rose of Sharon and not Hibiscus.  I started thinking that a lot of people might not know the difference in the plants.  Since my gardens have all three types, I thought that a post might be helpful.

The Rose of Sharon, while technically a Hibiscus, is a flowering shrub.  It blooms continuously from the end of May until the first frost.  It is a perennial and has been quite hardy.  At my house, they have endured hurricane force winds, very cold winters and long hot summers. The White Chiffon is planted close to the house so I placed a trellis behind it to contain its growth.  This plant is growing more upright and has not spread as much as the violet one. Rose of Sharon is one of my favorite plants because it provides a lot of flowers without a lot of maintenance.

Five Year Old Rose of Sharon Bush

Rose of Sharon
White Chiffon Rose of Sharon

The tropical Hibiscus are so beautiful and they come in a variety of colors from the familiar orange to yellow, and a coral pink. The hummingbirds love the nectar.  These plants also like sunny locations and flower all summer long without a lot of maintenance.  However, unless one lives in a tropical location like Florida these plants are annuals.  They cannot tolerate cold temperatures.  I sometimes dig them up before the first frost and plant them in a container and place them indoors over the winter. Then in the spring I transplant them outdoors.

Tropical Hibiscus

Lately the garden centers in my area have been selling perennial Hibiscus.  These plants can withstand the cold winter temperatures.  The plant has larger leaves and larger flowers than the tropical plants.  The hummingbirds also like the nectar of these plants. Unfortunately Japanese Beetles also like the leaves.  I don't spray the plants because the birds like to eat the beetles.

Three year old perennial Hibiscus.

Recently planted perennial Hibiscus.

I hope the pictures and the description of the plants will be helpful.

Monday, July 6, 2015

Mail Art

It's always fun to get a package in the mail.  It's even nicer to receive a brightly decorated package.  The first time that I encountered "mail art" was while leafing through Sommerset Studio magazine.  The editor published some of the creative packaging the magazine received containing art submissions.   At the time, I was sending so many packages to Connecticut that I thought it might be nice for Brittany to see a brightly decorated box on her door step after a long day on campus.  The decorated package was an instant hit, she loved it and so did her neighbors, her room mate and the UPS driver.  I reached for a plain shipping envelope to enclose a small box containing a gift card,  but I couldn't bring myself to place the contents inside this boring envelope.  Maybe it's time to revive mail art.

For the past few nights I had been trying to work art into my busy schedule.  I bought a copy of Dyan Reaverly's  Distictly Dylusional art journaling book, some Dylusions spray inks, stamps and the Dylusions journal and had been working my way through the book.  As I finished up my first entry in this new journal I decided to use the left over stamped flowers in the mail art.

Dylusions Journal Entry

I squirted some light blue DecoArt craft paint on the envelope in several places and spread it out with an old gift card.  Next I added some dark blue, and then purple paint creating a marbled effect as I spread the paint out.  I found a Chat Noir cut out in the "Pandora's Box" of die cuts and decorative elements. I glued the cat and the flowers to the envelope and added a decorative border (with a quote from Shakespeare on the inside of the border) for the address label.  Once the label is attached to the envelope the design area will be covered with clear contact paper to protect it during shipping. Hopefully this decorated package will brighten everyone's day.

Chat Noir Shipping Envelope


Directions for Decorated Shipping Envelope:

8x10 Padded Shipping Envelope
DecoArt light blue, purple and dark blue craft paint
Used GiftCard
Dylusions Flower Stamps
Color Box Chalk Ink-black
Dylusions Acrylic Block
Chat Noir Die Cut- SVG Cuts Maple Manor
Black and yellow card stock
Black Sharpie Marker-regular and fine point
White Gel Pen
Prisma Colored Pencils
Strathmore Bristol Paper
Clear Contact Paper or Shipping Tape


1.  Stamp several sizes of flowers on the Bristol paper using the black ink.

2.  Color the flowers with the colored pencils using colors that will stand out against the blue background.  Carefully cut the white paper away from the flowers petals.

3.  Cut Chat Noir at the given SVG Cuts file dimensions, out of black card stock.  Glue a small scrap of yellow card stock behind the opening for the cat's eyes.

4.  Randomly squirt light blue paint over the surface of the envelope and spread with the gift card.  Squirt dark blue paint over the surface and swirl with the gift card.  Repeat with the purple paint. Set aside to dry.

5.  Glue Chat Noir the left side of the envelope.  Use the journaling block to add a scalloped border the right side of the envelope.  The border should be large enough to attach and address label later.

6.  Add doodles or Zentangles to the inside of the border, with the black Sharpie marker.  Use the white gel pen to highlight to doodles.  Use a fine point black Sharpie to add a quote around the inside of the border.

7.  Glue the flowers randomly around the envelope, leave room for the postage in the upper right.

8.  Outline Chat Noir and the flowers with the white gel pen.  Add the cat's pupils and whiskers with the black Sharpie.

9.  Cover with clear contact paper or shipping to protect the design.

Saturday, June 27, 2015

Laurel Burch Cross Stitch Kits

Wow I can't believe that my last art project was at the end of May!  The past month just flew by, can't believe it's almost July.

 At the end of May we took a vacation to Gatlinburg, Tennessee.  The Smokey Mountains are so beautiful and the atmosphere was very restful.  Gatlinburg has always been known for it's Arts and Crafts community, but sadly this community is starting to dwindle down.  Only the most dedicated artists and crafts people still remain.  We toured the shops and studios of a variety of artists, from a man that did detailed sculptures (of bears and other animals) using a chain saw, jewelry designers, and artists working on canvas paintings (while we looked on and asked questions).  It was nice for me to be able to observe other artists at work and to talk shop, although I'm sure my family was a little bored.  If you are looking for a restful vacation spot, then consider the Smokies.  The blue smokey haze coming off of the mountains in the morning is breathtaking. the scenery in the Smokey Mountain park is beautiful, there's Dollywood in nearby Pigeon Forge and there is great food and the nicest people that I have ever met.  It's been tough acclimating from Smokey Mountain time where everything is at a slower pace and no one rushes about, to the DC area where everything is a constant rush and we are driven by the clock.

With all of the rain that we have had lately, my beautifully maintained flower and vegetable gardens have become a haven for weeds. The thistles have over taken my plants, so I have been dodging the rain and attacking the weeds.  Sadly my department store "Wellingtons" finally gave out and completely fell apart.  I spend so much time in the gardens that I opted for a really good pair of Wellingtons.  I ended up with Hunter boots from England and love them (after all they are good enough for Her Majesty).  I seriously doubt that Her Majesty wears hers for gardening and mowing the lawn.

While I was in Gatlinburg, we drove to nearby Pigeon Forge, where Brittany and I visited the Dixie Darlings Cross Stitch shop.  The shop is large and impressive with lots of floss, silk threads and wool for stitching, and a variety of cloth in various sizes and thread counts.  In addition there are numerous kits and rows and rows of cross stitch patterns.  I ended up buying the hard to find 14 count Aida cloth in the Haunted color for the Headless Horseman cross stitch pattern.  While there I saw some small Laurel Burch kits by Mill Hill.  I love Laurel Burch's cats so this was a must have.  I started the kit while I was in Gatlinburg and am almost finished.  I was able to find one of the companion kits on line so that I can hang them as a pair once finished.

Laurel Burch Feathered Friends


So many interesting art instruction books have recently been published.  I ended up ordering Art At The Speed of Life (Pam Carriker, not a recently published book), Creating Art At The Speed of Life (Pam Carriker), Mixed Media Portraits with Pam Carriker, Drawing and Painting Beautiful Faces (Jane Davenport), and No Excuses Watercolor (Gina Rossi Armfield).  I admit it, books are my downfall!  Most of these books are in workshop format and I decided to work my way through the lessons at my own pace rather than to try to find time to fit classes into my busy schedule. 

At the present, I am working my way through Jane Davenport's book.  This book shows how to create beautiful portraits in Jane Davenport's whimsical style.  The faces lend themselves to use in art journals and mixed media.  Pam Carriker's book focuses on drawing portraits using the face mapping technique. She demonstrates face mapping from a photo.

Thursday, May 21, 2015

Mixed Media Welcome Sign

Oh the weather has been so nice!  Warm and lots of sun so naturally I spend as much time outdoors as possible.  The peonies just bloomed.  The Sarah Bernhardt peony had the most beautiful large, pink blooms and then a violent rain storm knocked all of the blooms on the ground.  Oh well it was beautiful for one day, but some good did come from this.  After the rain was over, we had the most beautiful rainbow that I have ever seen.

Lately I have been working on little decorative accents for my house.  The garage is an area that has been overlooked.  It's not an area that anyone in the family ever thought of decorating, until now.  Why shouldn't the garage entrance to the house be inviting?  In an effort to try to give the garage a face lift, I made a welcome sign.  My husband really likes the sign for it's simplicity.  It's for the garage so I didn't want to go over board on embellishments.


This was a quick, easy and inexpensive project.


Directions for Mixed Media Welcome Sign:

Art Minds Clear Pine Craft Wood  5.25 x 12 inches- available at Michaels
Liquitex Acrylic Paint- Payne's Grey, black
SVG Cuts Maple Manor cutting files-Chat Noir
Gesso
Ranger Ultra Thick Embossing Enamel- Clear
Heat Gun or Ranger Melting Pot
Teflon coated craft tweezers
Golden Crackle Paste
Lavender color flowers
Martha Stewart Leaf Paper Punch
Black Card Stock for Chat Noir and outline
Scrap of olive card stock for leaves and gold for cat's eyes
Sheer Purple ribbon
Vinyl for electronic cutting machines- light purple and black
Computer font or Sketch font from Silhouette Design Store
Hot Glue Gun
Sharpie Marker- black
Tim Holtz Distress Ink-Twig
Craft mat or ceramic tile
Old paint brush

1.  Cut Chat Noir and outline out of black card stock to dimensions given in cutting file.  Glue the cat to the outline and then glue a scrap of gold card stock under the image for the eyes.

2.  Melt the UTEE in the Ranger melting pot and use tweezers to dip the cat until the entire image is coated. Set aside on the non stick craft mat to harden and dry.  If using the heat gun to melt the UTEE, place the cat on the craft mat.  Spread UTEE evenly over the cat and heat until the UTEE has melted.  Set aside to harden.

3.  Coat the wooden sign with gesso on both sides and let it dry.  Coat the the entire piece with Payne's Grey, let it dry and add a second coat of paint.

4.  After the paint has dried, apply a smooth coat of crackle paste with an old gift card.  Set aside to dry overnight.  Don't try to rush the drying with a heat gun, the crackle pattern will be more noticeable with air drying.

 5.  Once the piece is completely dry,  apply a thin coat of black paint with a foam brush and wipe off with a soft cloth or paper towel, until the only black paint that remains is in the cracks.

6.  Using a font from your computer or a purchased font, cut Welcome out of black vinyl, to fit the center of the sign.  I used the Silhouette Design Store Sketch font and cut it at 7.25 inches long.  Use the offset option to make an outline of Welcome and cut it at the same dimensions as the black lettering, out of light purple vinyl.

7.  Adhere the purple Welcome outline to the center of the sign and place the black lettering over the outline.

8.  Glue Chat Noir to the left side of the sign, letting his tail hang below the bottom edge of the sign. 

9.  Glue flowers around the right side of the sign and next to Chat Noir.  Punch leaves and glue under the edges of the flowers.  I used seven leaves but you can use more or less.

10.  Place a few drops of the distress ink on a craft mat and dip the tip of the paint brush handle in the ink.  Dot the ink randomly over the sign.  Picking up additional ink from the craft mat when necessary.

11.   Glue a piece of sheer purple ribbon behind the top edges of the sign to make a hanger.  Cut two pieces of ribbon large enough to tie small bows. Glue the bows to the top front edge of the sign.

Wednesday, May 13, 2015

Mixed-Media Journal

Art journaling has never been my strong point.  Journals are as important to artists as they are to writers. It's a place to experiment with new products and work out ideas.  Sometimes an idea works out and sometimes it doesn't, but that is part of the learning process.

 I really like the idea of keeping an art journal but I'm intimidated by it.  Recently I joined the Documented Life Project  group.  The other members of the group are very talented and creative and their journals are beautiful.  One member of our group had her work published recently in Somerset Studio magazine. Each month we have a theme.  April's theme was Color Safari, exploring inks and paints.  Dyann Reaverley was the guest artist. It was fun learning how to use the new Dylusions paints and inks and I enjoyed fun working with such a creative group of women who are encouraging and inspiring.

Here are some of my Color Safari projects using Dylusions paints and ink.  This background page was a lot of fun and used very little paint.  The Dylusions paint by Ranger is one of my favorite journaling products.  It's thin, goes on smoothly, doesn't soak through the page and dries quickly.  It's a definite improvement over the heavier acrylic paints. To achieve this background I applied orange Dylusions to the paper in a circular motion (with Ranger Foam Blending Tool), next turquoise was added around the edges, followed by grass green and then purple was blended over the entire page.  When using Dylusions, a little goes a long way. Always dip the foam blending tool in the paint lid (not directly in the paint) and swirl the paint around on a non stick craft mat (I used a small white glazed tile from Home Depot) to blend it, then apply the paint to the paper. Keep adding light layers of paint until you achieve the desired color.


These next photos are journal pages using Dylusions paints and inks.

Annabelle Lee

The background of this page was made using turquoise and purple paint.  The background was layered using Stencil Girl's Square Dance (circles in squares) 6x6 stencil and applying Tim Holtz Vintage Photo distress ink to the stencil.  The page was misted with water.  Once the page had dried, Stencil Girl's Talia the Rain Goddess was centered on the page and Viva purple metallic embossing paste was applied over the stencil with a palette knife.  Remove the stencil from the page and soak in water immediately to remove the modeling paste.  Let the page air dry over night.  Once the page is dry, outline the circles in the background with a black Sharpie marker.  Outline the black circle with Dina Wakely Heavy Body Acrylic paint- Penny and a fine tip applicator to fit the paint tube (this is available from Ranger).  Make a circle in the middle of the large circle, using the Penny colored paint.  After the page is dry add the quote of your choice.

 I was reading Edgar Allen Poe's poems while waiting for this to dry and decided to use a quote from Annabelle Lee.  The eyes of the piece are mesmerizing and Talia turned out beautiful so I chose the line " The stars never rise, but I feel the bright eyes of the beautiful Annabelle Lee."-Edgar Allan Poe.  Annabelle Lee is being copied and framed to hang in my home, without the white gel pen quote.


This bird was created by layering yellow Dylusions paint over the entire page and then adding bright pink and orange around the page.  I used Stencil Girl's Eyes 6x6 stencil and Tim Holtz Vintage Photo distress ink over the stencil.  To cover the entire page, move the stencil around.   Outline the some of the areas of the stencil with white gel pen and other areas with a fine line black Sharpie pen.  Outline black outline with Dina Wakely Turquoise Heavy Body Acrylic paint and let it dry.  Center Stencil Girl's Perched Bird 6x6 stencil on the page and cover with Liquitex Light Modeling Paste.  Let the bird dry.  Once dry, use a Bronze metallic Sharpie marker to draw in a branch and outline the branch with the fine line black Sharpie.  Color the leaves and the bird's eye with the Dina Wakely turquoise paint and make a freehand swirled border around the left side and the top of the page. Let the paint dry. Outline the swirled border with white gel pen.  Use TCW's Doily stencil and white Dylusions paint to add accents around the top and sides of the page.  Once dry, lay the stencil over the white stenciled areas and add bright pink Dylusions paint.  Once the page is completely dry spray with Walnut Ink Java color and then spritz with water until the ink beads up. Blot with a paper towel and repeat.  Gently wipe the ink from around the bird to outline him.

Pearls
Pearls is a tribute to Coco Chanel.  The quote "Pearls will set you free." came from Karen Karbos's book the Gospel According To Coco Chanel.

 While working in the Life Project class, we had sprayed so much water on our pages that the spray ink had soaked through the page.  I was using the Canson Mixed Media journal and the paper was not heavy enough to prevent the ink from saturating the page and bleeding through the back.  I didn't want to waste the page so I used the medium mask from Dylusions Flossie stencil and mask.  After laying the mask on the page, I used Dylusions purple paint the cover the entire page. Next I used a Hedi Swapp stencil and applied key lime Dylusions paint over the stencil.  The paint turned gold when it reacted with the purple.  I outlined the stenciled squares with white gel pen (on the right side of the page) and outlined Flossie and added her pearls with the gel pen. The chain was made by making small circles with the Penny colored Dina Wakely paint.  The Fleur de lys with made from scraps of paper using the Martha Stewart paper punch, after gluing them to the page, they were outlined with turquoise Dina Wakely paint.

Monday, May 4, 2015

Decorating With Paper and Vinyl


In the process of reorganizing my studio, I decided it's time to give it a "face lift" rather than a complete makeover.  The Jet Max white craft storage units store all of my art and craft supplies but the plain white cubes are beginning to look a little tired and drab.  They needed some decorative elements but painting was out of question.  Lately I have been experimenting with using vinyl in decorative projects around the house. I like the fact that vinyl can be removed or changed if I tire of it.  My printer and the storage cube are candidates for vinyl.  The desk top storage units will be papered and painted.

Decorated Printer
Decorated door to on storage cube.

The white storage units on my drafting table are functional but boring and not very inspiring.  I really like Graphic 45 Papers and wanted to use the paper from the Artisan collection in a decorative project.  I chose the peacock paper to cover the drawers on the desk top storage units and then painted the edges of the cubes with a mixture of Dylusions turqouise, Liquitex light blue and Liquitex white acrylic paints.  I added a few drops of Golden Acrylic Glazing Medium to make the paint flow.


Larger Storage Unit


Smaller Storage Unit and Washi Tape Storage.


 Directions For Decorating With Paper and Vinyl Projects:

Recollections Storage Cubes from Michaels
Hard Coat Mod Podge
Foam Brush
Graphic 45 Paper- I used Peacock from the Artisan Collection

Vinyl designed to be used in cutting machines- I used teal and bubblegum pink vinyl from My Vinyl Direct. They have a large selection of colors and sizes and offer a custom color pack where you can pick 12 (12x12) sheets of the colors of your choice.
Black vinyl- Left over Cricut vinyl from Michaels.  Both Cricut and My Vinyl Direct use vinyl manufactured by Orcal.

SVG Cutting Files- C'est la vie was from Snap Dragon Snippets and Carpe Diem from the Silhouette Design Store
Dylusions Turquoise acrylic paint
Liquitex White and Light Blue acrylic paint
Small Flat Paint Brush


1.  Cut the Carpe Diem out of teal vinyl, using the SVG cutting file dimensions (without resizing).  I placed a 12x12 sheet of vinyl on the cutting mat and taped the edges with Scotch Blue Painter's Tape to secure it.  Carefully weed the excess vinyl from the cutting mat.  Place the phrase on the front of the storage cube door and press in place.  Cut four corners from the vinyl left on the cutting mat and place the vinyl corner in each corner of the door, as accents.

2.  Cut the Eiffel Tower out of black vinyl, without resizing the original image.   Align the tower on the center of the printer and press in place to secure it.  Cut the heart and c'est la vie out of pink vinyl and align the phrase under the tower and the heart in the center of the tower.  Attach a small adhesive pink crystal to the top of the tower and adhesive pearls at the ends of the flourishes.

3.  Remove the drawer pulls from the desk top storage cubes and set aside.  Cut the 12x12 peacock paper in half.  Use Mod Podge to glue the paper to the drawer of the large storage cube.  Apply a coat of Mod Podge to the paper to coat it and set aside to dry.

4.  Cut the remaining half sheet of the peacock paper to fit the drawer of the small storage cube and the front panels of the washi tape storage cubes. Glue in place with Mod Podge and coat the top of the paper with Mod Podge and set aside to dry.