Saturday, November 10, 2012

Silk/Camel Hair Scarf

The yarn from the Woolen Rabbit has finally arrived! After having one of those, Why did I even bother to get out of bed this morning?, days it was a pleasant surprise to open my mailbox and find the yarn. I wound the yarn into a ball and started to knit with the pattern that I had chosen. After knitting 10 rows I hated the result, so I chose another pattern. I kept knitting, ripping out and starting over until I finally found a pattern that gave me the results I was looking for. Woolen Rabbit Oasis is a beautiful soft yarn (70% silk and 30% camel). The high silk content gives the yarn a lot of drape which was not suitable for the patterns that I originally chose. I finally settled on a lacy pattern that isn't very open and works well with this yarn.

Woolen Rabbit Oasis yarn-Moroccan Spice color


It's always so hard to come up with unique gifts for family and friends. Two years ago, I decided to give handmade items as gifts (paintings, knitted items). I was really nervous when the recipients opened their presents. Would they like it, what if they don't? The response was overwhelmingly positive. Not only did the recipients like their gifts but they sent thank you cards telling me how much they liked them. Since it's been so cold lately, I plan to give a lot of knitted gifts.

Brittany is living in Connecticut and gets so cold there. She really could use a knitted scarf. Brittany loves camels and has a collection of stuffed camels.  I thought that she might like a camel hair scarf. I found Woolen Rabbit Oasis yarn a blend of silk and camel hair in beautiful custom dyed colors.  I chose the Moroccan Spice, a deep rich Persian red with hints of gold for the scarf. When ordering from Woolen Rabbit, you must consider dye lots (the yarn is dyed for each order) and order enough yarn to complete your project. Oasis yarn has 375 yards to 100 gram skein. I wanted to make the scarf approximately 72 inches long and 7 inches wide, so I ordered 2 skeins of yarn to be one the safe side.
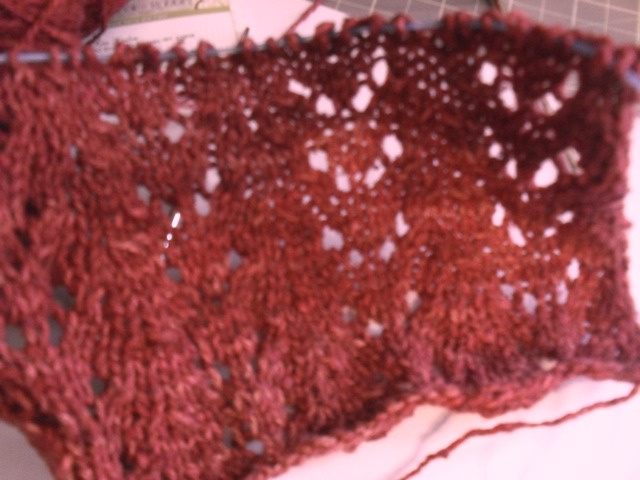
Work in progress.

 Like most of my projects, this one is beginner friendly. Beginners who know how to knit, purl and do yarn overs will be able to knit this scarf with no trouble. Woolen Rabbit Oasis has good yardage, so I only needed one skein of yarn for the scarf.

Marrakesh Scarf Directions:

1 skein Woolen Rabbit Oasis yarn (70% silk/30% camel)-Moroccan Spice

Size 5 knitting needles- I am using Addi Clicks

Gauge: 5 sts = 1 inch/ 20 sts = 4 inches  The gauge doesn't have to be exact since this is a scarf.

Using size 5 knitting needles cast on 38 stitches.

Row 1 (right side of scarf): Knit all stitches.
Row 2 : Purl all stitches
Row 3:  K1 (edge stitch), * K2 together, K2, yarn over, K1, yarn over, K2, slip one stitch knit-wise onto right needle, knit the next stitch on the left needle and pass the slipped stitch over the one that you just knit *; Repeat from * to * to last stitch, K1 (edge stitch).
Row 4:  Purl all stitches
Row 5:  K1 (edge), * K1, K2 together, yarn over, K3, yarn over, slip one stitch, K1 pass slipped stitch over, K1 *; repeat from * to * to last stitch K1 (edge).
Row 6:  Purl all stitches

Repeat rows 1-6 for pattern until desired length. Bind off stitches loosely. Lightly block the scarf with steam.

Note: My finished scarf ended up being 60 inches in length. I used one skein of Woolen Rabbit Oasis and knit until I was almost out of yarn, ending on Row 6 of the pattern.

Monday, November 5, 2012

Decorated Shipping Boxes


Lately I have been doing a lot of shipping. It seems like I am always standing in line at either the Post Office or the UPS store holding a package. I always made sure the contents of the package were attractively wrapped and made a nice presentation but I never thought about the shipping box itself. I always shipped in a plain brown box. I was reading the latest issue of Somerset Studio and there was a call for decorated envelopes and shipping boxes. The magazine staff liked getting letters and art submissions in creatively decorated envelopes and boxes.

I started thinking about it and thought, why not? My philosophy has always been why does something have to be boring and mundane just because it's functional? I was getting ready to send a package of sugar cookies off to Brittany, so why not send them in a decorated box? I could just imagine the look on her face as she saw one of my artistic creations sitting on her doorstep.

I had just finished reading, the recently published, Drawing and Painting Imaginary Animals by Carla Sonheim. I drew my rendition of a cat that was featured in the book. I was pleased with the way that the cat turned out and decided to use him to decorate my shipping box. I planned to ship through UPS and they do not allow the outer shipping box to be wrapped so I decided to decorate one side of the box. UPS accepted my decorated box with no problem.


My rendition of the Cat on Page 9.


Work in progress.
Close up of colored cat drawing.


Finished box.


Directions for Decorated Shipping Box:


Brown shipping box
Grey, light purple and dark purple card stock
K&Company Jubilee Printed Paper Pad- dark purple print
Martha Stewart Butterfly paper punch and Tulip paper punch
Cricut Beyond Birthdays cartridge
Stickles Glitter Glue- blue
Decorative edge scissors
Pearlescent chalk
Picture or drawing
Colored Pencils- I used Derwent Studio Colored Pencils

1.  Scan in your drawing or picture. I opened the picture with Microsoft Picture Manager and increased the contrast and the brightness to lighten the pencil shading of the drawing.

2.  Once you are satisfied with the picture, print it on white card stock. I used the wallet size option on a photo printer.

3.  Use colored pencils to color in the image. I chose two shades of blue for the cat and added dark purple for the shading and pupils and lavender for the eye itself. Once you are satisfied with the colors, trim away the excess white card stock.

4.  Cut a piece of dark purple print card stock approximately 1/4 inch larger, on all sides, than the drawing. Glue the drawing to the card stock.

5.  Cut a piece of light grey card stock slighter smaller than the box. Glue the card stock to the box. Glue the drawing to the center of the grey card stock.

6.  Use the Cricut cartridge to cut out "Thinking of You" at 1 inch out of medium blue card stock.  Glue it to the bottom of the drawing.

7.  Punch three dark purple and three light purple butterflies out of card stock, using the Martha Stewart butterfly paper punch. Position the butterflies randomly on each side of the drawing (3 on each side) and glue in place.

8.  Use the decorative scissors to make an edging out of light purple card stock. Apply this edging to the left and right edges of the grey card stock.

9.  Using scraps of card stock and the Martha Stewart Tulip paper punch, punch a green tulip and a lavender tulip. Cut the top of the lavender tulip off and glue it over the top of the green tulip. Glue the tulip that you just made, to the lower left of the "Thinking of You" phrase.

10.  Apply the chalk to the grey card stock panel. Randomly apply blue-violet around the panel. Next apply dark purple and then light purple highlights to the panel.

11.  Apply dots of glitter glue to the butterfly"s body and wings and to the decorative border on the sides of the panel. Let the glitter glue dry completely.

You may want to seal your design to prevent damage. I sealed mine with clear shipping tape.

Update: The UPS driver liked the box and said that it brightened his day. He mentioned that it was nice to see something besides plain shipping boxes.

Thursday, November 1, 2012

So Many Yarns, So Little Time

I first started knitting when I was in college. In those days the yarns were limited to wool or acrylic-no silk, cashmere, Alpaca or any other exotic fiber. Times have changed and today's knitter has a variety of yarns available- silks, cashmere, wool and fiber blends. Thank goodness knitting has lost it's stigma as being "uncool and something that only Grannies did" and younger women are beginning to see the value in knitting. It's this renewed interest in knitting that is responsible for the beautiful yarns that we have available today,

I love knitting and am inspired by the current yarns available on the market. While I try to buy from my local yarn shop whenever possible, lately I have had to turn to the internet for yarns that my local shop doesn't stock.
 
Recent yarn acquisitions!


My planned projects include Jared Flood's Rock Island Shawl knit in Lorna's Laces Helen's Lace (silk/wool blend) in Grand Street Ink color, a lacy mohair top from French Girl Knits in Louet's Kid 'n Linen (mohair/ linen blend), Artyarns Cashmere 1 and Ensemble Light (cashmere/silk blend) and two more pairs of socks in Mountain Colors Crazyfoot Sun River (red blend) and Mountain Twilight ( the dark purple, blue, burgundy and brown blend- shown in front left). This yarn is a beautiful dark blend that didn't photograph well.

Fabulous Yarns was the source for Artyarns. I can't say enough good things about this company. They have prompt service (they shipped during Hurricane Sandy), they discount their yarns and they offer free patterns. I found two free shawl patterns that used one skein of yarn making it very affordable to knit with cashmere.The yarns that I purchased are beautiful and luxurious. I can't wait to knit with them. 

I am waiting for one more yarn to arrive- Woolen Rabbit's Oasis , a DK weight wool and camel blend. I am designing a pattern especially for this yarn and can't wait to get started.

Monday, October 29, 2012

Franken Diva

For days those of us who live on the East Coast have been warned of the impending arrival of Hurricane Sandy. My family made the necessary emergency preparations for the arrival of Sandy. We are not near any water sources and our house sits on a hill so we are expecting a lot of rain, high winds and possible power outages. Fortunately we are not in an area where we are forced to evacuate and can wait the storm out at home. While I am waiting out the storm, I decided to head off to my Atelier to work on some projects. While I still have power (although the lights flickered while I am typing this) I fired up the Cricut and cut the necessary shapes. My drafting table faces the window and every time I look up from my work I can see the trees swaying wildly in the wind and rain furiously, pounding on my window.

Just in time for Halloween, Cricut released the Frightful Affair cartridge. The images on this cartridge are a little more sophisticated than the cutesy Halloween cartridge that they previously released. I like both types of cartridges and like have a variety of images. My favorite image on this cartridge is the Bride of Frankenstein. She is not the same old Bride of Frankenstein that one encounters every where but a "Bride" with attitude.  I was looking for a background for my Hello Kitty Halloween project and had the purple paper laying on my desk. The color didn't work for Hello Kitty but it would be perfect for the "Bride". I viewed her as a bit of a diva and decided to work from there.


 Here's the finished card. Oh, did I mention that I love bats and that they are a must for my Halloween cards?


Directions for Franken Diva Halloween Card:

Black, cream, light grey and yellow card stock
K&Company Kelly Panacci Halloween paper- purple with black dots and black with black glitter design
Cricut A Frightful Affair cartridge
Martha Stewart Iron Fence border punch
Stickles glitter glue-Ice Stickles
Recollections self adhesive pearls, Halloween crystals, small clear crystal
Black ribbon with silver spider web design
Sizzix die cutting machine
Sizzix bat die


1.  Fold an 8 1/2 by 11 inch piece of light grey card stock in half to make a card.

2.  Cut a piece of black card stock with black glitter design approximately 7 3/4 inches high by by 4 3/4 inches wide. Cut the purple dotted card stock approximately 6 3/4 inches high by 4 1/2 inches wide. Glue the purple dot card stock on top of the black card stock leaving a border of approximately 1/4 on all sides.

3.  Cut nine bats using the Sizzix machine and bat die. If you don't have the Sizzix bat die, you can substitute any bats (Cricut, etc.) You want the bats to be fairly small with long wings and small bodies.

4.  Cut a small round circle out of yellow card stock. I used a circle template just because I had one available, but you can use any small circle shaped object as a template.

5.  Use the Martha Stewart Iron Fence border punch to punch a fence out of black card stock. Trim the fence to fit the purple and black dotted card stock. Glue the fence to the bottom edge of the purple and black dotted card stock.

6.  Using the Cricut Frightful Affair cartridge cut the "Bride" 's dress out of black card stock at 5 1/2 inches. Press the shift and "Bride" key.  Next cut the "Bride" out of light cream card stock by pressing the "Bride" key.  Assemble the "Bride". Use a fine tip red marker to draw in her mouth.

7.  Center the "Bride" on the purple and black dotted card stock and glue her in place slightly above the bottom edge of the fence. Use Ice Stickles to fill in the white streak in the "Bride" 's hair. Add a small self adhesive pearl to the bolt on the side of her head. Apply 3 small pearls to her wrist to make a bracelet. Apply one small clear crystal to her ring finger and apply a golden Halloween crystal to the neckline of her dress.

8.  Apply 2 small and 2 medium purple Halloween crystals to the fence posts.

9.  Glue the yellow circle to the top right corner of the purple and black dotted card stock to make a moon.

10.  Gently fold the bat's wings upward to give them the illusion of flight. Glue 2 bats on the moon and glue the rest of the bats randomly around the top of the card.

11.  Center the black and black glittered card stock base on the light grey card stock and glue it in place.

12.  Tie a small bow out of the black ribbon and glue it to the bottom of the card.


Friday, October 5, 2012

Custom File Folders

In my continuing effort to reorganize my atelier, I purchased two of the Jet Max cubes from Michaels. I decided that a hanging file drawer and the three drawer cubes would give me a lot of useful storage and tuck neatly under my drafting table. The drawer for hanging files was a great idea! I imagined being able to store patterns and drawings from art projects and having them readily available when I needed them. The drawer went together easily and it even came with a package of six hanging file folders. I quickly filled up the six file folders so I reached for a box of standard hanging file folders from the office supply store. Then I discovered that the hanging bars on the file drawer were not standard ( they are wider than standard file drawers). I searched the Internet and ultimately found that the wider file folders could be purchased from Michaels but my Michaels doesn't carry them.

My search for the file folders indicated that a lot of people are still having trouble finding folders to fit the Jet Max file drawer. I decided to post my handmade file folders for those of you who want to make your own. The Jet Max file folders are 1/2 inch wider and three inches higher than the standard office supply store file folders. They are also lighter weight and not as sturdy as the standard file folders. My file folders are sturdier and can be made in any color to match your decor. The only drawback is that you need to use two file folders to make one finished hanging file folder.


Remove hanging bar from second file folder.

Open folder and lay flat with outside facing up.
Use a brayer to help the card stock stick to the file folder.
.                  
Fold the edge of the card stock over the hanging bars.
Score card stock 2 1/2 inches from the end.


Finished hanging file folder.


                                      Directions for Hanging File Folders:

Box of Standard Hanging File Folders- available at Office Supply Stores
X-Acto Knife or other craft knife
Glue or double stick tape- I used the Scotch ATG tape gun
Card stock- I used a blue and yellow print from DCWV Sorbet Stack. You will need 2 pieces of the same color or print to cover one file folder.
Brayer
Hot Glue Gun
Martha Stewart Scoring Board and Bone Folder


1.  Split the top edge of a file folder with the craft knife and remove the metal hanging bar. Repeat on the other edge to remove the other hanging bar.  Remove the hanging bars from the second file folder and carefully peel off the overlapping edge from the inside of the folder. Try not to damage the folder because this is the one that you will cover with card stock.

2.  Open the second file folder and lay it on the desk top with the outside of the folder facing up.

3.  Score a piece of card stock 2 1/2 inches from the edge of the card stock. I used the Martha Stewart Scoring Board to get a perfectly straight scored edge.

4.  Lay the card stock on top of the open file folder and center over the folder. The card stock will be slightly wider (approximately 1/8 inch on each side) than the file folder. Apply tape or glue to the file folder along the edges and across the middle. Align the card stock with the bottom edge of the file folder. center the card stock and press into place. Use a brayer over the card stock to assure that it adheres to the file folder.

5.  Position the metal hanging bars one on top another so that they create a 13 inch long hanging bar. Use the hot glue gun to glue them in place.

6.  Fold the card stock along the scored line and use a bone folder to crease it.

7.  Apply a thin layer of glue, with the hot glue gun, near the folded edge of the card stock. Position the hanging bar, that you just made, close to the folded edge of the card stock (on top of the hot glue) and press in place.

8.  Repeat these steps for the other side of the hanging file folder.

Thursday, September 13, 2012

Flapper Birthday Card

It's been quite a while since I have done a Cricut card. I saw the Art Deco cartridge this summer but wasn't sure if it contained enough useful images to justify buying the cartridge. The back of the  box only showed a sample of images from the cartridge and based on that sample there just wasn't enough to entice me to purchase the cartridge. I don't know why Cricut decided to show only a sample of images rather than showing all of the images available on the cartridge but I don't think it's a good marketing practice. In my case they almost lost a sale. Since I really liked the flapper, decorative elements and the Empire State Building, I decided to try to find the cartridge on line to see if I could view all of the images on the cartridge. After viewing all of the images I found quite a few that I really liked ( the Greyhound, bird, other buildings and people).

The past several weeks everything has taken precedence over my art projects. Since I'm in the process of reorganizing my Atelier, it is in a state of disarray and not very inviting. Last night I cleared off the drafting table so that I would have a place to work. Even though I don't like the ambiance I really needed to make a birthday card and the Art Deco cartridge was lying on my drafting table begging to be used. The Flapper is one of my favorite images on this cartridge and I thought that she would make a cute birthday card.


Here's the finished card. I added small stick on pearls to the strand around the Flapper's neck. After all, Is she really a Flapper without her her pearls? It was tedious to stick on each pearl but the result was worth it. When applying the pearls leave a small space between each one to mimic the way real pearls are strung.


Flapper Card Directions:

White, red, black beige and light grey card stock
Me and My Big Ideas Mambi Sheets Animal Print paper- black and white leopard print
Recollections Roses- light and dark grey
Recollections Self Adhesive pearls- small pearls
Peach and dark rose colored pencils
Artist Loft color pencil blender
Fine point black felt tip pen
Tattered Angels Pearl Glimmer Mist
Zots and Foam Dots


1.  Print a card greeting on the front and the inside of the card. Fold the card in half and crease.

2.  Using the Cricut Art Deco cartridge cut the flapper at 5 inches out of beige card stock. Press the Shift and Flapper keys and cut the clothes at 5 inches out of red card stock. Press the Layer and Flapper keys and cut the stockings and pearls out of white card stock. Next press the Layer, Shift and Flapper keys to cut the shoes and belt out of black card stock. Assemble the Flapper.

3.  Apply the self adhesive pearls to the necklace around the Flapper's neck.

4.  Color the Flapper's face and arms with the peach colored pencil. Use the color pencil blender to blend the skin tone. Apply a little dark rose colored pencil to the Flapper's cheek and lips. Use the black felt tip marker to draw her eye.

5.  Lightly spray the image with Pearl Glimmer Mist and let it dry.

6.  Cut a piece of light grey card stock approximately 5 1/4 inches high by 4 inches wide.  Center Flapper on the card stock and attach with small foam dots.

7.  Cut a piece of black and white leopard card stock approximately 6 inches high by 4 3/4 inches wide. Attach Zots to the back of the card stock. Center the card stock on the front of the card below the greeting and press in place. Attach Zots to the back of the grey card stock. Center the card stock on the leopard card stock and press in place.

8.  Glue a dark grey rose to the upper left corner of the leopard card stock and a light grey rose to the bottom right corner of the leopard card stock.


Sunday, August 26, 2012

Crazy foot Sock

I bought a copy of Ann Budd's Master Sock Knitting and some yarn while on vacation. I was anxious to start knitting. The book is divided into two parts: one devoted to knitting top down socks and the other section contains patterns for knitting socks from the toe up. I have tried both methods and I definitely prefer knitting from the top down.

 I personally think that the socks knitted this way fit my foot better. Besides I like knitting socks on double pointed needles.  I found knitting socks using two circular needles to be a bit confusing and I didn't like the ladders that were formed at the join of the needles. While buying this yarn, a woman in the yarn store approached me and asked if I had tried knitting from the toe up rather than using double pointed needles? I explained that I have tried both methods and still prefer the double pointed needles. She really loved knitting on two circular needles and tried very hard to convince me that this was the best way because I wouldn't have to "mess with those double pointed needles." I thanked her for her advice and quietly went to retrieve my yarn, which by this time had been wound into balls.

What can I say? I like knitting on double pointed needles so naturally I chose a sock pattern knitted from the top down. Anne Hanson (knitspot.com) is one of my favorite designers so when I saw her lacy sock pattern in the book I just had to knit them. The pattern is well written and easy to follow. I knitted my socks in Mountain Colors Crazyfoot in the Alpine color. This pattern is called a lace pattern but it's not an open lace making it suitable for socks. I'm really happy with the finished result. The Crazyfoot yarn gives the sock a nice cushy feel and the socks fit well with my Birkenstock clogs.

Sock Update: This pattern worked so well with the Crazyfoot yarn that I started knitting another pair in the Winter Sky color (deep blues and purple). I love my socks and wear both pairs on a regular basis. Even after repeated machine washing the socks still look and fit great.


Thursday, August 9, 2012

Colonial Williamsburg


I spent the last week in Colonial Williamsburg. Once a year I make the trek back into the 18th century. Since I love 18th century history it's the perfect place for me to escape modern life and reconnect with the past. When I mentioned that I was vacationing in Williamsburg, again this year, I got the "Oh that's nice" response from my friends. Don't be fooled into thinking that a visit to Colonial Williamsburg is a boring waste of time. On the contrary, there are interactive programs for the whole family and children especially are invited to participate with the actors in many of the activities. The actors do a good job at portraying events so that you feel almost like you are in the 18th century. I took some photos to share with you.


Wigmaker


Colonial Gardens


Basket-makers


Inside the Capitol

Messenger delivering message for the Governor


Don't worry about being bored in Williamsburg, there are plenty of other things to do besides the Colonial activities, Busch Gardens, plantations and other historic sites and plenty of shopping.

  The Williamsburg Pottery Factory has a reputation for bargains on everything from cooking supplies and gourmet foods to frames and floral arrangements. The original Pottery was housed in large steel buildings that interconnected where you could literally shop until you dropped and since it was not air conditioned it often got very hot. The new Pottery although a lot nicer and air conditioned, doesn't have the same charm that the old Pottery did. It's laid out like a store rather than a warehouse. There are still bargains but you really need to know your prices to ensure that you are getting a true bargain. I did get a heavy French souffle dish for $14 versus $40 on line and my husband got a large crab steaming pot for $49 versus $100 on line. The Pottery does offer senior citizen discounts to those 55 and over and military personnel discounts. The Pottery is only a short ride from the Prime Outlets with brand name stores. There's a Dooney and Burke factory store with great prices and fantastic sales. They sell seconds which are often bags with slightly irregular stitching or overstocks of their first quality bags.


New Pottery


Old Williamsburg Pottery Factory


Since Brittany and I love to knit we had to make a stop to the Knitting Sisters on our way home from Busch Gardens.  The Knitting Sisters is a large well stocked yarn shop that is run by two sisters. The owners are very knowledgeable and helpful. We were looking for sock yarn and they suggested Mountain Colors yarn (their favorite). We liked the yarn so much that Brittany and I bought five skeins. They also helped Brittany to pick out a beginner sock pattern. Now that we are back home and knitting with the Mountain Colors yarn we are so glad that the Knitting Sisters suggested this yarn to us.

This is the sock that I'm knitting from Mountain Colors Crazyfoot  Alpine Color.


Saturday, July 7, 2012

Skethchbook Makeover

Claude Monet once said that "Color is my day long obsession, joy and torment." Like Monet, I love color, it brings me joy. In fact one could say that I am obsessed with color, especially blue and purple. My gardens are filled with color and I spend a lot of time enjoying the symphony of color that my landscaping has created. Color inspires me so it is no coincidence that I chose a room with a direct view of my gardens for my studio.

Lately I have been giving the boring, mundane items in my studio a "face lift". Why can't functional items be colorful and inspiring? After reading Doodles Unleashed: Mixed Media Techniques For Doodling, Mark-Making & Lettering by Traci Bautista I decided to give my dull, boring sketchbook cover a make over. I was attracted to this book by it's bright cover and after leafing through the book I couldn't put it back on the shelf and walk away. I was inspired to try some of the projects. After reading the book I made some sketches and decided to follow Traci's instructions (she walks you step by step through the project) to turn my sketch into a cover for my new sketchbook. This is a book that everyone can use, even if you think that you can't draw or draw well. If after reading this book you are still convinced that you can't draw, downloads of Traci's images can be purchased from her website (www.treicdesigns.com).

Here's the work in progress!


Finished Sketchbook Cover


I had a lot of fun creating this sketchbook cover using Traci Baustista's images as inspiration for my drawing. This is a very forgiving project, you can't make a mistake. If you are looking for a fun project, then pick up a copy of Doodles Unleashed and let your creativity flow.

Directions for Sketchbook Face Lift:

Doodles Unleashed: Mixed-Media Techniques For Doodling Mark-Making & Lettering by Traci Bautista

Hardbound sketchbook

Gesso

Saral transfer paper

Modge Podge

Acrylic Paints

1.  Draw an image on drawing paper using a No. 2 pencil.

2.  Cover the sketchbook with gesso and let it dry. Apply a second coat and let it dry.

3. Using the techniques in Doodles Unleashed paint the background using acrylic paint. Set aside to dry.

4.  Transfer your drawing onto the cover of the sketchbook using Saral transfer paper. Again using the techniques described in Doodles Unleashed paint the image and set aside to dry. I outlined my finished image in black to enhance it.

5.  Seal the painted cover of the sketchbook with a light coat of Modge Podge and let it dry.

Tuesday, July 3, 2012

Afternoon in Paris Clipboard

I'm finally back in my studio again. I was on vacation at Myrtle Beach, SC. Myrtle Beach was great, the weather was beautiful and the beach was relaxing. It was the perfect vacation and then three days before the end of the vacation I came down with Strep Throat and a 102 degree F. fever. C'est domage! That's what it's like to be me!

Now that I'm back in my studio the first thing that I did was to finish a project that I started in March. The Afternoon in Paris clipboard is based on a project in Julie Nuttig's book Collage Couture. I came across this book while browsing in the bookstore. The Collage Couture is beautifully done- the pictures are inspiring and there is a step by step guide to completing projects shown in the book. I was inspired by the Japanese Garden clipboard. I could use a clipboard in my studio to corral stray notes. Just because clipboards are functional items why do they have to be plain and boring? For my project I chose a French theme (of course). I covered the clipboard in printed paper using the instructions on page 106 of the book. I drew a fashion figure using the instructions on page 10 of the book and added clothing. Next I used the Cricut to cut out the Eiffel Tower and the poodle. I added an inspirational quote and a butterfly to complete the clipboard.


Directions for Afternoon In Paris Clipboard:

Collage Couture by Julie Nuttig (available at Amazon or Barnes & Noble)
Lucite clipboard (available at Walmart)
K&Company Sera Sera Paper Pad- I used gold  and orange print paper and a scrap of blue print
K&Company Abrainna Paper Pad- blue and purple print paper- for figure's dress
Newspaper
Mod Podge
Foam brush
Butterfly- I used the Recollections gossamer butterfly from Michaels
Cricut cartridges- Summer in Paris and Paper Pups
White, gray, parchment, brown (for the figure's hair) and pale pink card stock
Tim Holtz Tea Dye and Tattered Rose distress ink
Tattered Angels Glimmer Mist- Pearl, Cherry Blossom, Raven
Black Sharpie
Narrow blue ribbon
Recollections self stick gold beads
Piece of pink tulle
Decorative edge scissors

1.   Tear gold and orange print paper in pieces and apply to the clipboard following the directions on pages 106 and 107 of the book.

2.   Draw a fashion figure on tracing paper according to the instructions on page 6 in the book. Draw the clothing and the hair as directed in the book. I cut my figure out of news print. I tied a piece of pink tulle around the figure's waist as a belt.

3.  Cut a 6 1/2 inch Eiffel Tower out of pale pink card stock using the Cricut Summer in Paris cartridge.
Apply Tattered Rose distress ink randomly over the tower. Next apply Tea Dye distress ink around the bottom, top and sides of the tower. Lightly spray the tower with Cherry Blossom Glimmer Mist and let it dry. Lightly spray the tower with Raven Glimmer Mist and let it dry.

4.   Using the Cricut Paper Pups cartridge cut a poodle at 1 3/4 inches out of gray card stock. Next press the black out key and cut the poodle out of white card stock. Assemble the poodle and lightly spray with Pearl Glimmer Mist and set aside to dry. Use the Sharpie to color the poodle's nose and eye.

5.   Type the quote: Artists who seek perfection in everything are those who cannot attain it in anything. -Eugene Delacroix and print it on parchment card stock using the font and size of your choice. Cut the quote out using decorative scissors. Glue the quote on to a small piece of blue patterned card stock.

6.   Position the Eiffel Tower to the left hand side of the clipboard and glue in place using Modge Podge. Position the fashion figure in the center of the clipboard and glue in place using Modge Podge. Glue the quote to the right of the fashion figure's head. Glue the poodle to the right of the fashion figure's foot. Cut a piece of narrow blue ribbon and loop in around the figure's wrist and attach the other end behind the poodle. Place a small gold bead self stick bead around the wrist loop and at the top of the leash.

7.   Glue the butterfly to the clip. Cover the entire clipboard with a coat of Modge Podge to seal it.

Wednesday, June 13, 2012

National Gallery of Art


One of my favorite places is the National Gallery of Art. Not only is the Gallery very serene but it's one of the few places where all of the employees are very knowledgeable and helpful. The employees know where all of the paintings are located. I found this to be impressive given the size of the Gallery. My friend Diana,Brittany and I headed off for a day to the Gallery. We spent the entire day there, stopping for lunch in the Garden Cafe and later for coffee at the Gelatto Bar and Cafe. We browsed through the gift shop to find our favorite prints, some books on Impressionist painting and Chat Noir earrings (for Brittany). I took some photos to share with you.


Fountain at National Gallery of Art

 
                                       Walkway to the East Building at National Gallery of Art

 
 East Building Walkway

  
 Rodin's Thinker in West Building of National Gallery of Art


Monet's Jerusalem Artichoke Flowers


Pond at National Gallery of Art Gardens

Monet's Jerusalem Artichoke Flowers is the only Monet painting on display in the Gallery at the present time. The Thinker is my favorite Rodin sculpture. In fact, I love the sculpture so much that I have a replica in my studio. So it was a rare treat for me to actually view the sculpture up close. Also at the Gallery were the Degas sculptures of the Fourteen Year Old Ballerina. Both the actual bronze sculpture and the wax cast were on display along with several Degas paintings. The Gallery does allow non-flash photography of some exhibits but to be on the safe side it's best to ask the guard for each room if photography is permitted.

For those of you who love art and are planning a visit to Washington, D.C. you may want to consider a trip to the National Gallery of Art. The Gallery has so much to offer and it's usually not crowded. I think it's the best kept secret in D.C.


This is one of the beautiful Calla Lilies from my gardens.

I have several projects lying around my studio in a semi-finished state. Among the projects are a Yorkie Painting and my Hello Kitty Fabric project both should be finished and ready for posting by the beginning of July.


Sunday, April 29, 2012

Tribute to Tempest


 When our kids were small we decided to get them a dog that would romp and play with them. At the time we had a ten year old Shih Tzu who loved the kids but didn't have the energy to keep up with them. We finally decided on a Collie and after several months of searching we found a beautiful Tri-color collie puppy. Collies are wonderful companions for small children because they are loyal and gentle. When Tempest grew up, in addition to being a playmate he assumed the role of  guardian for the kids. I couldn't have asked for a better babysitter. He would bark if the kids attempted to open the gate and leave the back yard. I was confident that I could leave Tempest in charge while I left the room long enough to cook dinner or do a load of laundry because he would "rat them out" if they got into mischief.

Although Tempest is no longer with us, it's Brittany that misses him the most. She has often expressed interest in having one of the photos of him enlarged so that she could frame it and hang it on her wall. This year for her birthday I decided to paint a portrait of Tempest and have it custom framed.


Monday, April 9, 2012

Beware of the Ides of March!

Anyone familiar with Shakespeare's Julius Caesar remembers the "Beware of the Ides of March" quote. When Brittany was in high school I used to send her off to school with a thought for the day. Sometimes it was a quote or just a nice saying. Her class was in the process of reading Julius Caesar and it was March 15 so the quote for the day was "Beware of the Ides of March". She laughed as she headed out the door to meet the bus. Ever since that time no matter where she is I call her and tell her to "Beware of the Ides of March". My husband laughed because he couldn't believe that this has some how become a tradition between the two of us.

Later that day, my husband was walking down the steps into the garage and the flip flop that he was wearing slid causing him to fall and fracture his leg. The next day when I visited him in the hospital I reminded him that it was the Ides of March when he fell. Hmm! Maybe Shakespeare was right and we should "Beware of the Ides of March". He has spent the last 3 weeks in a recliner with his leg elevated. He's convalescing well but still can't put any weight on his leg. I have tried to work on craft projects that don't require me to be in my studio so that I can be close by if he needs something. During this time I finished the Stacy Shawl and am completing Lions et Oiseux.

This is the beautiful Stacy Shawl from Wendy Knits Lace by Wendy Johnson. While the shawl was very easy, for someone new to lace, to knit it does require some knitting experience. Wendy's instructions and charts were clear and well written. I was a little confused by the Garter Stitch Tab but You Tube had a great tutorial. I loved the choice of yarn for the project. Dream in Color Classy was very easy to work with especially for my first lace project. I love the finished shawl and wear it with a white shirt and jeans as an alternative to a sweater.

This project calls for stitch markers to be placed to mark sections of the lace pattern. Stitch markers have always been a source of knitting frustration-the small plastic rings tend to jump off the needles and waste yarn looped over the needles tends to fray after several rows. I really like the beaded knitting markers available at the yarn shops but they tend to be a little pricey ($5 to $8 per marker). I bought a beaded marker to try it out. The weight of the beads held the marker firmly on the needle with no slipping. I liked the marker but didn't want to invest in a set of them so I came up with a similar version. Brittany and I have both tested my version and they slide along the needles easily and don't slip off. I'm posting my marker instructions so that you can make your own.


Beaded Knitting Marker Directions:

Decorative beads- I used beads left over from previous jewelry projects but you can buy beads at any craft store. Try choose a medium size bead.

Small beads-tube of glass E beads,tube of glass seed beads

2 inch silver-tone head pins-usually sold in packages of 72

Small silver-tone split rings- 12mm size

Needle nose pliers

1. Place two seed beads on the head pin.

2. Place an E bead on the head pin.

3. Now place a decorative bead on the head pin.

4. Place another E bead on the head pin.

5. Place another decorative bead on the head pin.

6. Place another E bead on the head pin.

7. Use the needle nose pliers to make a loop and thread the end of the loop into the top of the last E bead placed on the head pin. Place the split ring in the loop that you just made. Hold the split ring in place and squeeze the end of the head pin toward the bottom of the loop to secure it ( use the needle nose pliers for this ). This will also keep the split ring from slipping.

Wednesday, March 21, 2012

Spring in DC

This past week our family had the pleasure of hosting Brittany's boyfriend Alex. Since Alex is visiting from Norway we took a sight seeing trip to DC. He was impressed by the beauty of the city and commented that Washington was unlike any of the other large cities that he had visited.

We had a great time in DC. The weather was beautiful and the Cherry Blossoms were in bloom. Living so close to DC I tend to take the city and all it has to offer for granted. I forgot how truly beautiful the city can be.


                                         Magnolia's in bloom along the Gallery Place walk way.


After a trip to the Air and Space Museum, we visited the National Gallery of Art. I had almost forgotten how beautiful the Gallery is. I love the fact that the paintings can be viewed up close. As an artist I love to walk up close to a painting to view the details (brush strokes, fabric folds and the lighting). Cameras are prohibited in some of the individual galleries because flash can damage the paintings but we were allowed to photograph (without flash) the the beautiful Rotundra.

                                                 Rotunda in the National Gallery of Art

For those of you who are thinking about visiting Washington,DC you will need a week to see most of the attractions. The Smithsonian museums alone can take several days to visit. The Air and Space Museum and the Museum of Natural History are the most popular Smithsonian Museums. The National Gallery of Art has several wings and individual galleries. Alex has studied Leonardo Da Vinci and was interested in seeing his paintings. The night before our trip we searched the National Gallery's website and found a Da Vinci painting. This helped us to locate the painting at the Gallery.

I wished that I had more than one day to spend at the Gallery because I would have liked to have seen the new French Gallery. I decided to take a day trip back to the Gallery with my sketch book of course. The National Gallery of Art allows sketch books and pencils to be brought into the gallery. Visitors are welcome to sit and sketch the paintings but anyone who wishes to copy a painting must apply for a permit and use an easel and paints provided by the gallery.

Saturday, February 11, 2012

Honey Roasted Cashews

Looking for something different to give your Valentine? How about Honey Roasted Cashews instead of the traditional chocolate?

I took a trip to New York in December and came across a Street Vendor selling honey roasted nuts. The aroma of the roasted nuts enticed me to buy a bag of honey roasted cashews. These were the best honey roasted nuts that I ever had. Since then I have been on a mission to find a recipe for these nuts. I searched the internet for recipes but none of them were able to recreate the Street Vendor cashews. Finally after weeks of trying to recreate the Street Vendor cashews, I think that I have come pretty close to the ones that I sampled in New York.

While the finished nuts were cooling on a baking sheet on the kitchen counter my husband saw them and just had to sample them. He loved them and couldn't resist sampling some more. In light of his glowing praise, I decided to share the recipe with all of you.


Honey Roasted Cashews:

3 1/2 cups unsalted cashews
2 1/2 tablespoons clover honey
1 1/2 tablespoons of pure maple syrup--don't use maple flavored syrup because the flavor won't be the same
2 tablespoons butter
1 tablespoon of brown sugar
1 teaspoon sea salt
1/4 teaspoon cinnamon
1/8 teaspoon of grated nutmeg
3/4 teaspoon vanilla extract
3 tablespoons of vanilla Demerara sugar


Preheat oven to 350 degrees F. If using raw cashews, place them on a baking pan and roast in the oven for 5 minutes. Remove pan from the oven, stir the nuts and roast for approximately 5 minutes. Check them often and remove from the oven when the nuts have a light golden color. Set aside to cool. Skip this step if you are using nuts that have already been roasted.

In a small saucepan combine butter, honey, maple syrup, brown sugar, salt, vanilla, nutmeg and cinnamon. Stir to combine over low heat. After the butter has melted remove the saucepan from the heat.

Pour the cashews into a large mixing bowl and pour the syrup mixture over the cashews. Stir the nuts until all of them are coated.

Spray a large baking tray with cooking spray. Spread the nuts on the baking tray and bake for 6 minutes on the middle rack of the oven. Remove the nuts from the oven and stir. Return the tray to the oven and bake for approximately 8 minutes or until the nuts are golden brown.

Remove from the oven and pour the nuts in a large mixing bowl. Sprinkle 3 tablespoons of vanilla demerara sugar over the nuts and stir until all of the nuts are coated with the sugar.

Line another baking tray with parchment paper and spread the sugar coated nuts in a thin layer onto the parchment lined tray. Let the cashews cool completely. Store the cashews in an air tight container.


Bon Apetite,
Suzanne

Friday, February 10, 2012

Hello Kitty Valentine's Rose Box

I just couldn't let Valentine's Day pass without doing at least one Hello Kitty project. Hello Kitty is so sweet that she seemed like the perfect choice for decorating a Valentine's Day box filled with heart shaped sugar cookies. Who wouldn't want to receive a Hello Kitty box filled with cookies?

For those of you who love Hello Kitty, I have another project planned. I don't want to let the cat out of the bag just yet. I'm sorry for the bad pun but I will tell you that it's a fabric project.


Close-up of the top of the box.


Directions for Hello Kitty Valentine's Rose Box:

Cricut Hello Kitty Greetings and Doodlecharms cartridges
Dark pink, medium pink, white, olive green and black card stock
Fiskars paper crimper
Large purple brad
Self adhesive gold rhinestone
Stickles glitter glue-Ice Stickles
Tattered Angels Glimmer Mist-Pearl
Smooch purple paint
6 Fabric Rose Buds
Martha Stewart Leaf paper punch
Foam Dots
Hot Glue Gun
White sheer wire edged ribbon
Martha Stewart Treat Boxes


1. Cut the heart from the Doodlecharms cartridge. Press the heart and the shift keys and cut the heart at 5 inches out of dark pink card stock.

2. Load the rounded edge of the heart into the Fiskars paper crimper. Press the handle and turn the knob to run the heart through the crimper.

3. Load the Hello Kitty Greetings cartridge into the Cricut machine. Cut Hello Kitty 2 out of black card stock at 4 inches. Next press the White & Fur/Bow & Nose key and cut the fur and flower out of white card stock. Press the White & Fur/Bow & Nose and the Shift keys to cut Kitty's flower out of dark pink card stock. Press the Clothes key to cut Kitty's outfit. Cut the outfit again out of medium pink card stock. Press the Clothes and Shift keys to cut the flower stem out of olive green card stock. Assemble Kitty according to the picture in the Cricut handbook. Using a dark yellow colored pencil color Kitty's nose. Use the large purple brad for the center of the flower in Kitty's hair. Apply a small amount of Ice Stickles to the flower and let it dry. Paint the flower in Kitty's hand with purple Smooch paint and let it dry. Apply a small amount of Ice Stickles to the flower and set aside to dry. Press the gold rhinestone to the center of the purple flower.

4. Place foam dots on the back of Hello Kitty and attach her to the crimped heart. Lightly spray Kitty and the heart with Pearl Glimmer Mist and set aside to dry.

5. Assemble the Martha Stewart treat box. Fill the box with cookies and slide the red cover over the box. Tie the white sheer ribbon around the box and make a bow. Use the hot glue gun to glue the point of the crimped heart behind the bow's knot.

6. Position three fabric rose buds on the left front edge of the box top. Use the glue gun to glue the roses in place. Repeat the process to glue the roses to the right front edge of the box top. Apply a small amount of Ice Stickles around the edges of the rose petals and let them dry.

7. Punch six leaves out of olive green card stock with the Martha Stewart leaf punch. Glue three leaves under the roses on the left. Extend the front leaf slightly over the edge of the box. Glue three leaves under the roses on the right.

Tuesday, February 7, 2012

Night Owl Scarf

Knitted lace is beautiful but I have always been intimidated by it. The beautiful lacy patterns would inspire me but the written directions always seemed too complicated-yarn-overs, knitting through back loops and increases and decreases in the same row. I decided to give knitted lace another try. A scarf seemed like a good first project because I didn't have to worry about shaping the garment. I chose Brown Sheep Nature Spun yarn and a Vine Lace pattern. The pattern is easy to knit and works well with a worsted weight yarn. For those of you wondering about the name, I decided to name the scarf for the late nights I spent knitting it (often until 2 a.m.) rather than for the lace pattern that I used.


Mozart modeling the Night Owl scarf.


This is the actual color of the scarf.


Directions for Night Owl Scarf:

2 100 gram skeins (approximately 245 yards/224 meters per skein) of Brown Sheep Nature Spun, Alpine Violet color

Size 7 knitting needles

This scarf was knit on Addi needles using a worsted weight wool.

Gauge: 5 sts per inch on Size 7 needles in Stockinette Stitch

Finished measurements: 8 inches wide and 54 inches long before blocking.


Cast on 40 stitches.

Pattern Stitch:

Row 1: Purl
Row 2: K3, *yo, k2, ssk, k2 tog, k2, yo, k1; rep from * until one stitch left, k1.
Row 3: Purl
Row 4: K2,* yo, k2, ssk, k2 tog, k2, yo, k1; rep from * until two stitches remain, k2.

Repeat Rows 1-4 until scarf measures 54 inches. Cast off.

The end and sides of the scarf will tend to curl under during knitting but blocking will take care of this. To block the scarf lay it on an ironing board and straighten the sides and the end. Lightly steam the the scarf with a steam iron. Don't move the scarf until it is cool to the touch.

Monday, January 30, 2012

Foxy Valentine Card


Valentine's Day is fast approaching and as usual I have more ideas for projects than I have time to complete them. C'est la vie! There are several more Valentine's projects in the works and hopefully time won't run out before they are completed and ready to post.

The first of the cards is finally finished. This card was originally intended for Valentine's Day but I plan to use it for my Close-to-Valentine's Day Anniversary.


Directions for Foxy Valentine Card:

Cricut Ornamental Iron and Noah's ABC Animals cartridges
Martha Stewart Filigree Heart and tulip paper punches
DCWV Black Current Stack-patterned grey paper and pink dotted paper
Recollections Metallic Stack- silver paper
Black, rust, white, dark pink and grey card stock
Offray Black and White Dotted ribbon
Jolee's Bling adhesive pink pearls
Stickles Ice Stickles glitter glue
Adhesive clear crystals
Small pink adhesive backed rose
Scrap of green card stock to cut leaves for rose and tulip stem. Scrap of pink and white print for tulip
Smooch Pearlized Accent Ink- green apple or green metallic nail polish
Foam Dots


1. Fold the light grey card stock in half and crease along the fold.

2. Cut the grey patterned card stock to approximately 6 1/4 inches long by 5 inches wide. Next cut the black card stock 4 1/2 inches wide by 5 1/2 inches long. Cut the pink dotted card stock 4 inches wide by 5 1/4 inches long. Glue the pink dotted card stock on top of the black card stock, leaving approximately an 1/8 inch border on all sides. Attach foam dots to the back of the black card stock. Position the black/pink card stock on top of the grey patterned card stock, leaving a 1/4 inch border on all sides. Once you are happy with the placement press the black/pink card stock in place. Position the grey patterned card stock grouping about 1 1/2 inches from the top edge of the card and center it and glue in place.

3. Using the Cricut Noah's ABC Animals cartridge cut the Fox at 3 inches out of black card stock. Next press the Fox and the Shift keys and cut (Fox-s) out of white card stock. Finally press the Layer and the Fox keys and cut the fur out of rust card stock. Assemble the fox. Attach 3 clear crystals around the Fox's neck for a collar and apply a small amount of Ice Stickles to the Fox's eye lashes and nose. I used a tooth pick to apply the Stickles to the eyes and nose.

4. Load the Ornamental Iron cartridge into the Cricut machine. Cut Gate 10a at 5 inches out of silver metallic card stock. Glue the Gate to the pink dotted card stock.

5. Attach foam dots to the back of the Fox and position her near the bottom edge of the Gate, leaving a small space to the right of the Fox's feet. Press into place once you are happy with the placement.

6. Attach a pink pearl to the swirls at the top of the Gate. Next attach a small pink rose at the top center of the Gate. Cut 3 small free form leaves out of the green card stock. Don't worry if they are not perfect, leaves in nature are not perfect. Fold the leaves over an awl or other small object to give them an upward curve. Bend the tip of each leaf backward over the end of the awl. Paint the leaves with Smooch or nail polish and set aside to dry. When dry glue the leaves under the rose.

7. Punch a small tulip out of the scrap of green card stock and another tulip out of the pink and white patterned card stock. Cut the tulip flower from the stem of the pink and white card stock and glue it over the green tulip flower. Paint the tulip stem with Smooch. When the flower is dry glue it to the right of the Fox's feet.

8. Punch four hearts out of dark pink card stock using the Martha Stewart Filigree Heart paper punch. Glue a heart to each corner of the grey patterned card stock. Apply a small amount of Ice Stickles to the inside of the hearts.

9. Tie a small bow out of the black and white dotted ribbon and glue to the top center of the card.

Friday, January 13, 2012

Easy Knitted Scarf


This scarf is was knitted with Blick Fang a boucle merino wool yarn. I was instantly attracted to the variegated colors of the yarn and decided that it would make a nice warm scarf. Although I dislike knitting in garter stitch (knitting every row) it was the only stitch that showcased the boucle texture of the yarn. The pattern is beginner friendly and knits up quickly on size 9 needles.


Here's the finished scarf. It's quickly becoming my favorite scarf. The colors go with almost anything and it's soft and warm. It was cold and windy the day this picture was taken so I wrapped the scarf twice around my neck and tied it for extra warmth.


Mozart is modeling a more detailed view of the scarf.


Knitted Boucle Scarf Pattern;

2 100 gram hanks of Zitron Blick Fang color 800 (Traumwelt)
Size 9 knitting needles. I used Denise needles.

The finished scarf is approximately 68 inches long.
Gauge: 4 sts. per on Size 9 needles

1. Cast on 30 stitches.

2. Knit every row until you have used both skeins of yarn.

3. Cast off and weave in the loose ends.


* Please note that if you wish to substitute another boucle yarn that you need the same gauge and 300 meters of the substitute.

* Zitro Blick Fang is available from the Knitter's Nest 410-549-0709.

Tuesday, January 10, 2012

Robot Valentine's Day Card

I have so many projects going on that I have had little time to spend with my Cricut. Valentine's Day is quickly approaching and it's the perfect time to fire up the Cricut. I love making my own Valentine's Day cards because I am not limited to the design and message printed on a commercial card. Valentine's Day is the perfect opportunity to unleash your creativity! I wanted to do something different so I used the Robotz cartridge.


Close up of Robot

I always keep a lot of embellishments on hand for my projects. Embellishments can be expensive so look for sales and check the clearance aisles regularly and then stock up. After I cut the robot out, I grabbed several embellishments and laid them on my desk. I started laying them on the card until I had the design that I wanted.

Brittany recently asked how do I go about designing a card? The first thing that I do is to start with an idea of the main design element. Since I use Cricut cartridges to make most of my cards I usually decide on the image that I want to use and work from there. After I decide on an image the next thing is to determine the color scheme. For the Valentine's Day card we chose pink with grey accents. The next step is to have fun with the embellishments-place them on the card to see what works and what doesn't. Above all don't glue anything down until you are sure that this is finished design. I usually complete the design, leave it on my desk and walk away for awhile. When I return if I feel that the design doesn't need any changes then I glue the elements in place to complete the card.

Directions for Robot Valentine's Day Card:

Cricut Robotz cartridge
Cricut Paper Pups cartridge
White, light grey, black, light pink and medium pink card stock
Pink heart print card stock
Wilton heart shaped paper lace doily
Large pink self adhesive pearls
Recollections large white pearls
Stickles Ice stickles and platinum glitter glue
2 small black beads
Martha Stewart pink micro beads
Pink and white dotted sheer ribbon
Tattered Angels Pearl Glimmer Mist
Glue
Foam dots
Clear nail polish

1. Print the Valentine greeting using a card program and the half fold option on white card stock. Fold the card in half and crease along the fold.

2. Load the Cricut Robotz cartridge into the Cricut machine and cut Robot 10 at 3 1/2 inches out of medium pink card stock. Cut Robot base out of light grey card stock and Robot 10-s out of black card stock. Press the shift and layer keys to cut the eyes out of white card stock. Assemble the Robot. Spray the Robot lightly with Pearl Glimmer Mist and set aside to dry.

3. Cut the pink heart print card stock 4 1/2 inches long by 4 1/4 inches wide.

4. Glue the heart shaped doily to the center of the pink heart print card stock.

5. Attach the Robot to the center of the doily with foam dots.

6. Position the pink heart print card stock with the Robot about 2 1/2 inches from the top of the card, making sure that it is centered. Attach a pink self adhesive pearl to each corner of the pink heart print card stock.

7. Place a white self adhesive pearl over each of the wheels.

8. Load the Paper Pups cartridge into the Cricut machine. Select the Love Dog image. Press the dog and shift to cut the heart. Cut 2 hearts out of light pink card stock at 1 1/2 inches. Glue the open heart to the right and left of the Valentine's greeting. Apply Ice Stickles glitter glue to the hearts and set aside to dry.

9. Glue a small black bead to the center of the Robot's eyes. Apply Platinum Stickles to the Robot's left antennae.

10. Apply glue to the heart shape from the center of the open heart and cover it with Martha Stewart pink micro beads. Shake off the excess beads and cover the heart with clear nail polish to seal it. When the heart is dry attach it to the Robot with a foam dot.

11. Tie a small bow using the pink and white dotted sheer ribbon, center the bow just below the pink heart print card stock and glue in place.

Saturday, January 7, 2012

Miss Meow

I love painting and I love animals, so naturally most of my paintings are of animals. After Christmas Denis asked if I would consider painting a portrait of his cat? My response was an enthusiastic yes. I love painting and look for any opportunity to while away hours in my studio working on my next artistic creation. Denis e-mailed me a photo of Miss Meow and I couldn't wait to get started.

As an artist I don't limit myself to working only in one medium. Although my favorite medium is acrylic paints on canvas, I would quickly tire of painting all my portraits in acrylic. I prefer to let my subject dictate the media and Miss Meow was no exception. She is a beautiful black cat with smokey highlights. Her black fur has a velvety sheen. Oil pastels seemed like the perfect choice because the smokey highlights could easily be blended into the black fur. The oil pastels would also give the cat's fur a velvety sheen and softness.


I just finished the portrait and couldn't wait to photograph it. I used a temporary frame lying around my studio to photograph the painting.


I would like to thank Denis for entrusting me to paint a portrait of Miss Meow. She is truly a beautiful cat and was an interesting subject to paint.