Showing posts with label mixed-media journal page. Show all posts

Sunday, April 27, 2014

Raven Collage

This was a busy week for me but I did manage to make the trek to Hobby Lobby to buy some more art supplies. I bought the Ranger Melting Pot, bees wax and alcohol inks. I am really fortunate to have a husband who supports my art but even he couldn't understand the need for a Melting Pot. To him, melting wax and then pouring the hot wax onto my artwork just seems absurd. Normally Brittany is 100% behind my creative ideas but I think I lost her on this one.

Lately I have been working in my Medici Lion journal. At first I found art journaling intimidating-where do I start? I remembered how my high school art teacher required me to keep a journal and turn in 10 entries per week and how much I dreaded journaling. I wasn't visited by the Muse and my teacher was always complaining that my journal wasn't creative. How could it be, with a required number of entries a week? I set my fear of journaling aside and decided to make my journal a creative place where I could experiment with ideas and a variety of art products. I am really starting to enjoy journaling and look forward to each new entry.

The idea for this journal entry was inspired by Dali's Prince and Princess painting. I chose to do a collage rather than a painting. I used Van Gogh's Starry Night for the bottom of the collage, hand drawn elements (Raven, Moon and Tree) and dried hydrangeas from last summer's gardens. I added a quote by Edgar Allan Poe to finish the piece (Deep into that darkness peering, long I stood there wondering, fearing, Doubting, dreaming dreams no mortal ever dared to dream before.).

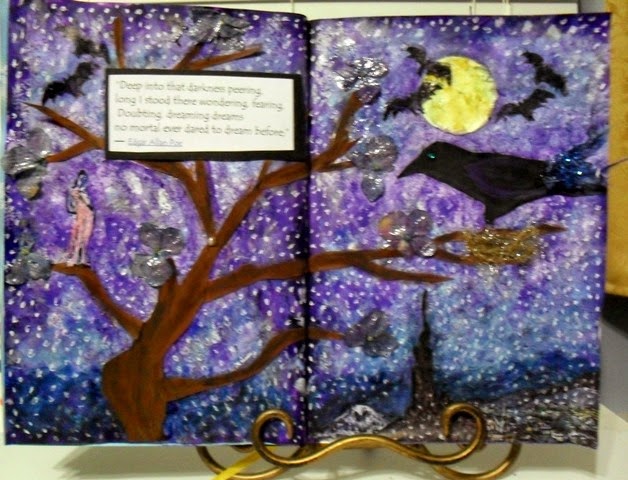
Finished Raven Collage entry.

The base for the collage is created by painting the pages with thinned light purple, dark purple and medium blue acrylic paints. The blue is painted on the lower half of the page and the purple on the rest of the page. Let the paint dry and take the Tim Holtz Honeycomb stencil and place it randomly on both pages. Apply modeling paste over the stencil. Remove the stencil and let the pages dry overnight. Apply acrylic paint over the stenciled area but don't cover the stencil completely (let some of the Modeling Paste show through). Cut a circle out of yellow card stock and glue it to the top of the right page. Glue a layer of yellow tissue paper over the moon. Cut the tree trunk and branches out of brown card stock and glue over both pages. The branches should extend to the right page. Draw or trace a  Raven and cut the bird out of black card stock. Glue the Raven to the branch on the right page. Glue two small dark blue feathers to the Raven's tail and glue blue glass glitter on top of the feathers. Add a small crystal for the Raven's eye. Add decorative trim for the nest and glue to the branch under the bird. Print a copy of Starry Night using the 3x5 option. Cut the Cypress tree, the village and the mountains out of the picture and glue it to the bottom right page (lower right corner). Stamp bats around the top of the pages. Cut out a banshee and glue her to the left side of the tree. Apply dried flowers to the tree branches with Golden Clear Gloss Gel medium. Print the quote by Edgar Allan Poe, mat it with black card stock and glue to the left page. Randomly apply dots over the entire collage with a white gel pen to unify the piece.

Sunday, March 30, 2014

Follow Your Dreams

For the past three days I have been complaining about the cold, rainy weather and wished that it would stop raining. This morning I am reminded of the quote, "Be careful what you wish for you just may get it." It finally stopped raining but the now rain has turned to snow and the snow is covering the ground once again. Oh well, C'est la vie!

I did take advantage of this miserable weather to work on a journal project. I love journaling because it allows me the freedom to experiment with my art. Lately I have been working with mixed-media in an effort to branch out from traditional painting. I decided to use my journal to explore mixed-media. Rather than using a traditional art journal, I am using my Medici Lion journal for my art work. This journal was originally intended for writers not artists and contains lined paper. the only draw back of using paper intended for writing is that the pages will tend to curl if the page gets wet. However the journal is refillable and both Barnes and Noble and Amazon sell sketch books that will fit the leather cover.

I often find journaling difficult. When I stare at the blank pages and wonder where to begin I often think of the quote by Vincent Van Gogh: "Just dash something down if you see a blank canvas staring at you with a certain imbecility. You do not know how paralyzing it is, that staring of a blank canvas which says to the painter: you don't know anything." I painted the pages with a thin coat of light blue acrylic paint and let it dry. Now I had blank blue pages staring at me. I wanted use following your dreams as the theme.

Follow Your Dreams journal entry.


Close up of page.


I had read in Sommerset Studio magazine about using modeling paste and stencils as a way of adding texture to art work and decided to incorporate it into my page. I layed the stencil on the pages and covered it with a thin layer of modeling paste. I used a palette (painting) knife to work the modeling paste into the open areas of the stencil and then smoothed the modeling paste across the top of the stencil, scraping off the excess. Think of icing a cake, the process is similar. Remove the stencil and let the modeling  paste dry overnight. Wash the stencil with soap and water immediately, other wise the modeling paste will dry on the stencil making it difficult to remove.

This was a fun project once I got started.  This project would also work well on canvas.

Directions for Follow Your Dreams:

Scraps of colorful scrapbook paper-for balloons
Golden Modeling Paste
Pieces of hemp or string-for balloons and black card stock
Scraps of brown card stock- for balloon basket
Light blue and white acrylic paint
Huey's Masks Circle Mask
Hero Arts French Verse stamp
Brown ink pad
Tim Hotlz's Distress Ink- Shaded Lilac
Small craft sponge
Color Box cats eye ink pads-blue, purple, green and orange
Eiffel Tower die cut
Gold beads
Faber Castell green gelato
Smooch apple green
Painting knife

1.  Paint journal pages with a light coating of light blue acrylic paint. Set aside to dry.

2.  Arrange the Circle mask on the page and apply modeling paste. Work the modeling paste into the open areas of the mask and then smooth the paste over the mask until a thin layer of paste covers the mask. Lift the mask straight up. Repeat on the next page. Wash the mask immediately with soap and water. Let the pages dry overnight.

3.  Randomly stamp the two pages using the cats eye ink pads. Stamp over the raised circles created by the modeling paste.

4.  Apply the brown ink to the French Verse stamp and randomly stamp around the edges of both pages. Lay the Eiffel Tower die cut on the left side of the right page and cover with black water color, thinned to a watery consistency. Work the water color into the open areas of the die cut. While the Eiffel Tower dries, cut balloons out of the scrapbook paper. Cut one large and two small balloons. Cut one large and two small balloon baskets out of the brown card stock. Glue two small pieces of hemp to each balloon and glue the other end to the baskets.

5.  Apply small amounts of white paint to a small craft sponge. Randomly apply the paint to the top of the pages to form clouds. Arrange the balloons on the pages. One large and small balloon on the left page and one small balloon to the right of the Eiffel Tower (on the right page). Glue the balloons in place.

6.  Load a small paintbrush with water and paint across the top of the green Gelato to pick up the green paint on the brush. Paint the green Gelato under the base of the Eiffel Tower. When the paint dries add grass accents with the Smooch paint.

7.  Randomly apply the lilac distress ink to the clouds to give them depth.

8.  Type Follow Your Dreams in Microsoft Word, using the font of your choice, at approximately 36pts. Print the verse on parchment paper and cut out. Mat the verse with black card stock. Glue the verse to the bottom of the left page, below the balloons.