Showing posts with label Silhouette Cameo projects. Show all posts

Saturday, October 10, 2015

Crazy Hat Bear Gift Bag

Michelle loves the Minions so I decided to go with that theme for her upcoming birthday.  I found the cutest Minion slippers on Amazon.  Every time I see them they make me smile and after having them sitting around the studio for the past few weeks, I'm going to miss them.


Minion Slippers


Like most crafters with an SVG cutting machine, I am always looking for interesting cutting files.  One of my favorite sites is Kadoodle Bug Designs. While I was browsing the site for a suitable image for my gift bag I decided to checkout the Freebie section.  This week's freebie is the Crazy Hat Bear.  He's so cute with his Minion style hat.  I decided to use the jpg image from the downloaded file.


Crazy Hat Bear Gift Bag

Directions for Crazy Hat Bear Gift Bag:

Crazy Hat Bear zip file from Kadoodle Bug Designs
Medium white gift bag-available at craft stores
Pink Satin Ribbon
White card stock- letter size (8 1/2 x 11 inch)
Glue
Cutting machine with Print and Cut capability- I used Silhouette Cameo (directions will be for the Cameo)

1.  Download the Crazy Hat Bear file from Kadoodle Bug Designs.  Unzip the file and export the jpg file to the Silhouette machine.

2.   Open the Silhouette mat and resize the mat to letter size.

3.   Import the Crazy Hat Bear image to the mat and resize to 8.465 x 8.465 inches.

4.  Add the registration marks to the Silhouette mat.  Make sure the bear fits within the registration marks.

5.   Load a sheet of white card stock in the printer. Send the image to the printer.

6.  Open the Trace window and turn off the high pass filter and increase the threshold until most of the image is blocked out in yellow.  The area inside the eyes may not be blocked out but that will not affect the cutting.  Select Trace Outer Edge option.  There should be a red outline around the outside of the image.

7.  Open the Cut window and select cut outer edge.  There should be a thick red line around the outside edge of the bear. Place the printed image on the Silhouette cutting mat and load into the machine and select cut.

8.  Unload the cutting mat from the Cameo and remove the cut image.

9.  Apply glue to the back of the bear and attach to the front of the gift bag.  Cut a piece of pink satin ribbon long enough to tie around the top of the handles of the gift bag and tie in a bow.


Thursday, August 27, 2015

Halloween Yard Signs

It's been a while since I have posted a craft project, but I have been working on Halloween decorations.  The kids are just getting ready to go back to school and the stores are displaying Halloween candy and decorations.  While I'm holding on to what is left of the summer and not ready to embrace fall or it's holidays just yet, it does make sense to start working on Halloween craft projects now.

Several years ago I purchased some cute signs to decorate my walkway.  Over time the signs faded and fell apart.  Unable to find replacements I decided to make my own.  The supply list for the project is simple- wood and stakes from Home Depot, craft vinyl, paint and an electronic cutting machine.  The total cost one sign was about $5.


Finished Sign- Stake nailed to sign at top and bottom.


Finally finished and ready to attach stake.

Just need to finish the phrase!

Sign in progress.

 
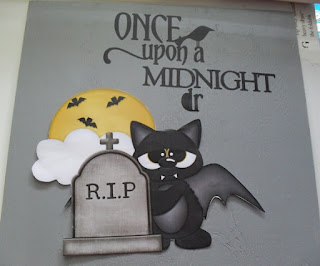
After sealing the wood with craft varnish and painting it with Gesso, it was painted with two coats of acrylic craft paint.  The bat is a Treasure Box Designs file (available from the Silhouette Design Store). The phrase was also purchased from Silhouette.  The sign is slightly larger than 12 x 12 inches.  The bat was resized and printed on a laser printer using the landscape option to fit on  8 1/2 x 11 inch paper.  The image was hand cut because the wing extended past the registration marks for the Silhouette.  I did try to print the image on printable vinyl but my HP 5700 ink jet printer would not feed the vinyl through.  The bat will be applied to the sign with Mod Podge.


Directions For Yard Sign:

Orcal Black and Purple Vinyl (available from My Vinyl Direct, Cricut or Silhouette)
Batty Print and Cut file and Once Upon a Midnight Dreary quote- available from Silhouette Design Store
Piece of Wood cut slightly larger than 12x12 inches
White paper
Mod Podge-Hard Coat
Vinyl Transfer Tape- I used Cricut
Grey Craft Paint- I used two bottles of Americana
Foam Brush
Craft Varnish- I used DecoArt DuraClear
Wooden Stakes (available at Home Depot in the lumber section)
1.  Open the Batty file and place on the Silhouette mat, then open the Once Upon a Midnight Dreary file and place on the same mat.  Resize the files so that most of the Batty image fits on the lower left portion of the mat and the quote fits across the top right portion of the mat. Once you are happy with the layout, save the file.

2.  Open another mat and copy and paste the resized Batty file onto the new mat.  Add the registration marks for the Silhouette and use the Trace Outer edge and Cut options. Load plain white paper in a laser printer and print the Batty file. Place Batty on a Silhouette mat and load into the machine and cut the design.

3.  Seal the wood with the craft varnish and let it dry.

4.  Paint both sides of the wood with the grey paint.  Let it dry and then add a second coat of paint.  Set aside to dry.

5.  Open a third Silhouette mat and copy and paste the quote onto this mat.  Place the black vinyl on the Silhouette mat. I use painter's tape around the edges of the mat to keep the vinyl from slipping while it's being cut.  Load the vinyl into the machine and cut out the quote.  Carefully weed the excess vinyl from the design.  Apply transfer tape over the quote while it is still on the mat.  Position the quote on the upper right part of the sign, but don't press it in place yet.

6.  Liberally apply Hard Coat Mod Podge to the back of the Batty design and place Batty on the lower left portion of the sign.  Press in place and smooth out any air bubbles with your finger tips.  Re adjust the quote if needed.  Press the quote in place and use a brayer to secure it.

7.  Apply two more coats of Mod Podge to Batty, letting the Mod Podge dry between coats.

8.  Cut small triangles out of purple vinyl to fit around the edges of the sign.  I cut a 1/2 wide strip of vinyl and then cut the triangles from the strip, making each cut at an angle to form the triangles.  Place the triangles around the edges of the sign to make a border.

9.  Center the sign on stake making sure that the top of the stake is even with the top of the sign. Nail a wooden stake to back of the sign at the top and bottom.  I put a small nail through the purple border and then covered it with a small piece of purple vinyl.


Sunday, February 22, 2015

Happy Snow Day

On Monday, I made a rare stop at Burger King for lunch.  I rarely eat fast food but I could hear my stomach growling over Haydn's Symphony in C, so decided to get off at the next exit for some lunch.  When I pulled up at the window to pay, the cashier handed me a dollar bill and told me that it was from the lady in the truck in front of me. He said "The Lady in the green truck told me to give this dollar to you and tell you to have a happy snow day." It just so happened that the forecast was calling for 3 inches of snow later that day. I handed the dollar back to the cashier and told him to pass it along to the man in the truck behind me with the same message. Hopefully it brightened his day as much as it did mine.  This lady has no idea how much her act of kindness actually meant to me.  Lately everyone that I have had to deal with has been crabby, surly and some of them down right mean, but this little act of kindness made me realize that there still are nice people who care about others. Hunger aside, I was actually glad that I took the time to stop for lunch that day.

Like everyone I'm getting a little tired of the cold, snowy weather and can't wait for it to end.  I am taking advantage of this time to work on some craft projects and really try to learn all of the features of the Silhouette Cameo. We have a plastic memo paper holder (attached to our fridge) that has become faded and worn over the years.  The decal on the front of holder has country themed designs in slate blue and mauve.  Not only are the colors dated ( from 1990's) but the decal is faded.  I contemplated throwing it out but I couldn't bear to part with it because it is useful and Michelle sold it to us for a 2nd grade school fundraiser.  This became a snow day boredom, makeover project.  I used the Cameo to print and cut some cute little owls that I found on Miss Kate's Cuttables for 50 cents. I printed the owls on white card stock with a HP Laser printer and then sent them to the Cameo to cut. 


Finished Memo paper holder.  
I should note that the flower stickers on the owls are not actually on my memo paper holder, I just placed them there for copyright purposes so I could share this project with you.


Directions for Owl Memo Paper Holder:

Plastic Memo Paper Holder or something else that needs a makeover, this would also make a cute card.
Cuttlebug Swiss Dots embossing folder
Embossing machine- I used the Sizzix Boutique
Pale pink, white and scraps of pink card stock
Ranger Liquid Pearls- platinum, blue, pink and white. The blue, pink and white were part of a set purchased at Michaels
Four self adhesive gold beads
Mod Podge and foam brush
Cutting machine that has print and cut capability- I used Silhouette Cameo
Owls sitting on a branch design downloaded from Miss Kate's Cuttables


1.   Unzip the owl zip file from Miss Kate's Cuttables.  Import the image to the cutting machine (Cameo) and resize if desired.  I sized the owls at 3 1/2 inches wide.  The next instructions are for Cameo users. Set the page size to letter; click show registration marks (make sure the image is inside the grey area); open the Trace window- turn off the high pass filter, move the threshold until the image is completely yellow, click trace outer edge; open the cut window and click cut- thick red lines should outline the image.  Click the printer icon and print the design.  Place the printed card stock on the left edge of the Cameo mat and load into the machine.  Click send to Silhouette. Turn on a light is the room is not well lit so the Cameo can detect the registration marks. I rotated my desk lamp to provide more light for the Cameo.  Carefully remove the image from the mat. The hearts each cut separately from the owls.

2.  Cut a piece of pale pink card stock approximately 3 1/4 inches high by 4 1/4 inches wide.  Use the Swiss Dots embossing folder to emboss the card stock.

3.  Liberally apply Mod Podge to the back of the pink card stock with a foam brush.  Cover the front surface of the memo paper holder with the card stock. Smooth out any air bubbles with your fingers. Apply Mod Podge to the back of the owl design and center on the memo paper holder and repeat the process for the hearts.  Cut four small triangles by snipping the corners off of a scrap of pink patterned paper.  Glue the a triangle in each corner of the card stock. 


4.   Apply Mod Podge over the entire surface and set aside to dry.  After the surface is dry, attach a gold bead to each corner.  Apply a dot of platinum Liquid Pearls to the ends of the branches, a dot of blue to each of the blue owl's feathers (on his head) and a dot of pink to the pink owl's feathers. Apply small dots of the white Liquid Pearls to the center of each heart.