Showing posts with label Halloween signs. Show all posts

Saturday, October 17, 2015

Another Halloween Yard Sign

With just about two weeks left until Halloween I have been taking every opportunity to work on projects.  The candy wrappers and tea light holders are finished and will be posted tomorrow (hopefully).  The Boo sign is almost finished and ready to put out and the something wicked sign is in progress.

Boo sign just needs the stake and it's finished!

I thought this little skeleton was so cute and envisioned her as a sign.  All of my svg files are from the Silhouette Design Store but may be available directly from the designers to the owners' of other cutting machines:  Ghoulie Girl (Boo) is a Michele Renee Cloud 9 Design, Spider Web Flourish is a Silhouette Design and the bat came from Happy Halloween by Jennifer Wambach.  All pieces of the this design were cut from Orcal vinyl (available from My Direct Vinyl).


Directions for Boo:

Silhouette SVG cutting files: Happy Halloween by Jennifer Wambach, Ghoulie Girl by Michele Rene and Spider Web Flourish by Silhouette.

Orcal Vinyl for electronic cutting machines- black, orange, dark purple, grey and white.  Available at My Vinyl Direct, limited colors are available at Michaels

Americana Craft paint- Dolphin Grey- available at Michaels

DecoArt DuraCoat Varnish

Small purple button

Small yellow crystals for the bat's eyes

Wood available at Home Depot and cut to 24 inches long by 10 inches wide

Wooden stake available at Home Depot

Small Nails

Hammer


1.  Cut the wood to 24 x 10 inches and seal with water based craft varnish and let it dry.  Varnish again and let it dry. Paint the sign with the grey paint, let it dry and repeat.  Varnish with the DuraCoat and let it dry.

2.  Size the entire Ghoulie Girl to 9.75 inches on the Silhouette mat on the computer screen. Some pieces of the file won't be on the mat but that's fine.  Ungroup the file.  Move the body, the eyes, nose and hands on Mat 1 and open a new mat.  Group the bones and skull together on Mat 2.  Open Mat 3 and move the bottom of the skull (jaw) to this mat.  Open Mat 4 and place the bow, the center circle for the bow and the smaller BOO on it.  Finally place the BOO outline on Mat 5.

3.  Place the black vinyl on the cutting mat, select vinyl on the machine, adjust the blade and cut the images from Mat 1.  Cut the images on Mat 2 in white vinyl, images from Mat 3 in grey vinyl, images from Mat 4 in orange vinyl and the image from Mat 5 in purple vinyl.

4.  Center the body on the sign, approximately 2 inches from the lower edge of the sign.  Add the Skull, jaw and the bones to the body, center the purple Boo outline on the body and overlay the orange Boo before adding the hands.  Add the eyes, nose and bow.  Smooth out any wrinkles or air bubbles with your finger tips.

5.   Open the Spider Web Flourish onto the Silhouette mat on screen and resize to approximately 5.5 inches.  Click Copy and then paste to make three more webs.  Next open the Halloween title and ungroup the title and the bat. Move Halloween from the mat and delete it.  Group the pieces of the bat together and resize to 1.75 inches. Ungroup the bat and move the eyes from the image and delete them.  Click on the bat, copy and paste 7 more bats on the screen (8 total).  Arrange the Spider Web Flourishes on the mat so that on flourish is in each corner.  Place two bats is each of the open areas of the flourish.  Select cut, load the black vinyl on the cutting mat and send to Silhouette.

6.  Carefully weed the pieces of vinyl from around the spider web flourish, remove from the mat and place one flourish in the upper right corner of the sign, smoothing out any air bubbles. Place another flourish in the lower right corner of the sign.  The ends of the upper and lower flourishes will overlap at the middle of the sign.  Repeat this procedure on the left side of the sign.

7.  Arrange the Bats around the open area in the middle of the sign.  I used a grouping of three because odd numbers are more visually pleasing.  Glue the small crystals to the bat's face for eyes.

8.  Center the wooden stake on the sign so that the top of the stake is even with the top of the sign.  Nail the stake to the back of the sign at the top and the bottom of the sign.

Thursday, August 27, 2015

Halloween Yard Signs

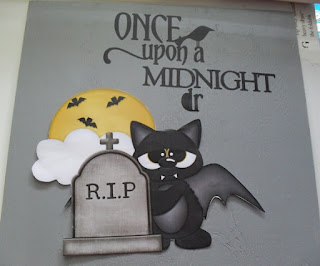
It's been a while since I have posted a craft project, but I have been working on Halloween decorations.  The kids are just getting ready to go back to school and the stores are displaying Halloween candy and decorations.  While I'm holding on to what is left of the summer and not ready to embrace fall or it's holidays just yet, it does make sense to start working on Halloween craft projects now.

Several years ago I purchased some cute signs to decorate my walkway.  Over time the signs faded and fell apart.  Unable to find replacements I decided to make my own.  The supply list for the project is simple- wood and stakes from Home Depot, craft vinyl, paint and an electronic cutting machine.  The total cost one sign was about $5.


Finished Sign- Stake nailed to sign at top and bottom.


Finally finished and ready to attach stake.

Just need to finish the phrase!

Sign in progress.

 
After sealing the wood with craft varnish and painting it with Gesso, it was painted with two coats of acrylic craft paint.  The bat is a Treasure Box Designs file (available from the Silhouette Design Store). The phrase was also purchased from Silhouette.  The sign is slightly larger than 12 x 12 inches.  The bat was resized and printed on a laser printer using the landscape option to fit on  8 1/2 x 11 inch paper.  The image was hand cut because the wing extended past the registration marks for the Silhouette.  I did try to print the image on printable vinyl but my HP 5700 ink jet printer would not feed the vinyl through.  The bat will be applied to the sign with Mod Podge.


Directions For Yard Sign:

Orcal Black and Purple Vinyl (available from My Vinyl Direct, Cricut or Silhouette)
Batty Print and Cut file and Once Upon a Midnight Dreary quote- available from Silhouette Design Store
Piece of Wood cut slightly larger than 12x12 inches
White paper
Mod Podge-Hard Coat
Vinyl Transfer Tape- I used Cricut
Grey Craft Paint- I used two bottles of Americana
Foam Brush
Craft Varnish- I used DecoArt DuraClear
Wooden Stakes (available at Home Depot in the lumber section)
1.  Open the Batty file and place on the Silhouette mat, then open the Once Upon a Midnight Dreary file and place on the same mat.  Resize the files so that most of the Batty image fits on the lower left portion of the mat and the quote fits across the top right portion of the mat. Once you are happy with the layout, save the file.

2.  Open another mat and copy and paste the resized Batty file onto the new mat.  Add the registration marks for the Silhouette and use the Trace Outer edge and Cut options. Load plain white paper in a laser printer and print the Batty file. Place Batty on a Silhouette mat and load into the machine and cut the design.

3.  Seal the wood with the craft varnish and let it dry.

4.  Paint both sides of the wood with the grey paint.  Let it dry and then add a second coat of paint.  Set aside to dry.

5.  Open a third Silhouette mat and copy and paste the quote onto this mat.  Place the black vinyl on the Silhouette mat. I use painter's tape around the edges of the mat to keep the vinyl from slipping while it's being cut.  Load the vinyl into the machine and cut out the quote.  Carefully weed the excess vinyl from the design.  Apply transfer tape over the quote while it is still on the mat.  Position the quote on the upper right part of the sign, but don't press it in place yet.

6.  Liberally apply Hard Coat Mod Podge to the back of the Batty design and place Batty on the lower left portion of the sign.  Press in place and smooth out any air bubbles with your finger tips.  Re adjust the quote if needed.  Press the quote in place and use a brayer to secure it.

7.  Apply two more coats of Mod Podge to Batty, letting the Mod Podge dry between coats.

8.  Cut small triangles out of purple vinyl to fit around the edges of the sign.  I cut a 1/2 wide strip of vinyl and then cut the triangles from the strip, making each cut at an angle to form the triangles.  Place the triangles around the edges of the sign to make a border.

9.  Center the sign on stake making sure that the top of the stake is even with the top of the sign. Nail a wooden stake to back of the sign at the top and bottom.  I put a small nail through the purple border and then covered it with a small piece of purple vinyl.