Sunday, November 20, 2011

Reverse Cable Scarf

Scarves make great knitting projects. They can be knitted quickly, often only use two skeins of yarn and make great gifts. Knitted scarves are very popular and patterns can be found everywhere. I found a free cabled scarf pattern at Michaels. This pattern is also available at www.caron.com. The pattern calls for 2 skeins of Caron Simply Soft yarn. I usually don't like to knit with acrylic yarn but I couldn't resist Caron's beautiful Iris color. I did like the idea that I could throw the scarf in the washer and dryer which is something that I couldn't do with a wool scarf.


I enlisted Mozart's help again to model the scarf since no one else in my house would agree to be a model.


The scarf is knitting up quickly and is very soft. Although the pattern is rated for an intermediate level knitter a beginner with some knitting experience could knit this scarf as well. The cable pattern is relatively easy (slip 8 stitches onto the cable needle, knit 8 stitches from the left hand needle and then knit the 8 stitches from the cable needle) and would make a good introduction to knitting cables.

Bandit Portrait


I love animals and am trying to expand my repertoire. Cats are independent and have an air of mystery so they seemed like a good choice. Bandit is a beautiful black and white tuxedo cat. The contrast of black and white fur made him an interesting subject to paint. After sketching my Afghan Hounds, drawing a cat was a bit out of my comfort zone. It took several attempts to get the cat to a point where I was happy with him and ready to progress to painting.


Directions for Reclining Cat Portrait:

Daler Rowney Canvas Paper
Liquidtex black, white, grey, silver, raw umber and bronze yellow acrylic paint
White 65 lb. card stock
Cray Pas Expressionist oil pastels: pink, green and gold
Drawing board
Royal Soft-Grip brushes: 3/4 inch, #4 flat, #4 round, #0

This painting is based on a photograph that I took of Bandit. I liked the reclining pose but found it hard to sketch.

1. Scan the picture into the computer, enlarge it to a 5 x 7 inch size and print it on white 65 lb. card stock.

2. Since I don't have a light box I taped the card stock print to a sunny window. Tape a piece of canvas paper over the card stock and trace the outline of the cat with a 2H pencil. Remove the canvas paper and card stock from the window. Place the canvas paper on a drawing board and begin to fill in the details of the cat (his eyes, nose, and the lines for his coloration).

3. Using a #4 round brush and white paint fill in the white areas of the cat. Let it dry.

4. Fill in the black areas of the cat with black paint and a #4 round brush. Let it dry.

5. Mix bronze yellow and raw umber until the color resembles a light golden wood. Fill in the floor area with this color. Add raw umber lines on the floor (to resemble a hard wood floor) before the golden wood floor dries.

6. After the floor dries add highlights with grey paint. Using the 3/4 inch brush paint the wall with a light coat of grey paint.

7. Color the cat's eyes with green oil pastel and blend with a paper stump. Add a layer of gold oil pastel to the eyes and blend with the paper stump. Repeat with the green pastel and blend. Add black acrylic paint to the center of the cat's eyes.

8. Fill in the cat's nose with pink oil pastel and blend with the paper stump. Clean the stump by rubbing it across a piece of sand paper before using it to blend the pink nose.

9. Mix a small amount of grey paint into white paint to make a light grey color. Apply the light grey to the white areas of the cat (shading).

10. Using a #4 round brush and white paint, paint the fur using short strokes. Pull some of the strokes outward toward the black and long strokes for whiskers (above the eyes and on the face). Paint short strokes with the black paint on the black areas. Use black to paint in the marks for the claws on feet.

11. Paint the wall with short swirled strokes using a #4 flat brush and silver paint. Allow some of the grey base coat to show through.

12. Mix the grey paint with a little bit of black and paint a shadow on the floor to the left of the cat.

Sunday, October 30, 2011

65th Anniversary


A couple that I know is celebrating their 65th Wedding Anniversary. This is such an important occasion that I wanted to do something special for them. I love poetry and like to give framed poems a gifts. I chose Sir Philip Sidney's the Bargain. I framed the poem with a textured ivory mat and decorated the mat with roses.


Directions for 65th Anniversary Gift:

Pewter frame (8 x 10)
8 x 10 ivory textured mat
Parchment Paper
Recollections Adhesive Faux Pearls
Recollections Foral Embellishments-Shades of Purple
Dark olive card stock
Martha Stewart Leaf Paper Punch


1. Type the poem into Microsoft Word using the French Script Font at 18 and print it on parchment paper.

2. Trim the parchment paper to fit into an 8 x 10 inch mat. Center the poem in the mat.

3. Remove the glass from the picture frame. Place the matted poem in the frame and put the back on the frame.

4. Position three roses (one light purple, one medium purple and one dark purple) in the upper left hand corner and lower right hand corner of the mat. Glue the roses in place. Punch 4 leaves out of olive card stock using the paper punch. Glue 2 leaves under each set of flowers.

5. Arrange the faux pearls in the corners opposite the roses and press in place.

Portrait de Les Squelettes


I wanted to do one more card for Halloween but didn't want to do witches, haunted houses or pumpkins. I wanted something different! I had purchased some cute K & Company skeleton stickers and wanted to use them. The skulls peering over tombstones or looking out of the windows of a haunted mansion just wasn't what I was looking for. I had just finished reading the Picture of Dorian Gray and was putting the book back on the shelf when the idea popped into my head. What about skeleton portraits? I could frame the skulls and then cover the entire card in spider webbing.

Here's the finished result. It's hard to see the spider webbing because I used a thin layer to cover the card.


Directions for Portrait de Les Squelettes:

Cricut Happy Hauntings cartridge
K & Company Tim Coffey Halloween Bone and Bats Layered Accents
Black, lime green and white card stock
K & Company Kelly Panacci Halloween Paper
Spider Webbing

1. Using the Happy Hauntings cartridge cut Frame 3 twice, once at 3 3/4 inches and the second time at 3 inches out of black card stock. Press the Phrase, Frame 3 and the Shift keys and cut the word CREEPY at 2 1/2 inches out of black card stock. Cut Frame 7 at 3 3/4 inches out of black card stock.

2. Place the lime green card stock on the Cricut mat and load into the machine. Press the Phrase and Frame 3 keys and cut the word CREEPY at 2 1/2 inches. Glue the green word over the black word base.

3. Print a Halloween greeting on the inside of the card using white card stock and a card program. Choose the half fold card option. Fold the card in half and crease.

4. Cut a piece of purple and black dot card stock from the Halloween paper to fit the front of the card. Glue in place.

5. Position the frames so the smaller frame is centered on the purple card stock approximately 4 inches from the bottom of the card. Place the larger frames below the small frame (the square frame to the right and the oval frame to the left). Glue the frames in place. Place a large skull in the center each of the 3 3/4 inch frames and a small skull in the center of the 3 inch frame.

6. Glue the word CREEPY above the smaller frame. Place a bat to the left of the word.

7. Tear off a small piece of spider webbing a pull it apart until it starts to form web strands. Cover the front of the card with the webbing a glue the loose ends under the front edges of the card.

Sunday, October 16, 2011

Waiting For The Great Pumpkin


This weekend is devoted to Halloween-both decorating and working on projects. While I was out buying supplies for my up coming projects I came across a Linus and a pumpkin sticker set. I just couldn't resist it. The story of Linus waiting in the pumpkin patch for the arrival of the Great Pumpkin is one of my perennial favorites.


Directions for the Great Pumpkin card:

K & Company Kelly Panacci Halloween paper- yellow print card stock
EK Success-Peanuts Linus Halloween dimensional sticker set
K & Company Tim Coffey Halloween Grand Adhesions-pumpkins
Medium purple ribbon
Foam Dots
White card stock


1. Print a Halloween greeting on the inside of an 8 1/2 inch by 11 inch piece of white card stock. Print the card using a greeting card program and the half-fold card option. Fold the card in half.

2. Cut the yellow print card stock 7 inches high by 4 1/2 inches wide.

3. Position Linus and the pumpkin 1 1/4 inches from the bottom of the card stock. Center the image and press in place. Position two of the smaller pumpkins from the Tim Coffey set to the right and left sides of Linus and his pumpkin. Press into place.

4. Center the Halloween sticker from the Linus set approximately 1 7/8 inches above Linus' head. Then center Happy above Halloween. Position the smaller bats to the left and right of Happy and the larger bat above Linus' head and slightly to the right.

5. Attach foam dots to the back of the yellow print card stock and place it 1 1/4 inches from the bottom of the card and 1/2 inch from the fold of the card. Press into place.

6. Cut a piece of purple ribbon 5 3/4 inches. Place the ribbon slightly below the yellow print card stock. The left end of the ribbon should touch the fold of the card. Glue the ribbon in place. Tuck the remaining ribbon under the right edge of the card and glue to secure. Cut a piece of purple ribbon and tie a small bow. Center the bow over the ribbon and glue in place.

Tuesday, July 26, 2011

Le Petit Rien

I adore my husband! He is as close to perfect as humanly possible. He's an intelligent, handsome, devoted and loving person. He is my muse! I hope that he doesn't read this and let it go to his head. He knows that art is important to me and encourages me to devote more time to it. I wanted to give him a gift to show him how much he means to me.

While browsing in Michaels I saw a little brown cardboard book with blank pages. This would make the perfect gift for my husband.


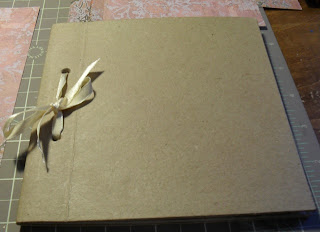
I removed the ribbon and covered the book in card stock.


Since this idea of this book is to express my love for my husband I wanted this book to come from my heart. I wanted to share all of the things that I love with him. I love poetry and have two shelves in my library devoted to it. So naturally this book includes several poems-Elizabeth Barret Browning's How Do I Love Thee, several of Shakespeare's Sonnets and various other poems. I collected flowers from my gardens and pressed them and then glued them in the book. I also included the pink Poodle Valentine's card along with some of our favorite pictures.

This is the finished book. I called it Le Petit Rien which translates to the little something. I chose a French title for the book because of my French heritage.


Directions for Le Petit Rien:

Darice small cardboard book-available with the paper mache boxes at Michaels
DCWV Old World Stack-8x8 inch card stock-pink and grey print
Silk roses-light aqua, medium pink, and dark pink
Mod Podge-matte finish
Gold edged ivory wired ribbon
Hot glue gun
White lace trim
Small white Calla Lilies
Adhesive backed pearl trim
Olive green and parchment card stock
Martha Stewart leaf paper punch
Microsoft word
Small piece of white tulle and craft wire
Tim Holtz Tea dye distress ink
Small oval craft punch
Bone folder
Small hole punch
Clear nail polish or Fray Check

1. Remove the ribbon from the book and set aside. Cut two pieces of pink and grey card stock to fit the covers of the book. Cut the back cover 1/2 inch wider than the book cover. Place the smaller cover on the front of the book. Open the book cover slightly and crease the paper at the line where the book opens. Crease this line with a bone folder. Lay the card stock on the back cover and fold the extra 1/2 inch over the spine of the book and crease with a bone folder. Mark the holes from the covers on the card stock with a pencil and punch with the small hole puncher.

2. Put a thin coat of Modge Podge on the back book cover and postion the card stock over it. Put Modge Podge on the piece that covers the spine and press in place, covering the spine of the book. Let the book dry and then cover the front of the book with Modge Podge and apply the card stock. Let it dry.

3. Cover the back of the book with a light coating of Modge Podge and let it dry. Repeat the process with the front cover.

4. Cut a strip of the adhesive pearls the length of the front cover. Position the pearl strip over the area where the book cover bends to open (see picture) and press in place. Cut a piece of lace edging the length of the front cover and glue with a hot glue gun along the front edge of the cover.

5. Print Le Petit Rien or the title of your choice with Microsoft Word (Hasty Hmk at 20) on parchment card stock. Punch the title out using the small oval paper punch. Use a small sponge and the tea dye distress ink to ink the edges of the oval. Lightly apply the distress ink to the center of the oval.

6. Cut a 2 1/2 inch long strip of white tulle. Fold the strip in half an wrap a piece of craft wire around the center of the tulle. Cut off the excess wire leaving a 1 1/2 inch tail.

7. Position the silk flowers in the center of the book cover. The dark and light pink flowers next to each other and the light aqua flower below them. Form three Calla Lillies into a bouquet and place on top of the tulle. Wrap the tail of the craft wire around the lillies to secure them on top of the tulle. Place the lillies between the pink roses with the green stems extended under the aqua rose.

8. Using the Martha Stewart leaf paper punch and the olive card stock punch four leaves. Positon the leaves under the edges of the roses to fill in open spaces. Once you are satisfied with the placement of the flowers, lift each flower one at a time and place a dab of hot glue on the back of the flower and press in place. Be careful not to disturb the arrangement.

9. Glue the leaves in place with craft glue. Position the title in the upper left just above the flowers and glue in place with craft glue.

10. Put the pages back in the book. Cut a piece of gold edged ivory ribbon approximately 4 inches. Insert the ribbon in the holes in the book cover. Thread the ribbon through the back holes first then the top. Tie the ribbon and make a tight knot. Tie a bow. Adjust the bow and trim the ends at an angle. Apply a small amount of clear nail polish or Fray Check to the ends of the ribbon to kept it from raveling.

Sketch Book


Writers have their journals and artists have sketch books. Although the weather in the DC area has been very hot and at times intolerable (even in the outer Maryland suburbs) I try to spend at least part of my day outdoors in my gardens. I find it inspiring. It's hard not to be inspired when I am surrounded by beautiful flowers. This is one of the Mandevilla plants in my garden.


I love the craft projects and will always continue to do them and post them here but I wanted to get back to sketching and painting. I haven't really done this since I was in high school. When I was a teenager the walls of my room were covered with my sketches. After high school there always seemed to be a reason not to sketch. College, work and family all came first leaving precious little free time. After thinking about it for a while, last week I was prompted by a 40 % off coupon on artist paper and sketch books from Michaels to get back to sketching.

I love Afghan Hounds and had a sketch of one hanging on my wall when I was in high school. After several moves over the years my sketch has been lost. I decided that my first sketch should be an Afghan Hound. I enjoyed sketching this dog and may use him in future projects.


If you have never sketched before I encourage you to try it. Don't worry if your sketches aren't perfect. The more you draw the better your drawings will be. There are several books available for beginners and most communities offer art classes.*


*Drawing on the Right Side of the Brain by Betty Edwards and Lessons in Classical Drawing by Juliette Aristides are two excellent books for anyone seriously interested in learning to draw.