Monday, January 30, 2012

Foxy Valentine Card


Valentine's Day is fast approaching and as usual I have more ideas for projects than I have time to complete them. C'est la vie! There are several more Valentine's projects in the works and hopefully time won't run out before they are completed and ready to post.

The first of the cards is finally finished. This card was originally intended for Valentine's Day but I plan to use it for my Close-to-Valentine's Day Anniversary.


Directions for Foxy Valentine Card:

Cricut Ornamental Iron and Noah's ABC Animals cartridges
Martha Stewart Filigree Heart and tulip paper punches
DCWV Black Current Stack-patterned grey paper and pink dotted paper
Recollections Metallic Stack- silver paper
Black, rust, white, dark pink and grey card stock
Offray Black and White Dotted ribbon
Jolee's Bling adhesive pink pearls
Stickles Ice Stickles glitter glue
Adhesive clear crystals
Small pink adhesive backed rose
Scrap of green card stock to cut leaves for rose and tulip stem. Scrap of pink and white print for tulip
Smooch Pearlized Accent Ink- green apple or green metallic nail polish
Foam Dots


1. Fold the light grey card stock in half and crease along the fold.

2. Cut the grey patterned card stock to approximately 6 1/4 inches long by 5 inches wide. Next cut the black card stock 4 1/2 inches wide by 5 1/2 inches long. Cut the pink dotted card stock 4 inches wide by 5 1/4 inches long. Glue the pink dotted card stock on top of the black card stock, leaving approximately an 1/8 inch border on all sides. Attach foam dots to the back of the black card stock. Position the black/pink card stock on top of the grey patterned card stock, leaving a 1/4 inch border on all sides. Once you are happy with the placement press the black/pink card stock in place. Position the grey patterned card stock grouping about 1 1/2 inches from the top edge of the card and center it and glue in place.

3. Using the Cricut Noah's ABC Animals cartridge cut the Fox at 3 inches out of black card stock. Next press the Fox and the Shift keys and cut (Fox-s) out of white card stock. Finally press the Layer and the Fox keys and cut the fur out of rust card stock. Assemble the fox. Attach 3 clear crystals around the Fox's neck for a collar and apply a small amount of Ice Stickles to the Fox's eye lashes and nose. I used a tooth pick to apply the Stickles to the eyes and nose.

4. Load the Ornamental Iron cartridge into the Cricut machine. Cut Gate 10a at 5 inches out of silver metallic card stock. Glue the Gate to the pink dotted card stock.

5. Attach foam dots to the back of the Fox and position her near the bottom edge of the Gate, leaving a small space to the right of the Fox's feet. Press into place once you are happy with the placement.

6. Attach a pink pearl to the swirls at the top of the Gate. Next attach a small pink rose at the top center of the Gate. Cut 3 small free form leaves out of the green card stock. Don't worry if they are not perfect, leaves in nature are not perfect. Fold the leaves over an awl or other small object to give them an upward curve. Bend the tip of each leaf backward over the end of the awl. Paint the leaves with Smooch or nail polish and set aside to dry. When dry glue the leaves under the rose.

7. Punch a small tulip out of the scrap of green card stock and another tulip out of the pink and white patterned card stock. Cut the tulip flower from the stem of the pink and white card stock and glue it over the green tulip flower. Paint the tulip stem with Smooch. When the flower is dry glue it to the right of the Fox's feet.

8. Punch four hearts out of dark pink card stock using the Martha Stewart Filigree Heart paper punch. Glue a heart to each corner of the grey patterned card stock. Apply a small amount of Ice Stickles to the inside of the hearts.

9. Tie a small bow out of the black and white dotted ribbon and glue to the top center of the card.

Friday, January 13, 2012

Easy Knitted Scarf


This scarf is was knitted with Blick Fang a boucle merino wool yarn. I was instantly attracted to the variegated colors of the yarn and decided that it would make a nice warm scarf. Although I dislike knitting in garter stitch (knitting every row) it was the only stitch that showcased the boucle texture of the yarn. The pattern is beginner friendly and knits up quickly on size 9 needles.


Here's the finished scarf. It's quickly becoming my favorite scarf. The colors go with almost anything and it's soft and warm. It was cold and windy the day this picture was taken so I wrapped the scarf twice around my neck and tied it for extra warmth.


Mozart is modeling a more detailed view of the scarf.


Knitted Boucle Scarf Pattern;

2 100 gram hanks of Zitron Blick Fang color 800 (Traumwelt)
Size 9 knitting needles. I used Denise needles.

The finished scarf is approximately 68 inches long.
Gauge: 4 sts. per on Size 9 needles

1. Cast on 30 stitches.

2. Knit every row until you have used both skeins of yarn.

3. Cast off and weave in the loose ends.


* Please note that if you wish to substitute another boucle yarn that you need the same gauge and 300 meters of the substitute.

* Zitro Blick Fang is available from the Knitter's Nest 410-549-0709.

Tuesday, January 10, 2012

Robot Valentine's Day Card

I have so many projects going on that I have had little time to spend with my Cricut. Valentine's Day is quickly approaching and it's the perfect time to fire up the Cricut. I love making my own Valentine's Day cards because I am not limited to the design and message printed on a commercial card. Valentine's Day is the perfect opportunity to unleash your creativity! I wanted to do something different so I used the Robotz cartridge.


Close up of Robot

I always keep a lot of embellishments on hand for my projects. Embellishments can be expensive so look for sales and check the clearance aisles regularly and then stock up. After I cut the robot out, I grabbed several embellishments and laid them on my desk. I started laying them on the card until I had the design that I wanted.

Brittany recently asked how do I go about designing a card? The first thing that I do is to start with an idea of the main design element. Since I use Cricut cartridges to make most of my cards I usually decide on the image that I want to use and work from there. After I decide on an image the next thing is to determine the color scheme. For the Valentine's Day card we chose pink with grey accents. The next step is to have fun with the embellishments-place them on the card to see what works and what doesn't. Above all don't glue anything down until you are sure that this is finished design. I usually complete the design, leave it on my desk and walk away for awhile. When I return if I feel that the design doesn't need any changes then I glue the elements in place to complete the card.

Directions for Robot Valentine's Day Card:

Cricut Robotz cartridge
Cricut Paper Pups cartridge
White, light grey, black, light pink and medium pink card stock
Pink heart print card stock
Wilton heart shaped paper lace doily
Large pink self adhesive pearls
Recollections large white pearls
Stickles Ice stickles and platinum glitter glue
2 small black beads
Martha Stewart pink micro beads
Pink and white dotted sheer ribbon
Tattered Angels Pearl Glimmer Mist
Glue
Foam dots
Clear nail polish

1. Print the Valentine greeting using a card program and the half fold option on white card stock. Fold the card in half and crease along the fold.

2. Load the Cricut Robotz cartridge into the Cricut machine and cut Robot 10 at 3 1/2 inches out of medium pink card stock. Cut Robot base out of light grey card stock and Robot 10-s out of black card stock. Press the shift and layer keys to cut the eyes out of white card stock. Assemble the Robot. Spray the Robot lightly with Pearl Glimmer Mist and set aside to dry.

3. Cut the pink heart print card stock 4 1/2 inches long by 4 1/4 inches wide.

4. Glue the heart shaped doily to the center of the pink heart print card stock.

5. Attach the Robot to the center of the doily with foam dots.

6. Position the pink heart print card stock with the Robot about 2 1/2 inches from the top of the card, making sure that it is centered. Attach a pink self adhesive pearl to each corner of the pink heart print card stock.

7. Place a white self adhesive pearl over each of the wheels.

8. Load the Paper Pups cartridge into the Cricut machine. Select the Love Dog image. Press the dog and shift to cut the heart. Cut 2 hearts out of light pink card stock at 1 1/2 inches. Glue the open heart to the right and left of the Valentine's greeting. Apply Ice Stickles glitter glue to the hearts and set aside to dry.

9. Glue a small black bead to the center of the Robot's eyes. Apply Platinum Stickles to the Robot's left antennae.

10. Apply glue to the heart shape from the center of the open heart and cover it with Martha Stewart pink micro beads. Shake off the excess beads and cover the heart with clear nail polish to seal it. When the heart is dry attach it to the Robot with a foam dot.

11. Tie a small bow using the pink and white dotted sheer ribbon, center the bow just below the pink heart print card stock and glue in place.

Saturday, January 7, 2012

Miss Meow

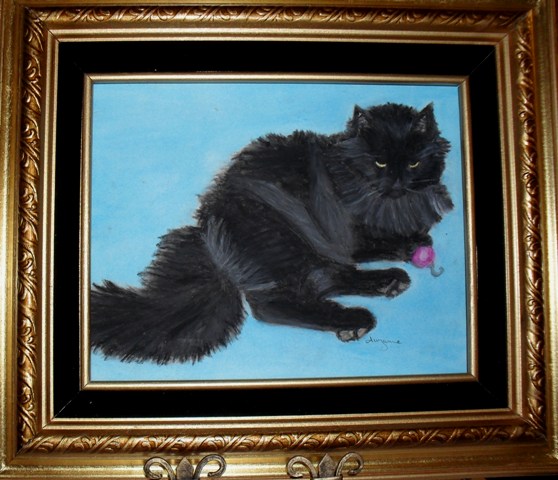
I love painting and I love animals, so naturally most of my paintings are of animals. After Christmas Denis asked if I would consider painting a portrait of his cat? My response was an enthusiastic yes. I love painting and look for any opportunity to while away hours in my studio working on my next artistic creation. Denis e-mailed me a photo of Miss Meow and I couldn't wait to get started.

As an artist I don't limit myself to working only in one medium. Although my favorite medium is acrylic paints on canvas, I would quickly tire of painting all my portraits in acrylic. I prefer to let my subject dictate the media and Miss Meow was no exception. She is a beautiful black cat with smokey highlights. Her black fur has a velvety sheen. Oil pastels seemed like the perfect choice because the smokey highlights could easily be blended into the black fur. The oil pastels would also give the cat's fur a velvety sheen and softness.


I just finished the portrait and couldn't wait to photograph it. I used a temporary frame lying around my studio to photograph the painting.


I would like to thank Denis for entrusting me to paint a portrait of Miss Meow. She is truly a beautiful cat and was an interesting subject to paint.

Friday, December 16, 2011

Peace On Earth

Every year I tend to under estimate the time it takes to make Christmas cards. No matter how good my intentions are it seems that I'm always making my cards at the last minute. I suppose that I could go to the store and buy a box of cards but I just can't bring myself to do that. I really enjoy making the cards and printing an individualized Christmas message for each recipient.


The lion and the lamb laying down peacefully together is one of my favorite themes. It's a theme that I feel is appropriate especially at Christmas time. This card uses 3 Cricut cartridges: Noah's ABC Animals, Joy of the Season and New Testament.

Directions for Peace On Earth:

Cricut cartridges: Noah's ABC Animals, Joy of the Season, New Testament
White, light blue, dark blue, yellow, golden yellow, and black card stock
Cuttlebug Swiss Dots embossing folder and Sizzix Big Shot or Cuttlebug
Self adhesive pearl trim
Self adhesive clear crystals
Martha Stewart Snowflake border punch
Stickles Icicle glitter glue
Gold ribbon
Foam Dots
Computer greeting card program

1. Load the Noah's ABC Animals cartridge into the Cricut machine and cut the Lion at 2 inches out of golden yellow, yellow, dark blue and black card stock (as directed in the handbook). Assemble the lion.

2. Load the New Testament cartridge into the Cricut and cut the lamb at 1 1/2 inches out of black and white card stock. Assemble the lamb.

3. Load the Joy of the Season cartridge into the Cricut and cut the North Star at 1 1/2 inches out of dark blue and yellow card stock. Assemble the star. Next cut peace at 1 1/2 inches out of dark blue card stock.

4. Punch several small snowflakes out of white card stock using the Martha Stewart snowflake border punch.

5. Cut a 4 3/4 inch wide by 5 1/2 inch long piece of light blue card stock and emboss it with the Swiss Dots embossing folder and the Sizzix or Cuttlebug machine.

6. Using the greeting card program select the half fold vertical card option and print a Christmas message on the inside of the card. Fold the printed card in half and crease along the edge.

7. Glue the embossed blue card stock 1 1/4 inches from the bottom of the front of the card. Apply foam dots to the back of the lamb and attach him near the bottom right of the blue embossed card stock. Apply foam dots to the back of the lion and attach him to the embossed card stock, with his paw extending onto the lamb's body. Press the lion in place. Center the North Star at the top of the blue embossed card stock, apply foam dots and press into place. Glue the small snowflakes to the embossed blue card stock. Place a self adhesive clear crystal to the center of the North Star. Apply Stickles Icicle glitter glue to the center of each snowflake and the yellow part of the North Star. Apply the self adhesive pearl border along the top edge of the embossed blue card stock.

8. Measure 3/4 inches down from the top edge of the card and center the word peace. Glue into place. Dot the ends of the word with Stickles.

9. Cut a piece of gold ribbon the width of the front of the card plus 1/2 inch. Starting at the left edge of the card glue the ribbon in place and fold the extra 1/2 inch of ribbon over the edge of the card and secure with glue. Tie a small bow and glue it over the ribbon.

Snow Friends Candle

I have had this idea on my project list for a while and finally got around to completing it-just in time for Christmas. I enjoyed making the Halloween candle so much that I wanted to do a winter themed candle. Although I hate snow, I think snowmen are so cute. The Cricut Snow Friends cartridge has the most adorable Snowman images. These happy little Snowmen were perfect for my winter candle. This was a quick (2 hours start to finish) and easy project.


Directions for Snow Friends Candle:

Cricut Snow Friends cartridge- still available through Amazon
White or Ivory Flame-less Candle
Candle Holder-large enough to hold the candle globe
Glass Candle Globe or cylinder
Sheer Dark Aqua Ribbon
Martha Stewart Snow flake paper punch
Vellum
Self adhesive crystals and pearls
Blue and white print card stock, white, black, and orange card stock
Pink colored pencil
Hot glue gun
Xyron Machine

1. Using the Snow Friends cartridge cut Snowman 7 at 2 1/2 inches out of white card stock. Cut the shoes, buttons and eyes out of black card stock. Cut the nose out of orange card stock. Cut the scarf out of blue and white print card stock. Cut a total of four Snowmen. Assemble the Snowmen. Highlight the Snowman's cheeks with pink colored pencils. I like the look of Snowmen with rosy cheeks.

2. Run the Snowmen through the Xyron machine. Remove the paper backing and attach each Snowman 1 1/2 inches from the base of the glass cylinder, leaving about 1 inch of space between each Snowman. Press them securely in place.

3. Tie a small bow with the dark aqua ribbon and use the hot glue gun to attach the bow between the Snowman's hands. Trim the ends of the ribbon if necessary. Repeat this 3 more times.

4. Punch 8 snowflakes out of Vellum using the Martha Stewart Snowflake paper punch. Punch each snowflake slowly to avoid tearing the Vellum as it punches. Run the snowflakes through the Xyron machine. Carefully peel each snowflake from the paper backing to avoid tearing. Position 4 snowflakes approximately 1 1/2 inches above the bows and press in place. Next position the other 4 snowflakes between the attached snowflakes about 1/4 inch from the top of the glass globe. Press firmly in place.

5. Add a self adhesive rhinestone to the center of each snowflake. Add a small pearl to each branch of the snowflake (5 pearls for each snowflake).

6. Place the glass globe in the candle base and place the flame-less candle inside the glass globe.

Thursday, December 15, 2011

Annie Portrait

I recently visited New York to do some sight seeing and of course shopping. Michelle, Brandon and I took a walking tour of Central Park. I was mesmerized by it's beauty and it's calm demeanor in the middle of the hustle and bustle of the city. I took several photographs of the park and the lake. I hope to turn one of them into a painting.

This was my favorite spot in Central Park.

I never know what to give my friend Cindy for Christmas. She has everything and really doesn't want or need anything. Cindy owns a beautiful Golden Retriever, Annie, that just turned 8 years old so I thought a portrait might be a nice gift. I wanted the gift to be a surprise so I called her husband Randy to enlist his help. Randy sent me some pictures of Annie so I could make a sketch. I asked my husband to be a combination of technical adviser and art critic. I asked for an honest, don't spare my feelings critique of the initial sketch and the painting itself. Sometimes it's hard to see things that need to be changed when working closely on a painting for a long period of time and I feel a second set of eyes is helpful.


Annie is so sweet and I wanted to convey her personality in the portrait. I had worked on the painting for several days but it wasn't until I did the shading on her face that I was able to finally put down my brush and say yes this is Annie!