Bienvenu `a mon blog! Welcome to Madame Frog's Craft Blog! This site is devoted to crafts.
Friday, February 22, 2013
Wishing For Spring
Winter just won't go away. Those of us living in Maryland have been fortunate not to have had a lot of snow this year, but we have had our share of miserable weather. We have had snow, freezing rain, sleet or a combination of all three every week this winter. Yesterday was one of the rare bright sunny days so I took advantage of it to run some errands. Even though the sun was shining, it was still very cold and windy.
Home Depot was my last stop. One last time to get out of the car and brave the icy wind before heading home. My husband sent me to home depot to pick up trays to start his tomato plants. While walking from the garden center to the check out, I found a display of orchids. I was mesmerized by the blue orchids. They were beautiful and unusual and I had to have one. I started to read the tag about orchid care and quickly became disillusioned by the blue orchid. The tag stated that the plant was actually a white orchid infused with blue dye and the new blooms would be white. Sadly I put the blue orchid back on the shelf and walked away. While walking to the check out I found another display of orchids in lavender, pinks and light coral (all natural colors and half the price of the fake blue one). A beautiful lavender orchid caught my attention so I decided to buy it and bring it home as a little present to myself to help me cope with what's left of winter.
Monday, February 11, 2013
Panda Box
I'm always saying that there are never enough hours in the day for me to get everything accomplished, but some how I can find time to decorate a shipping box. There's always time for art! Decorating shipping boxes is a fun, quick, creative project and everyone seems to like them. The man at the UPS store told me that they enjoy the decorated boxes and Brittany likes coming home from a long day at the University to find a cheerful box waiting on her door step.
After a stressful day at work, I headed off to my atelier with the my plain brown box. I didn't have a clear vision of the finished project before I started. I knew I wanted a Panda scene and worked from there. I fired up the Cricut and cut the Pandas, bamboo and the pagoda. Next I pulled several sheets of paper and card stock-for the sky and ground and placed the images against the papers that I had chosen until I found the paper that worked well with my images. I placed the paper on the shipping box and marked the measurements for the ground and sky on the paper. I constructed the entire scene before gluing anything down. The scene needed some elements in the sky, so I hand cut a sun and some clouds. When I was satisfied, I glued everything in place and then covered the entire scene with clear shipping tape to protect it. By the time that I had finished my project I was no longer stressed out. Art is such a great way to relieve stress. I get so absorbed in my projects, whether it is painting or Cricut, that I lose all track of time.
Directions for Panda Box:
Medium size brown shipping box- I recycled a box.
Prima Marketing Sasha Paper Collection- green background paper with flowers
Blue paper for sky
White, black, brown, red, yellow, light green and olive card stock
Cricut Paisley Cartridge
Circle cutter or small round object to cut the sun
Martha Stewart Bangle Chain border punch
Aleene's Clear Tack craft glue
1. Cut the Sasha green flower print paper to approximately 6 inches. Cut the blue paper to approximately 6 inches. Position the blue paper so that one inch is under the edge of the green flower paper. The blue sky should measure approximately 5 inches high. Glue the paper so that the flower paper over laps the blue paper by one inch.
2. Using the Cricut paisley cartridge cut one 2 inch sitting Panda out of the black and white card stock. Cut a 1 1/2 inch sitting Panda and a 1 1/2 inch standing Panda out of the black and white card stock. Assemble the Panda's.
3. Cut the bonsai tree out of the brown and olive card stock at 1 1/2 inches and the Pagoda out of the red and black card stock at 1 1/2 inches. Using scissors cut a small branch from the bamboo for the Panda to hold. Cut the bamboo at 1 1/2 inches out of light green and olive card stock. Assemble the bonsai tree, bamboo and the Pagoda. Glue the hand cut bamboo branch in the Panda's hands.
4. Use the Martha Stewart Bangle Chain border punch to punch a border the length of a 12 x 12 inch piece of brown card stock.
5. Position the background green flower/blue sky paper on the box. Once you like the placement glue it in place with Aleene's Clear Tack craft glue. Position the large and small sitting Panda's so that they are sitting in a field with flowers and glue in place.
6. Position the brown bangle chain border so that it covers the seam between the ground and the sky and glue in place.
7. Center the bonsai tree on the top part of the border and glue in place.
8. Glue the Pagoda on top of the border just to the right of the bonsai tree. Glue the small standing Panda to the left of the bonsai tree. Position the Panda on the center of the chain just above the bottom loops.
9. Use a small round object or a circle cutter to cut a small sun out of yellow card stock. Glue the sun to the upper right of the picture. Lightly draw free form clouds, with a pencil, on white card stock. Cut the clouds out with scissors. The clouds don't have to perfect, in fact it's better if they are not. Glue the clouds to the upper left portion of the picture.
10. Once all of the glue is dry cover the entire picture with clear shipping tape. Position the tape so that the edges meet and no portion of the picture is left unprotected. This step is necessary to make sure that your decorated box arrives at it's destination in tact. My box traveled to Connecticut via UPS and arrived unharmed. The box was in such good shape that Brittany's room-mate wanted to use it to pack some of her clothing to take back to Turkey for the summer break.
Saturday, February 9, 2013
Kitty Thank you Card
I was standing in the check out line in the grocery store and noticed a display of greeting cards with a "hand made" touch. I picked up a cute card with a die cut bird and bird house on the front. I contemplated buying the card until I turned it over to look at the price. I was in sticker shock- $7.95 for a card with a few die cuts on it? There was no way that I could ever justify the price when I have a Cricut at home.
Although this is a thank you card, it could be used for other occasions by changing the greeting. I almost decided to use theme for a Valentine's Day card instead.
Directions for Kitty Thank you Card:
Recollections small white roses
Tattered Angels Glimmer Mist-Cherry, Pearl
Martha Stewart Heart Border Punch, leaf paper punch
Pink ribbon with white hearts
Recollections adhesive backed small crystal hearts, pearls
White, black, light pink,cream and olive green card stock
DCWV Tres Chic mat stack- pink and black print card stock
Cricut Four Legged Friends cartridge
Bone folder
Zots
Small foam dots
1. Print the greeting on a piece of white card stock using the half fold option. Fold the card in half and crease it with a bone folder.
2. Using the Cricut Four Legged Friends cartridge cut Cat 5 at 2 1/2 inches out of white card stock. Press the shift key and cut Cat 5-S out of cream card stock. Press the Layer key and cut the ear, nose and collar out of light pink card stock. Press the Layer and Shift keys and cut the eye lashes out of black card stock. Assemble the cat. Lightly spray Kitty with Pearl Glimmer Mist and let her dry. Attach a small pink crystal heart over Kitty's nose and attach 3 small pearls to her collar.
3. Cut a square, 3 1/2 inches high by 3 1/2 inches wide, from black and pink print card stock. Cut a 4 inch square out of the light pink card stock. Cut a 4 1/4 inch square out of the black card stock.
4. Glue the pink card stock on top of the black card stock, leaving a 1/4 inch border on all sides. Attach Zots to the back of the black and pink print card stock. Layer the print card stock on top of the light pink card stock leaving a 1/4 inch border on all sides. Press the print card stock in place. Attach foam dots to the back of Kitty, center her on the print card stock and press in place.
5. Cut a piece of pink ribbon and tie a small bow. Cut two smaller pieces of ribbon and glue them to opposite corners layered card stock. Glue the bow over the ribbon on the upper right hand corner of the card stock.
6. Lightly spray a white rose with Cherry Glimmer Mist. Let it dry. Punch two leaves out of the olive green card stock, using the Martha Stewart leaf paper punch.
7. Punch a heart border out of the light pink card stock, using the Martha Stewart heart border punch. Save the left over pieces from the punched paper (hearts and paper scraps from heart image).
8. Apply a small pink heart on each side of the word Merci. Use the left over scrap of pink card stock from the heart border punch and glue it over the top and bottom of the word Merci, to frame it. Glue the rose to the left of the frame and glue two leaves under the rose.
9. Glue the heart border under the front edge of the card. Glue the small hearts from the border punch to each corner of the black card stock.
Wednesday, January 2, 2013
Decoupaged Wooden Stool
I would like to take this time to wish all of you a very happy New Year and thank you for supporting my blog.
As we are putting away the Christmas decorations and trying to get back to our normal routine, retailers are gearing up for another holiday. Michaels is clearing away Christmas stock and filling the shelves with Valentine's items. It's only a month until Valentine's Day but I'm not quite ready to start crafting for another holiday. The next two weeks have been set aside for projects that were on hold during the holidays.
Finished stool. |
Creating the pattern for the top of the stool. |
Measuring print to the top of the stool. |
First coat of Modge Podge applied. |
Directions for Decoupaged Wooden Stool:
Gesso
Acrylic paint
Modge Podge
Foam Roller
Small foam brush
Sanding pad with fine grit
Wooden Stool- available at Walmart for less than $20
Drop cloth or old newspaper
Color print-I used standard 8 1/2 inch by 11 inch card stock because I didn't want to distort the print. If you want a print that will cover the entire top of the stool, you will need a print slightly larger than the diamater of the stool. Use the newsprint template to trim the print.
Strathmore Newsprint pad
Acrylic Sealant
1. Choose a color of acrylic paint that coordinates with your print. I used acrylic craft paint from Michaels. I chose ultramarine blue because it was closest to the color in my print. I really like the look of natural wood and chose not to paint the legs. If you decide to paint the legs you will need to buy extra paint.
2. Wipe the top of the stool with a damp cloth. Then wipe with a dry cloth to make sure the stool is dry.
3. Open the pad of Strathmore Newsprint and lay the stool top down on the pad. Trace very close to the stool with a pencil. Cut out the the circle that you just made-this is your template.
4. I scanned in one of my Van Gogh prints and printed it with an inkjet printer on white card stock. Cut away any white borders around the print.
5. Lay the print on the top of the stool. Mark the measurements of the top of the stool on the print. I marked the corners of the print. Line the newsprint template along the marked edges and cut away the excess corners of the print.
6. Apply a light coat of gesso to the top and side of the stool, using the small foam brush. Let it dry completely.
7. After the gesso is completely dry, lightly sand it using a fine grit sanding pad. Wipe the top of the stool with a damp cloth and dry it. Ultramarine blue was too dark, so I added white and a small amount of black and mixed the paint. Be sure to mix enough paint to complete your project. Using the foam roller paint the top and sides of the stool. Let the paint dry then apply a second coat of the paint. Let it dry completely ( I let mine dry over night).
8. Apply Modge Podge with the small foam brush liberally to the back of the print. Center the print on the top of the stool and press in place. Apply a thin coat of Modge Podge over the print. If you used an inkjet printer to make a copy of your print, apply the coating very slowly to avoid smearing the ink. Do not go back over any areas while the Modge Podge is wet to avoid smearing the ink.Once the Modge Podge becomes tacky to the touch, use your fingers to smooth out any remaining air bubbles from the surface of the print. Let the Modge Podge dry for several hours.
9. Lightly sand the top of the stool using the fine grit sanding pad. You want a smooth surface in which to apply the second coat. It will be hard to see any bumps or raised places, especially if your print had dark colors, so glide your hand over the surface to make sure there are no raised places. Wipe the top of the stool with a damp cloth. Make sure the stool is dry before applying a second coat. Repeat this step until you have built up several coats. Don't rush this step; it provides the protection for the top of the stool.
10. After the stool is completely dry seal it with two coats of acrylic sealant. I don't like using sprays and chose DecoArt's DuraClear satin varnish.
Saturday, November 10, 2012
Silk/Camel Hair Scarf
The yarn from the Woolen Rabbit has finally arrived! After having one of those, Why did I even bother to get out of bed this morning?, days it was a pleasant surprise to open my mailbox and find the yarn. I wound the yarn into a ball and started to knit with the pattern that I had chosen. After knitting 10 rows I hated the result, so I chose another pattern. I kept knitting, ripping out and starting over until I finally found a pattern that gave me the results I was looking for. Woolen Rabbit Oasis is a beautiful soft yarn (70% silk and 30% camel). The high silk content gives the yarn a lot of drape which was not suitable for the patterns that I originally chose. I finally settled on a lacy pattern that isn't very open and works well with this yarn.
It's always so hard to come up with unique gifts for family and friends. Two years ago, I decided to give handmade items as gifts (paintings, knitted items). I was really nervous when the recipients opened their presents. Would they like it, what if they don't? The response was overwhelmingly positive. Not only did the recipients like their gifts but they sent thank you cards telling me how much they liked them. Since it's been so cold lately, I plan to give a lot of knitted gifts.
Brittany is living in Connecticut and gets so cold there. She really could use a knitted scarf. Brittany loves camels and has a collection of stuffed camels. I thought that she might like a camel hair scarf. I found Woolen Rabbit Oasis yarn a blend of silk and camel hair in beautiful custom dyed colors. I chose the Moroccan Spice, a deep rich Persian red with hints of gold for the scarf. When ordering from Woolen Rabbit, you must consider dye lots (the yarn is dyed for each order) and order enough yarn to complete your project. Oasis yarn has 375 yards to 100 gram skein. I wanted to make the scarf approximately 72 inches long and 7 inches wide, so I ordered 2 skeins of yarn to be one the safe side.
Like most of my projects, this one is beginner friendly. Beginners who know how to knit, purl and do yarn overs will be able to knit this scarf with no trouble. Woolen Rabbit Oasis has good yardage, so I only needed one skein of yarn for the scarf.
Marrakesh Scarf Directions:
1 skein Woolen Rabbit Oasis yarn (70% silk/30% camel)-Moroccan Spice
Size 5 knitting needles- I am using Addi Clicks
Gauge: 5 sts = 1 inch/ 20 sts = 4 inches The gauge doesn't have to be exact since this is a scarf.
Using size 5 knitting needles cast on 38 stitches.
Row 1 (right side of scarf): Knit all stitches.
Row 2 : Purl all stitches
Row 3: K1 (edge stitch), * K2 together, K2, yarn over, K1, yarn over, K2, slip one stitch knit-wise onto right needle, knit the next stitch on the left needle and pass the slipped stitch over the one that you just knit *; Repeat from * to * to last stitch, K1 (edge stitch).
Row 4: Purl all stitches
Row 5: K1 (edge), * K1, K2 together, yarn over, K3, yarn over, slip one stitch, K1 pass slipped stitch over, K1 *; repeat from * to * to last stitch K1 (edge).
Row 6: Purl all stitches
Repeat rows 1-6 for pattern until desired length. Bind off stitches loosely. Lightly block the scarf with steam.
Note: My finished scarf ended up being 60 inches in length. I used one skein of Woolen Rabbit Oasis and knit until I was almost out of yarn, ending on Row 6 of the pattern.
Woolen Rabbit Oasis yarn-Moroccan Spice color |
It's always so hard to come up with unique gifts for family and friends. Two years ago, I decided to give handmade items as gifts (paintings, knitted items). I was really nervous when the recipients opened their presents. Would they like it, what if they don't? The response was overwhelmingly positive. Not only did the recipients like their gifts but they sent thank you cards telling me how much they liked them. Since it's been so cold lately, I plan to give a lot of knitted gifts.
Brittany is living in Connecticut and gets so cold there. She really could use a knitted scarf. Brittany loves camels and has a collection of stuffed camels. I thought that she might like a camel hair scarf. I found Woolen Rabbit Oasis yarn a blend of silk and camel hair in beautiful custom dyed colors. I chose the Moroccan Spice, a deep rich Persian red with hints of gold for the scarf. When ordering from Woolen Rabbit, you must consider dye lots (the yarn is dyed for each order) and order enough yarn to complete your project. Oasis yarn has 375 yards to 100 gram skein. I wanted to make the scarf approximately 72 inches long and 7 inches wide, so I ordered 2 skeins of yarn to be one the safe side.
Work in progress. |
Marrakesh Scarf Directions:
1 skein Woolen Rabbit Oasis yarn (70% silk/30% camel)-Moroccan Spice
Size 5 knitting needles- I am using Addi Clicks
Gauge: 5 sts = 1 inch/ 20 sts = 4 inches The gauge doesn't have to be exact since this is a scarf.
Using size 5 knitting needles cast on 38 stitches.
Row 1 (right side of scarf): Knit all stitches.
Row 2 : Purl all stitches
Row 3: K1 (edge stitch), * K2 together, K2, yarn over, K1, yarn over, K2, slip one stitch knit-wise onto right needle, knit the next stitch on the left needle and pass the slipped stitch over the one that you just knit *; Repeat from * to * to last stitch, K1 (edge stitch).
Row 4: Purl all stitches
Row 5: K1 (edge), * K1, K2 together, yarn over, K3, yarn over, slip one stitch, K1 pass slipped stitch over, K1 *; repeat from * to * to last stitch K1 (edge).
Row 6: Purl all stitches
Repeat rows 1-6 for pattern until desired length. Bind off stitches loosely. Lightly block the scarf with steam.
Note: My finished scarf ended up being 60 inches in length. I used one skein of Woolen Rabbit Oasis and knit until I was almost out of yarn, ending on Row 6 of the pattern.
Monday, November 5, 2012
Decorated Shipping Boxes
Lately I have been doing a lot of shipping. It seems like I am always standing in line at either the Post Office or the UPS store holding a package. I always made sure the contents of the package were attractively wrapped and made a nice presentation but I never thought about the shipping box itself. I always shipped in a plain brown box. I was reading the latest issue of Somerset Studio and there was a call for decorated envelopes and shipping boxes. The magazine staff liked getting letters and art submissions in creatively decorated envelopes and boxes.
I started thinking about it and thought, why not? My philosophy has always been why does something have to be boring and mundane just because it's functional? I was getting ready to send a package of sugar cookies off to Brittany, so why not send them in a decorated box? I could just imagine the look on her face as she saw one of my artistic creations sitting on her doorstep.
I had just finished reading, the recently published, Drawing and Painting Imaginary Animals by Carla Sonheim. I drew my rendition of a cat that was featured in the book. I was pleased with the way that the cat turned out and decided to use him to decorate my shipping box. I planned to ship through UPS and they do not allow the outer shipping box to be wrapped so I decided to decorate one side of the box. UPS accepted my decorated box with no problem.
Directions for Decorated Shipping Box:
Brown shipping box
Grey, light purple and dark purple card stock
K&Company Jubilee Printed Paper Pad- dark purple print
Martha Stewart Butterfly paper punch and Tulip paper punch
Cricut Beyond Birthdays cartridge
Stickles Glitter Glue- blue
Decorative edge scissors
Pearlescent chalk
Picture or drawing
Colored Pencils- I used Derwent Studio Colored Pencils
1. Scan in your drawing or picture. I opened the picture with Microsoft Picture Manager and increased the contrast and the brightness to lighten the pencil shading of the drawing.
2. Once you are satisfied with the picture, print it on white card stock. I used the wallet size option on a photo printer.
3. Use colored pencils to color in the image. I chose two shades of blue for the cat and added dark purple for the shading and pupils and lavender for the eye itself. Once you are satisfied with the colors, trim away the excess white card stock.
4. Cut a piece of dark purple print card stock approximately 1/4 inch larger, on all sides, than the drawing. Glue the drawing to the card stock.
5. Cut a piece of light grey card stock slighter smaller than the box. Glue the card stock to the box. Glue the drawing to the center of the grey card stock.
6. Use the Cricut cartridge to cut out "Thinking of You" at 1 inch out of medium blue card stock. Glue it to the bottom of the drawing.
7. Punch three dark purple and three light purple butterflies out of card stock, using the Martha Stewart butterfly paper punch. Position the butterflies randomly on each side of the drawing (3 on each side) and glue in place.
8. Use the decorative scissors to make an edging out of light purple card stock. Apply this edging to the left and right edges of the grey card stock.
9. Using scraps of card stock and the Martha Stewart Tulip paper punch, punch a green tulip and a lavender tulip. Cut the top of the lavender tulip off and glue it over the top of the green tulip. Glue the tulip that you just made, to the lower left of the "Thinking of You" phrase.
10. Apply the chalk to the grey card stock panel. Randomly apply blue-violet around the panel. Next apply dark purple and then light purple highlights to the panel.
11. Apply dots of glitter glue to the butterfly"s body and wings and to the decorative border on the sides of the panel. Let the glitter glue dry completely.
You may want to seal your design to prevent damage. I sealed mine with clear shipping tape.
Update: The UPS driver liked the box and said that it brightened his day. He mentioned that it was nice to see something besides plain shipping boxes.
I started thinking about it and thought, why not? My philosophy has always been why does something have to be boring and mundane just because it's functional? I was getting ready to send a package of sugar cookies off to Brittany, so why not send them in a decorated box? I could just imagine the look on her face as she saw one of my artistic creations sitting on her doorstep.
I had just finished reading, the recently published, Drawing and Painting Imaginary Animals by Carla Sonheim. I drew my rendition of a cat that was featured in the book. I was pleased with the way that the cat turned out and decided to use him to decorate my shipping box. I planned to ship through UPS and they do not allow the outer shipping box to be wrapped so I decided to decorate one side of the box. UPS accepted my decorated box with no problem.
![]() |
My rendition of the Cat on Page 9. |
Work in progress. |
Close up of colored cat drawing. |
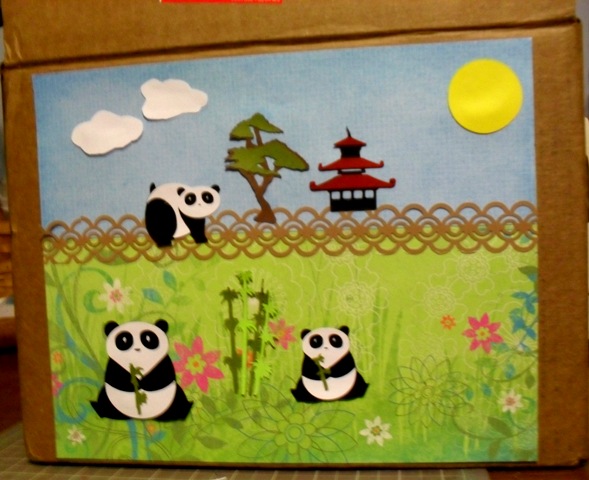
Finished box. |
Directions for Decorated Shipping Box:
Brown shipping box
Grey, light purple and dark purple card stock
K&Company Jubilee Printed Paper Pad- dark purple print
Martha Stewart Butterfly paper punch and Tulip paper punch
Cricut Beyond Birthdays cartridge
Stickles Glitter Glue- blue
Decorative edge scissors
Pearlescent chalk
Picture or drawing
Colored Pencils- I used Derwent Studio Colored Pencils
1. Scan in your drawing or picture. I opened the picture with Microsoft Picture Manager and increased the contrast and the brightness to lighten the pencil shading of the drawing.
2. Once you are satisfied with the picture, print it on white card stock. I used the wallet size option on a photo printer.
3. Use colored pencils to color in the image. I chose two shades of blue for the cat and added dark purple for the shading and pupils and lavender for the eye itself. Once you are satisfied with the colors, trim away the excess white card stock.
4. Cut a piece of dark purple print card stock approximately 1/4 inch larger, on all sides, than the drawing. Glue the drawing to the card stock.
5. Cut a piece of light grey card stock slighter smaller than the box. Glue the card stock to the box. Glue the drawing to the center of the grey card stock.
6. Use the Cricut cartridge to cut out "Thinking of You" at 1 inch out of medium blue card stock. Glue it to the bottom of the drawing.
7. Punch three dark purple and three light purple butterflies out of card stock, using the Martha Stewart butterfly paper punch. Position the butterflies randomly on each side of the drawing (3 on each side) and glue in place.
8. Use the decorative scissors to make an edging out of light purple card stock. Apply this edging to the left and right edges of the grey card stock.
9. Using scraps of card stock and the Martha Stewart Tulip paper punch, punch a green tulip and a lavender tulip. Cut the top of the lavender tulip off and glue it over the top of the green tulip. Glue the tulip that you just made, to the lower left of the "Thinking of You" phrase.
10. Apply the chalk to the grey card stock panel. Randomly apply blue-violet around the panel. Next apply dark purple and then light purple highlights to the panel.
11. Apply dots of glitter glue to the butterfly"s body and wings and to the decorative border on the sides of the panel. Let the glitter glue dry completely.
You may want to seal your design to prevent damage. I sealed mine with clear shipping tape.
Update: The UPS driver liked the box and said that it brightened his day. He mentioned that it was nice to see something besides plain shipping boxes.
Thursday, November 1, 2012
So Many Yarns, So Little Time
I first started knitting when I was in college. In those days the yarns were limited to wool or acrylic-no silk, cashmere, Alpaca or any other exotic fiber. Times have changed and today's knitter has a variety of yarns available- silks, cashmere, wool and fiber blends. Thank goodness knitting has lost it's stigma as being "uncool and something that only Grannies did" and younger women are beginning to see the value in knitting. It's this renewed interest in knitting that is responsible for the beautiful yarns that we have available today,
I love knitting and am inspired by the current yarns available on the market. While I try to buy from my local yarn shop whenever possible, lately I have had to turn to the internet for yarns that my local shop doesn't stock.
My planned projects include Jared Flood's Rock Island Shawl knit in Lorna's Laces Helen's Lace (silk/wool blend) in Grand Street Ink color, a lacy mohair top from French Girl Knits in Louet's Kid 'n Linen (mohair/ linen blend), Artyarns Cashmere 1 and Ensemble Light (cashmere/silk blend) and two more pairs of socks in Mountain Colors Crazyfoot Sun River (red blend) and Mountain Twilight ( the dark purple, blue, burgundy and brown blend- shown in front left). This yarn is a beautiful dark blend that didn't photograph well.
Fabulous Yarns was the source for Artyarns. I can't say enough good things about this company. They have prompt service (they shipped during Hurricane Sandy), they discount their yarns and they offer free patterns. I found two free shawl patterns that used one skein of yarn making it very affordable to knit with cashmere.The yarns that I purchased are beautiful and luxurious. I can't wait to knit with them.
I am waiting for one more yarn to arrive- Woolen Rabbit's Oasis , a DK weight wool and camel blend. I am designing a pattern especially for this yarn and can't wait to get started.
I love knitting and am inspired by the current yarns available on the market. While I try to buy from my local yarn shop whenever possible, lately I have had to turn to the internet for yarns that my local shop doesn't stock.
Recent yarn acquisitions! |
My planned projects include Jared Flood's Rock Island Shawl knit in Lorna's Laces Helen's Lace (silk/wool blend) in Grand Street Ink color, a lacy mohair top from French Girl Knits in Louet's Kid 'n Linen (mohair/ linen blend), Artyarns Cashmere 1 and Ensemble Light (cashmere/silk blend) and two more pairs of socks in Mountain Colors Crazyfoot Sun River (red blend) and Mountain Twilight ( the dark purple, blue, burgundy and brown blend- shown in front left). This yarn is a beautiful dark blend that didn't photograph well.
Fabulous Yarns was the source for Artyarns. I can't say enough good things about this company. They have prompt service (they shipped during Hurricane Sandy), they discount their yarns and they offer free patterns. I found two free shawl patterns that used one skein of yarn making it very affordable to knit with cashmere.The yarns that I purchased are beautiful and luxurious. I can't wait to knit with them.
I am waiting for one more yarn to arrive- Woolen Rabbit's Oasis , a DK weight wool and camel blend. I am designing a pattern especially for this yarn and can't wait to get started.
Subscribe to:
Posts (Atom)