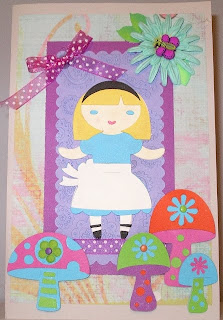
Here are the directions for the card:
1. Cut a piece of patterned paper approximately 7 1/2 inches by 5 inches. Cut a piece of purple card stock approximately 6 inches by 3 1/2 inches. Fold a piece of 8 1/2 by 11 inch card stock in half and glue the patterned paper on top. Next center the purple card stock on top of the patterned paper and glue into place.
2. Using the largest die in the Spellbinders Nestabilities scalloped rectangles set cut a large rectangle out of lavender card stock.
3. Emboss the rectangle with the Cuttlebug Paisley embossing folder. Highlight the paisley images with purple chalk. Cut a piece of pink sheer ribbon and attach it to the bottom edge of the rectangle. Center the rectangle on top of the purple card stock and glue in place.
4. Using the Cricut Once Upon a Princess cartridge set the size dial to 4 inches and cut Princess 2 out of cream card stock (this is the doll base). Then press the shift key and cut Princess 2 again (this is the doll top). Press the layer key and cut the hair out of yellow card stock.
5. Press the Dress 1 key and cut a dress out of blue card stock. Press the shift key and Dress 1 to cut the apron out of white card stock. Press Dress 1 again and cut the dress out of white card stock. Select the Layer key and then Dress 1 to cut the headband out of black card stock.
6. Assemble the doll by gluing the doll top over the doll base. Glue the hair to the doll and then glue the bangs over the hair. Glue the headband to the hair. Using markers color in the eyes and the mouth. Cut off the blue stockings from the lower edge of the dress and replace them with the white stockings from the white dress. Glue the white apron on top of the blue dress. Using a black marker color in the shoes. Attach the doll to the embossed rectangle just above the ribbon. Make a bow with the pink ribbon and glue to the upper left corner of the embossed rectangle.
7. Using the Cricut Paisley cartridge set the size dial to 2 inches and cut Mushroom 1 out of bright blue card stock. Press Layer 1 and Mushroom 1 to cut the mushroom top out of bright pink card stock. Press the shift key and Layer 2 to cut the mushroom stem out of green card stock. Glue the mushroom pieces together. Attach a small paper flower with a brad to the center of the mushroom top.
8. Cut Mushroom 4 at 2 1/2 inches out of bright pink card stock. Press the shift key and Layer 1 to cut the mushroom top out of orange card stock. Press Layer 1 to cut the mushroom stem out of bright green card stock. Press Layer 2 to cut the flower out of bright blue card stock. Assemble the mushroom and glue the pieces in place.
9. Set the size dial to 2 inches and cut Mushroom 4 out of purple card stock. Cut the mushroom top out of bright green card stock, the flower out of bright blue card stock and the stem out of orange card stock ( glue only the circles to the stem of the mushroom). Assemble the mushroom and glue the pieces in place. Set the size dial to 1 1/2 inches and cut the stem out of bright green card stock, the top out of bright blue card stock and the flower out of bright pink card stock. Assemble the mushroom and glue the pieces in place.
10. Attach the mushrooms to the bottom of the card using raised glue dots. Glue a paper flower to the upper right hand corner of the card. Glue a butterfly button to the center of the flower. Using bright green card stock and the Martha Stewart leaf punch, punch three leaves. Highlight the edges of the leaves with green ink. Glue the leaves just under the flower petals. Using chalk highlight Alice's face and dress.