 | |
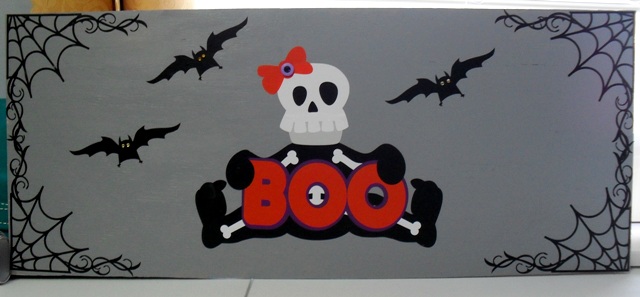
| Boo sign just needs the stake and it's finished! |
I thought this little skeleton was so cute and envisioned her as a sign. All of my svg files are from the Silhouette Design Store but may be available directly from the designers to the owners' of other cutting machines: Ghoulie Girl (Boo) is a Michele Renee Cloud 9 Design, Spider Web Flourish is a Silhouette Design and the bat came from Happy Halloween by Jennifer Wambach. All pieces of the this design were cut from Orcal vinyl (available from My Direct Vinyl).
Directions for Boo:
Silhouette SVG cutting files: Happy Halloween by Jennifer Wambach, Ghoulie Girl by Michele Rene and Spider Web Flourish by Silhouette.
Orcal Vinyl for electronic cutting machines- black, orange, dark purple, grey and white. Available at My Vinyl Direct, limited colors are available at Michaels
Americana Craft paint- Dolphin Grey- available at Michaels
DecoArt DuraCoat Varnish
Small purple button
Small yellow crystals for the bat's eyes
Wood available at Home Depot and cut to 24 inches long by 10 inches wide
Wooden stake available at Home Depot
Small Nails
Hammer
1. Cut the wood to 24 x 10 inches and seal with water based craft varnish and let it dry. Varnish again and let it dry. Paint the sign with the grey paint, let it dry and repeat. Varnish with the DuraCoat and let it dry.
2. Size the entire Ghoulie Girl to 9.75 inches on the Silhouette mat on the computer screen. Some pieces of the file won't be on the mat but that's fine. Ungroup the file. Move the body, the eyes, nose and hands on Mat 1 and open a new mat. Group the bones and skull together on Mat 2. Open Mat 3 and move the bottom of the skull (jaw) to this mat. Open Mat 4 and place the bow, the center circle for the bow and the smaller BOO on it. Finally place the BOO outline on Mat 5.
3. Place the black vinyl on the cutting mat, select vinyl on the machine, adjust the blade and cut the images from Mat 1. Cut the images on Mat 2 in white vinyl, images from Mat 3 in grey vinyl, images from Mat 4 in orange vinyl and the image from Mat 5 in purple vinyl.
4. Center the body on the sign, approximately 2 inches from the lower edge of the sign. Add the Skull, jaw and the bones to the body, center the purple Boo outline on the body and overlay the orange Boo before adding the hands. Add the eyes, nose and bow. Smooth out any wrinkles or air bubbles with your finger tips.
5. Open the Spider Web Flourish onto the Silhouette mat on screen and resize to approximately 5.5 inches. Click Copy and then paste to make three more webs. Next open the Halloween title and ungroup the title and the bat. Move Halloween from the mat and delete it. Group the pieces of the bat together and resize to 1.75 inches. Ungroup the bat and move the eyes from the image and delete them. Click on the bat, copy and paste 7 more bats on the screen (8 total). Arrange the Spider Web Flourishes on the mat so that on flourish is in each corner. Place two bats is each of the open areas of the flourish. Select cut, load the black vinyl on the cutting mat and send to Silhouette.
6. Carefully weed the pieces of vinyl from around the spider web flourish, remove from the mat and place one flourish in the upper right corner of the sign, smoothing out any air bubbles. Place another flourish in the lower right corner of the sign. The ends of the upper and lower flourishes will overlap at the middle of the sign. Repeat this procedure on the left side of the sign.
7. Arrange the Bats around the open area in the middle of the sign. I used a grouping of three because odd numbers are more visually pleasing. Glue the small crystals to the bat's face for eyes.
8. Center the wooden stake on the sign so that the top of the stake is even with the top of the sign. Nail the stake to the back of the sign at the top and the bottom of the sign.