Monday, May 31, 2010

Decoupaged 18th Century Chest

I have always liked decoupage but my projects never turned out the way that I had envisioned them. After reading the decoupage section in Martha Stewart's Encyclopedia of Crafts I decided to give decoupage one more try.

My daughter Brittany's friend Mitch was the inspiration for this project. Mitch collects Marie Antoinette memorabilia. On their trip to Versailles Mitch was disappointed that the only collectibles were pictures of Marie Antoinette. He told Brittany that he wished he could find something that he could display on a table. Brittany knew that I wanted to do another Marie Antoinette project and was looking for an idea. I had just recently finished reading a book about Versailles and decided to do a small chest that resembled some of the chests in the book. I decided to replace the painted images on the top of the Versailles chests with a decoupaged picture.


I used Jolee's dimensional stickers for the trim.


The frame was cut using Cricut Home Decor and card stock. It was then painted with metallic gold acrylic paint and sealed with Modge Podge.

Directions:

1. Lightly sand a pre-sanded wooden chest to remove any rough spots. Wipe the piece down with a damp cloth to remove dust. Paint the chest with Folk Art Italian Sage acrylic paint. Let the chest dry over night then apply a second coat of paint.

2. Paint the trim with Dazzling Metallics Elegant Finish Venetian Gold acrylic paint. Let the chest dry over night then apply a second coat of paint.

3. Scan a picture of Marie Antoinette and print on glossy photo paper (I used an inkjet printer). The printed picture is approximately a 2 1/2 inch oval. Carefully trim around the edges of the picture. Apply the picture to the top of the chest using a foam sponge and a very thin coat of Modge Podge. Using light pressure roll a brayer over the top of the image to remove any air bubbles. Let the image cure for about a week and then lightly sand it with very fine sand paper. Wipe with a damp cloth to remove any dust and let it dry. Apply a second coat of very thin Modge Podge and brayer the image. Let it cure for about a week. Since I was working under humid conditions I let the piece sit for a week between coats of Modge Podge to be sure that the piece was completely dry.

4. Using a foam sponge and Modge Podge lightly coat the entire chest to seal it. Let it dry completely and then seal it again.

5. Using the Cricut Home Decor cartridge and cream card stock cut an oval frame at 2 1/2 inches. Paint the frame gold and when it dries paint it again. After the frame is dry lightly coat it with Modge Podge to seal it. When the Modge Podge dries glue small pearls around the edges of the frame.

6. Glue the dimensional stickers to the top, sides and front of the chest. Glue the frame around the picture of Marie Antoinette.

Tip: Instead of a traditional palette and disposable palette paper try using a large glazed ceramic tile. They are available from Home Depot for about $1.50 per tile. They clean up with soap and water.

Monday, May 17, 2010

Quilled Wedding Invitations

My daughter Brittany's friend Nancy is getting married in June. Brittany and Nancy met in an Economics class in college. This was about the same time that I began baking my way through Marcel Desaulnier's Death by Chocolate books. Nancy and Brittany agreed to become my cookie testers, so I would bake a batch of cookies and send them off to be critiqued. I wanted to give Nancy a special gift (after all she was one of my cookie testers) so I decided to do a quilled invitation to commemorate her wedding.


Quilled Invitation Directions:

1. Make 3 roses using 3/8 inch wide red paper. To make the rose insert the end of the paper into a slotted quilling tool and turn it 3 times to form the rose's center. Fold the paper away from you at a right angle. Roll the paper, keeping the bottom edge tight against the quilling tool causing the top edge to flare out to form the petal. Repeat this step until the rose is the size you want. Carefully remove the rose from the quilling tool and let it rest and then glue the end in place.

2. Make 1 small rose using a strip of 1/8 inch ivory paper. Then make 1 rose using 1/2 inch ivory paper. Color the rose made with 1/2 inch paper using pink chalk.

3. Tear 3 pieces of 12 inch (1/8 inch wide) quilling paper in half and roll into coils. Let the coil rest on the work surface and then glue the end in place. Shape the coil into petals by tightly pinching one end with your fingers. Glue 5 petals together to form a flower. Tear 2 pieces of 12 inch quilling paper in half (6 inches) and then tear it in half again (3 inches). Roll the 3 inch strips into coils. Let the coils rest and then glue the ends in place. Glue 5 petals together to form a small flower. Glue a pearl to the center of each flower.

4. Using 6 inch strips of 1/8 inch wide green paper roll 10 coils. Let them rest then glue the ends in place. Pinch the one end between your fingers and form the coil into a leaf.

5. Make the vines by rolling 6 six inch strips of 1/8 inch wide green paper into loose coils. Slowly unroll the coil until the end of the vine has a slight curl.

6. Place the wedding invitation in a mat. Remove the glass from the frame. Then place the matted invitation in the frame and arrange the flowers and the vines along the side and the top of the mat. Cover the invitation with a piece of plastic wrap and carefully glue the flowers, leaves and vines in place. Let the glue dry and then remove the plastic wrap.

Note: I used an ivory double mat and an ivory and gold frame. For further quilling instructions go to Martha Stewart.com

Tuesday, May 4, 2010

Rock Star

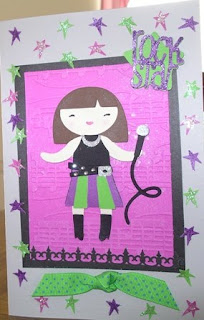
My daughter, Brittany sings Karoake with her friends at a local club in Koln, Germany. When I bought the Once Upon a Princess cartridge this image reminded me of her. I made this card and sent it off to her in Germany. I mailed it two weeks before her birthday and was hoping that it would arrive on time. Fortunately she got the card in time for her birthday.


I used Cricut's Once Upon a Princess cartridge for the images, Cuttlebug's Allegro embossing folder and Martha Stewart's fence punch.

Here are the directions:

1. Emboss a piece of bright pink card stock with Cuttlebug's Allegro embossing folder. Very lightly sand to highlight the notes. Spray lightly with Tattered Angels Pearl Glimmer Mist and let it dry.

2. Using the Cricut Once Upon a Princess cartridge and cream card stock cut Doll 2 at 3 1/2 inches. Press the shift key and cut the top layer for Doll 2. Using the layer key for Doll 2 cut the hair out of brown card stock.

3. Keeping the size dial set at 3 1/2 inches, cut the outfit out of black card stock using the Rocker key. Press the shift key and cut the skirt out of purple card stock. Press the Layer key and cut the skirt pieces out of bright green card stock. Press the shift key and then the Layer key and cut the microphone and necklace out of silver metallic card stock.

4. Press the phrase key and cut the rock star background at 1 1/2 inches out of bright green card stock. Press the shift key and cut rock star out of purple card stock. Glue the purple image over the green one and embellish with purple glitter glue.

5. Punch stars out of the various colors of card stock used in the project. Punch a fence out of black card stock with the Martha Stewart punch.

6. Layer the pink embossed card stock over a piece of black card stock leaving a 1/4 inch border.
Assemble the doll and attach to the embossed card stock using raised glue dots. Add facial features to the doll using markers and chalk. Highlight the microphone, belt buckle and necklace with silver glitter glue. Layer the fence at the lower edge of the card and the rock star at the upper right hand corner. Tie a piece of green ribbon and glue it just below the fence. Glue the stars randomly around the card. Embellish the stars with glitter glue.

Saturday, May 1, 2010

Alice In Wonderland

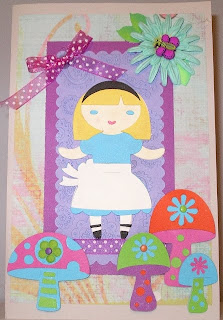
Since Alice In Wonderland is one of my favorite books, I decided to do a project devoted to Alice. The inspiration for this card came from the chapter where Alice encounters a caterpillar sitting on mushroom smoking a hookah. The caterpillar tells Alice that one side of the mushroom will make her taller and the other side will make her shorter. Since I never really liked the hookah smoking caterpillar I decided not to include him in the card. Instead I chose to surround Alice with the mushrooms representing the many choices that she faces.


Here are the directions for the card:

1. Cut a piece of patterned paper approximately 7 1/2 inches by 5 inches. Cut a piece of purple card stock approximately 6 inches by 3 1/2 inches. Fold a piece of 8 1/2 by 11 inch card stock in half and glue the patterned paper on top. Next center the purple card stock on top of the patterned paper and glue into place.

2. Using the largest die in the Spellbinders Nestabilities scalloped rectangles set cut a large rectangle out of lavender card stock.

3. Emboss the rectangle with the Cuttlebug Paisley embossing folder. Highlight the paisley images with purple chalk. Cut a piece of pink sheer ribbon and attach it to the bottom edge of the rectangle. Center the rectangle on top of the purple card stock and glue in place.

4. Using the Cricut Once Upon a Princess cartridge set the size dial to 4 inches and cut Princess 2 out of cream card stock (this is the doll base). Then press the shift key and cut Princess 2 again (this is the doll top). Press the layer key and cut the hair out of yellow card stock.

5. Press the Dress 1 key and cut a dress out of blue card stock. Press the shift key and Dress 1 to cut the apron out of white card stock. Press Dress 1 again and cut the dress out of white card stock. Select the Layer key and then Dress 1 to cut the headband out of black card stock.

6. Assemble the doll by gluing the doll top over the doll base. Glue the hair to the doll and then glue the bangs over the hair. Glue the headband to the hair. Using markers color in the eyes and the mouth. Cut off the blue stockings from the lower edge of the dress and replace them with the white stockings from the white dress. Glue the white apron on top of the blue dress. Using a black marker color in the shoes. Attach the doll to the embossed rectangle just above the ribbon. Make a bow with the pink ribbon and glue to the upper left corner of the embossed rectangle.

7. Using the Cricut Paisley cartridge set the size dial to 2 inches and cut Mushroom 1 out of bright blue card stock. Press Layer 1 and Mushroom 1 to cut the mushroom top out of bright pink card stock. Press the shift key and Layer 2 to cut the mushroom stem out of green card stock. Glue the mushroom pieces together. Attach a small paper flower with a brad to the center of the mushroom top.

8. Cut Mushroom 4 at 2 1/2 inches out of bright pink card stock. Press the shift key and Layer 1 to cut the mushroom top out of orange card stock. Press Layer 1 to cut the mushroom stem out of bright green card stock. Press Layer 2 to cut the flower out of bright blue card stock. Assemble the mushroom and glue the pieces in place.

9. Set the size dial to 2 inches and cut Mushroom 4 out of purple card stock. Cut the mushroom top out of bright green card stock, the flower out of bright blue card stock and the stem out of orange card stock ( glue only the circles to the stem of the mushroom). Assemble the mushroom and glue the pieces in place. Set the size dial to 1 1/2 inches and cut the stem out of bright green card stock, the top out of bright blue card stock and the flower out of bright pink card stock. Assemble the mushroom and glue the pieces in place.

10. Attach the mushrooms to the bottom of the card using raised glue dots. Glue a paper flower to the upper right hand corner of the card. Glue a butterfly button to the center of the flower. Using bright green card stock and the Martha Stewart leaf punch, punch three leaves. Highlight the edges of the leaves with green ink. Glue the leaves just under the flower petals. Using chalk highlight Alice's face and dress.

Tuesday, April 20, 2010

Queen of Hearts

One of my favorite books is Alice In Wonderland by Lewis Carroll. My absolute favorite character is the Cheshire Cat. There is something so cool about a cat that appears and disappears at will leaving behind only a grin.

A few years ago I was browsing through the literature section at Borders and was fortunate enough to find Alice In Wonderland translated into French. While working on this project I decided to consult the French version to give me another perspective on the characters. I went to the bookshelf to consult the book and couldn't find it. I searched for an hour with no luck. I was on a mission to find it because the French version can't be easily replaced. After tearing apart my study I finally found my treasured copy of Alice In Wonderland.

The images on Cricut's Once Upon A Princess cartridge are so cute that I decided to adapt them to the Alice In Wonderland characters. Here's my version of the Queen of Hearts.


Directions for Queen of Hearts:

1. Using the Cricut Once Upon a Princess cartridge cut Doll 3 at 4 1/2 inches out of cream card stock. Then press the layer key and cut the hair out of orange card stock. Repeat this using pink card stock (for the mouth) and violet card stock (for the eyes).

2. Keep the dial set at 4 1/2 inches and cut the dress for princess 4 out of black card stock. Press the shift key and cut the skirt out of red heart patterned card stock. Using the layer key and red card stock cut the bodice for the dress.

3. Load gold metallic card stock into the Cricut and cut the scepter using the shift key for Princess 4. Change the dial to 1 1/2 inches. Select the font key and then press the chick key to cut the crown. Glue some red card stock behind the crown and trim the card stock to conform to the shape of the crown (if necessary). Glue three pearls evenly spaced along the bottom of the crown. Glue a large crystal in the center of the crown and two smaller ones on either side. Apply red glitter glue to the red card stock center of the crown.

4. Set the dial to 1 inch. Cut 5 small hearts out of red card stock. Select the font key and Crown 2. Attach on heart to the top of the scepter and apply red glitter glue. Glue a small pearl to the top of the scepter.

5. To assemble the Queen of Hearts glue the black dress to the doll. Layer the red bodice over the dress and glue in place. I cut off the skirt that was attached to bodice. Glue the heart patterned skirt over the black dress just below the bodice. Next glue three small pearls evenly spaced to the bodice to resemble buttons. Make a small bow from narrow red ribbon and glue it to the point where the bodice and the skirt meet. Evenly space the four hearts along the bottom of the dress. Layer the hair on the doll and glue in place. Glue eyes and mouth in place. Highlight the doll's hair with red and orange chalk. Use pink chalk to add blush to the cheeks. Glue the scepter to the doll's hand. Attach the crown to the doll's head with glue.

6. Using TPC Studio The Reasons I Love You card stock: With the gray patterned side cut a piece approximately 4 inches by 6 1/2 inches and attach the doll using raised glue dots. Cut a piece of red paper 1/4 inch larger than the dimensions of the gray paper. Glue the gray card stock on top of the red paper. Using the heart print side of the card stock layer the red paper on top so that a heart border frames the piece. Mat the heart print layer on top of black card stock.

7. Glue red sheer ribbon to opposite corners of the card. Make a small bow and attach to the upper right hand corner. Attach the card to a white half fold card using raised glue dots.

Wednesday, April 14, 2010

Paint Cans

I love the clear paint cans that can be purchased in the craft stores. They are so much fun to decorate and are perfect for packaging cookies. They can be decorated for any occasion.

My husband is having hip replacement surgery so I decided to make some Sables* to bring to him while he's in the hospital. They are a French butter cookie and his favorite. Since I made a get well card with a Panda I decided to go with the Panda theme. There's just something about Panda's that touch your heart.


Here are the directions for the cookie canister.

1. Using the Martha Stewart filigree heart punch and bright pink card stock, punch several hearts.

2. Cut a 3 inch Panda out of black card stock using the Cricut Pagoda cartridge. Keep the dial set at 3 inches. Press the shift key and the Panda key and cut the image out of white card stock. Assemble the Panda.

3. Glue the hearts and the Panda to the paint can using Aleene's Clear Gel Tacky Glue. Hold the pieces in place a few minutes until they stick.

4. Gather several small silk flowers and twist the stems together to form a bouquet. Cut a small piece of pink ribbon around the bouquet and make a bow. Glue the flowers over the Panda's paws.

5. Cut 4 lengths of pink ribbon and 2 lengths of ivory ribbon to make streamers. Gather 2 pink ribbons and the ivory ribbon together. Tie them at the side of the handle. Do the same for the other side.

6. Using the spool of ivory ribbon (Don't cut the ribbon, work directly from the spool.) and a hot glue gun glue the end of the ribbon to the top of the can. Make a loop with the ribbon and glue in place. Keep making loops until you have made a bow. Glue a large purple flower on top of the bow and then glue a smaller flower over the large flower. Glue a pearl in the center of the flower.

* Baking by Dorie Greenspan

Saturday, April 3, 2010

Panda Hugs

The weather is absolutely beautiful. I was inspired to make a trip to the nursery to buy some flowers. Apparently I was not the only one inspired by this beautiful weather because the nursery was crowded. After the harsh winter that we had everyone is ready for Spring.

This is the last in the series of get well cards. I made this card for my husband who is having hip replacement surgery next week. I didn't want to make a third speedy recovery card so I decided to use the hugs instead.


Here are the directions for Panda Hugs:

1. Cut a piece of light blue card stock approximately 5 1/2 by 7 1/2 inches. Emboss using the Cuttlebug Swiss Dots embossing folder. I ran the folder through my Sizzix. Instead of running the folder all the way through the machine, I stopped after the card stock had embossed and turned the handle in the opposite direction and ran the embossing folder back through the machine. Doing this gives a deeper embossed texture. Using Color Box fluid chalk cats eye ink pads Misty Meadow collection gently tap the medium blue ink randomly over the blue card stock. I did this to give the illusion of clouds.

2. Cut a piece of green patterned paper approximately 51/2 by 3 inches. Use the Color Box chalk green and randomly tap over the green card stock to give it depth. Again apply light pressure when stamping. Glue green patterned paper to the bottom of the blue card stock.

4. Randomly cut a tree trunk out of brown card stock. Cut a 2 inch flower out of purple card stock using the Cricut Paisley cartridge and the button feature. Glue the tree trunk on top of the flower. Embellish with small paper flowers. Attach the tree to the blue card stock just above the green paper. Use dimensional glue dots to attach the tree.

5. Cut a 2 1/2 inch Panda out of black and white card stock using the Cricut Pagoda cartridge. Attach the Panda next to the tree using raised glue dots.

6. Punch eight hearts using a small heart shaped paper punch. Glue hemp to the back of three hearts and tie them together with a bow of hemp. Glue the heart strings over the Panda's hands.

7. Randomly hand cut a small basket shape out of white card stock. Cut several 1/8 inch wide strips out of brown card stock and weave them together. Glue the woven strips to the basket shape and trim. Using one of the brown strips of card stock make a handle and glue it to the basket. Glue the basket next to the Panda. Glue the hearts in the basket.

8. Using purple card stock and the Cricut Beyond Birthdays cartridge cut a 2 inch Hugs To You.
Apply a light coat of Smooch Grape Soda to the Hugs and let it dry. Press the purple Hugs over the top of a Versa Mark ink pad. Sprinkle Clear Sparkle embossing powder over the image and shake off the excess. Emboss using a heat gun. Glue Hugs to the blue card stock over the Panda's head.

9. Embellish the card with a paper flower and a pre-made butterfly. Glue a pink ribbon across the bottom of the card and attach a bow.