The Cricut Quarter Note cartridge has been sitting on my drafting table for a while. I wanted to use the cartridge but never could find a way to incorporate the images into a project until now. Mozart is my favorite composer and I love his music, especially his divertmenti. Since tomorrow (January 27) is Mozart's birthday I decided to do a project that honors him.
I started by printing some sheet music on parchment paper and then soaked it in coffee to age it.
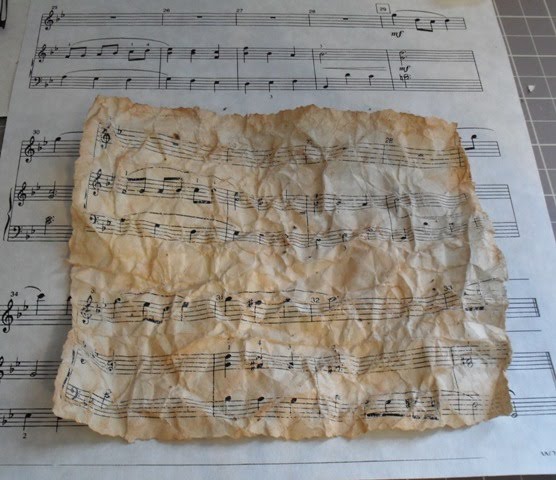
The picture below shows the music printed on parchment and the smaller coffee aged piece on top of it. After the coffee aged piece dried I carefully crumpled it into a ball, unrolled it and repeated the process. Next I made a wash of sienna and dark umber watercolors and lightly painted them over the crumpled sheet music. I repeated this until the parchment was sufficiently aged. Once the piece was completely dry I trimmed the edges of the paper with deckle edge craft scissors and roughed up the edges with a fine grit sanding pad. I highlighted the creases in the paper and the edges with distressing ink. I wanted the music to look very aged, almost as if Mozart while working on the piece could have crumpled it up and thrown it away.
Here's the finished project.

Directions for Tribute to Mozart:
Cricut Quarter Note cartridge
Black, burgundy and cream card stock
Parchment and white paper
Metal Leaf (I used a mix of gold, copper and silver leaf pieces)
Recollections self adhesive gold beads
Tattered Angels Pearl Glimmer Mist
Tim Holtz Tea Dye Distress Ink
Color Box Gold Pigment Ink
Pearl Ex Gold Powdered Pigment
Small Stenciling Brush and soft paint brush
Sizzix Damask embossing folder and embossing machine
Fine grit sanding pad
Deckle edge craft scissors
Foam Dots
Sienna and dark umber watercolors
Frame
1. Load the Cricut Quarter Note cartridge into the Cricut machine and cut the Violin at 4 inches out of black card stock. Press the Shift and the Violin keys and cut the violin out of cream card stock. Emboss the cream violin using the Sizzix Damask embossing folder. Use the Tim Holtz Tea Dye Distress Ink to darken the violin until it becomes a soft light brown color . Glue the distressed cream layer on top of the black violin. Spray lightly with Pearl Glimmer Mist and let it dry. Highlight the raised areas of the violin with the gold pigment ink. Immediately apply the Pearl Ex gold pigment to the areas you just highlighted. Lightly brush off any loose pigment and let the violin dry. Attach the gold beads to the violin's tuning keys. Using the Quarter Note cartridge press the Phrase key and cut The Gift of Music out of black card stock. Press the Shift and Phrase keys and cut the same phrase out of burgundy card stock. Assemble the pieces and lightly spray with Pearl Glimmer Mist. Set aside to dry.
2. Scan a piece of sheet music into the computer and print it on parchment paper with a laser printer (or photo copy the music on parchment paper). Do not print the music on parchment paper with an ink jet printer or the ink will run when you soak the paper in the coffee. Soak the music in coffee until the desired color is achieved. Let the parchment dry completely. Carefully crumple the parchment into a ball and unroll it. Repeat the process until the paper is visibly creased. Make a wash of sienna and dark umber watercolors and lightly paint them over the paper. Repeat the process until the paper is a light amber color. Let the paper dry completely. Cut the edges of the paper with deckle edge craft scissors. Use a fine grit sanding pad to rough up the edges of the paper and distress it. Apply the Tea Dye Distress Ink to the edges of the paper and to the creases in the paper.
3. Print a picture of Mozart on white paper. You can use an inkjet printer. Glue the picture to a piece of black card stock approximately 3 1/2 inches wide by 4 inches high. With an A2 glue pen apply glue to one edge of the card stock at a time. Apply pieces of metal leaf to the edge of the picture with a small stencil brush. Work the leaf into the glue, brushing away any excess metal leaf. Repeat until all edges of the picture have been framed. Set aside to dry. Cut another piece of black card stock 3 3/4 inches wide by 4 1/4 inches high. Glue the picture of Mozart to the card stock leaving a 1/4 border on all sides.
4. Center the aged sheet music on a piece of parchment card stock and glue in place. Attach foam dots to the back of the Mozart picture, center on the sheet music and press in place.
Center the phrase over the top of the sheet music and glue in place. Attach the violin in the lower right corner of the music with foam dots and press in place. Frame the finished piece.